How To Get & Use OpenCV
If you are interested in running the executable files or compiling and running a new version of them, you will need to complete the following steps to install the OpenCV (Intel® Open Source Computer Vision Library) that is utilized in these programs.
Click here to download OpenCV. If the link does not work for you, go to http://www.sourceforge.net/projects/opencvlibrary or search for "OpenCV." This is an open source library that is free to download for both non-commercial and commercial use. At the end of the installation, there is an option to view documentation. This is where you can find the manual for the various structures, functions, and general information concerning the OpenCV libraries; when you install OpenCV, it is automatically stored at C:\Program Files\OpenCV\docs\index.htm so you can reference it later if you do not choose to view the documentation immediately.
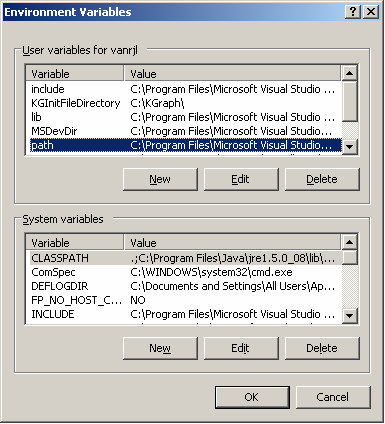
After installing OpenCV, you will need to change the environment variables so your computer will know where to look for the referenced libraries for programs using OpenCV. To do this, right click on the My Computer icon on your desktop and go to Properties. Choose the Advanced tab and click Environment Variables. You will see a screen much like the one in the image below. In both areas (User variables and System variables), edit the "path" variable by adding ";C:\Program Files\OpenCV\bin" to the end of each (by highlighting path and clicking the Edit button). Save your changes by selecting OK.
At this point, the executable files should be able to run on your machine. If you plan to edit or write code that uses the OpenCV libraries, you will need to also make the following changes using Visual Studio (either 6.0 or .NET). The code I have available as well as a majority of the OpenCV code is in C or C++, though OpenCV does offer some Python which can be found in C:\Program Files\OpenCV\samples\python when you install the libraries.
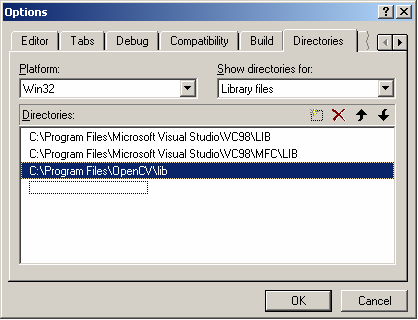
Visual Studio 6.0: Open Microsoft Visual C++ 6.0. Go to the Tools menu and choose Options. Click on the Directories tab and add the appropriate directories to the Library files and Include files (chosen in the drop-down menu labeled "Show directories for:"). The screen should be similar to the one shown here.
Visual Studio .NET: Open Microsoft Visual Studio .NET 2003. Go to the Tools menu and choose Options. In the listing, choose Projects, then VC++ Directories. Add the appropriate directories to the Library files and Include files (chosen in the drop-down menu labeled "Show directories for:") by clicking the Insert New icon (looks like a folder with a '*').The screen should be similar to the one shown here.
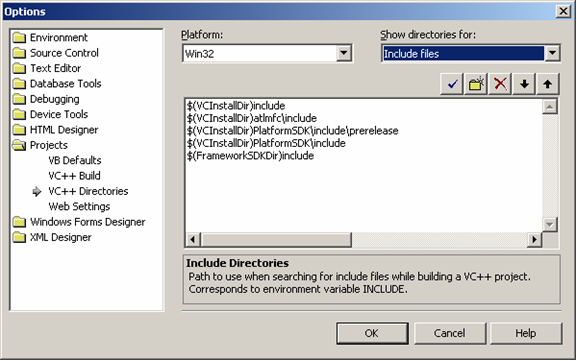
In either environment, add the following directories:
To Library files, add:
C:\Program Files\OpenCV\lib
To Include files, add:
C:\Program Files\OpenCV\cv\include
C:\Program Files\OpenCV\cxcore\include
C:\Program Files\OpenCV\otherlibs\highgui
C:\Program Files\OpenCV\cvaux\include
C:\Program Files\OpenCV\otherlibs\cvcam\include
It is also necessary to add the libraries to the project before linking. To do this, in the Project menu, go to the Add to Project sub-menu and click Files. Then browse to C:\Program Files\OpenCV\lib and add all libraries to the project. There should be a total of eight libraries listed here.
From there the code should compile, link, and run successfully.
If you are using a program that opens a still image (i.e. diff_cv.cpp, cmp_threshold.cpp, rescale_cmp.cpp, or your own version), be sure to have the appropriate file name in the program code (my programs use "mexico.jpg") and place the image file in the appropriate folder. If you are simply running the executable file (.exe program), the image must be in the same directory as the .exe file. On the other hand, if you are running from Visual Studio, it must be with the .cpp file. The other option is to use a fully-qualified path name (that includes the exact location or directory where it can be found) rather than a relative path, but be careful if you move this program to another location or computer that you are consistent with the image location.
If you want to use a program that uses the webcam for streaming video (i.e. scroll_webcam.cpp or your own version), make sure that the correct drivers are properly installed and your webcam is working properly. You should be able to use any webcam for these programs. I tested them using a Logitech QuickCam Pro 4000 as well as a Creative Labs WebCam Pro. Note that the quality of your camera will affect the quality of the image in the program.
To download my sample programs, return to the Explore My Project page.