Project
in Progress
The following is a link to the code for my first testing program; it was written with Microsoft Visual C++ 6.0. The program allows a user to test Riermersma's algorithms of Listing One and Listing Two from his article in Dr. Dobb’s Journal, May 2002, which scale a one-dimensional line of pixels. My program uses integers to mimic pixels from his algorithms. This testing program also allows the user to test different values for 'm' which I use to calculate the value of 'Mid' from the original algorithms. Riemersma always uses m=.5 (rather, he always divides by 2 instead of using float multiplication), but I wanted to be able to test variations of the algorithm that could give different results. I will later analyze the effect of these different values on the quality of the image after scaling. The widths of the source array and target array are hard coded as global variables; you will need to adjust and recompile to test with different dimensions.
The following are links to output from a version of the program listed above. I adjust the program to fill a source array with "random" ints, run Listing 1 on the source array, and then run Listing 2 with 10 different values for the Mid. I chose to test the values of m = .1, .2, .3, ..., .9, and 1. When m = 1, Listing 2 mimics Listing 1 because it will never average any pixels. The program used to run this data can also be found here, if you are interested in testing different values in this program as well.
Source Width = 5, Target Width = 7
Source Width = 7, Target Width = 10
Source Width = 10, Target Width = 14
Source Width = 14, Target Width = 21
Source Width = 21, Target Width = 14
Source Width = 15, Target Width = 12
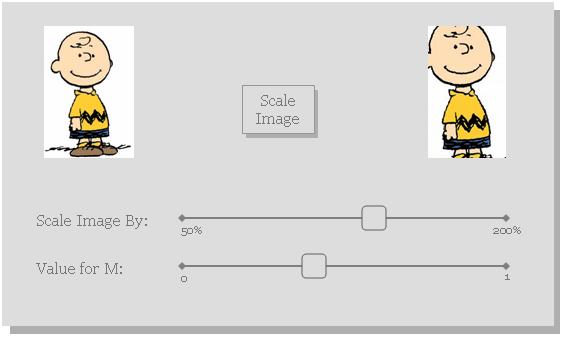
Above is a diagram for an elementary user interface for my program that will be used to scale images. It will first be used with still images, and later converted to work with streaming video data. The “Scale Image” button will be used for the still pictures so the user can set the other information to desired values and then see what the result would be with the scaling algorithm and those values applied to the original picture. The picture on the left is the original, and that on the right is the one that is scaled by the algorithm.
There are two sliders (for now) on the bottom of the program. The first is the one that will say how much to expand or shrink the image. For now this slider will take values from 50-200% since that is the recommended range Thiadmer Riemersma states for his algorithm. This may change when I implement different versions of his algorithm or completely different algorithms. The second slider is to get a value for ‘M’ from the user between 0 and 1. This is used to get a variation of Riemersma’s algorithm (he always uses 0.5). This is the value used to determine the threshold for when we copy versus average pixels as we scale an image.
Other features may be added to this design as I test other aspects of the algorithm, and create new algorithms.
|
|
|
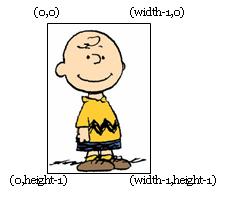
The data for the colors of each pixel is stored in the array as pictured above. This is the way that the webcam handlers deal with the data, so I use the pixel data from a still picture in a similar fashion. The above notation can be explained as follows: b(x,y) is the value for blue of the pixel at (x,y) (see picture above), g(x,y) is the green value and r(x,y) the red. These are all bytes that represent color intensity.
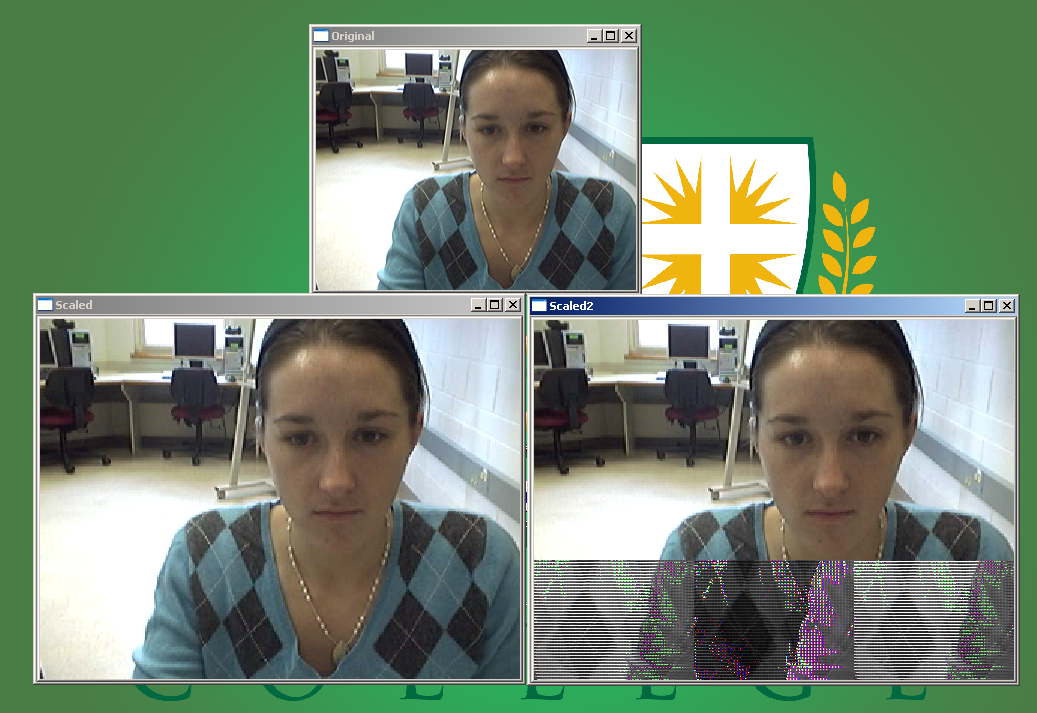
Below is a screen capture of the current version of my scaling program. It is written using OpenCV. The window labeled "Original" is the image captured directly from the camera. The window "Scaled" uses OpenCV's "cvResize" function to adjust the size of the original image. The window labeled "Scaled2" is an attempt at using the Bresenham algorithm. As you can see from the image below, the data is inaccurate in some way. I believe this may have something to do with the alignment and whether or not there is extra padding, but I am still looking into that. Also, the part that looks accurate in that window does not always show up; at times the window is simply black in that area. Any suggestions are appreciated, but I will continue to look into that.
My project has changed significantly from the last update on this page. For the finished product including a "How to," downloadable code, executable programs, and description with analysis, please see the Explore My Project page.