|
|


Face Tutorial |
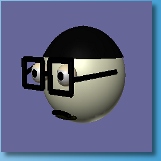
The Head Let's begin by making the Head. It's simply a sphere, so it won't take long. Start in the Object Editor with the front view filling the screen. Select Add Sphere from the toolbar, click in the center of the screen and drag to create a sphere. Now double-click on the sphere to show it's properties dialog and set it's diameter to 30. You can also give it more detail by increasing the number of divisions used in the longitude and latitude axis. Something like 18 for longitude and 12 for latitude looks good. Just remember that more details take longer to draw, and can make file sizes bigger, so don't go overboard. Now click OK. You should also give the object a name. Otherwise it will get hard to remember what is what when you are making your character. Select Settings->Object from the menu, and enter something like "head" for its name. Next make a material for the sphere. Select Options->Materials from the menu to make the materials toolbar visible. Double click on the "new" entry and select your material properties. Click "OK" and then click the Apply button in the materials toolbar. Make sure that your object is selected. One final thing that you can do that can make future construction of your character a bit easier is to center it in its coordinate system. You do this with the Edit->Locate->CenterAboutOrigin menu command. The Hair The hair is made up of half of a sphere that is just a bit larger in diameter than the head. So the first thing you want to do is create a sphere with a diameter a little greater than the head, with the longitude and latitude divisions set to the same as the head. Rotate it by 90 degrees around the X-axis and convert it into a mesh (Build->ConvertToMesh). Center it with Edit->Locate-> CenterAboutOrigin and change into Point Edit mode. Make sure that you have Point Selection enabled, and Drag Select all of the points below but not on the center line of the sphere. You may need to zoom in by temporarily going into Object/Viewport mode and enlarging your view for easier selection. Then delete the selected points. Once the points that you don't want are gone, you should be able to go to full view and apply your hair color of choice. Once the color is taken care of you need to attach the hair to the head. Select the hair half sphere and move it on top of the head. Once the hair is placed on top of the head in a nice manor, select both the head and the hair. After they are both selected, go to Build-> Group. Here the two will be made into one object. The Eyes Next you're going to build the eyes. This tutorial is for non-moving eyes. If you want you eyes to move, and then you will have to make the eye and lids in separate parts. Select Object->New and name the new object "Eye". In the "front" view, add a sphere. Double click on it to view its properties dialog, and set the diameter to 10 and the longitude and latitude divisions to 18 and 8. Convert the sphere into an editable mesh with the Build->ConvertToMesh menu command. Then make two new materials, one shiny white and the other shiny black. Try a roughness of about 50, and a specular value of 0.6 for the white and 0.7 for the black. These colors will be white of the eye, and the pupil. Select the sphere and apply the white material. Now switch to Point Edit mode and then enable Face selection . Drag Select the top most row of faces, as shown to the right. You may have to switch to a different view to see what you've selected. Then select the black pupil color from the Materials toolbar and apply it to the selected faces. Now your object has two materials at the same time. Deselect the faces by click/dragging the mouse in a blank part of the window, and switch back to Edit mode. Select the object and apply the Edit->Rotate->RotateX90 command. Your eye should now look like the right. Move it to the center with Edit->Locate->CenterAboutOrigin so it will line up with the eye lids easier. Then hide it with the Edit->Hide menu command to keep it out of the way for a while. The eyelids are made of the halves of spheres, and are just a bit larger in diameter than the eyeball. Create a sphere of diameter 10.5, with the longitude and latitude divisions also set to 18 and 8. Rotate it by 90 degrees around the X-axis and convert it into a mesh. Center it with Edit->Locate-> CenterAboutOrigin and change into Point Edit mode. Make sure that you have Point Selection enabled, and Drag Select all of the points below but not on the center line of the sphere. You may need to zoom in by temporarily going into Object/Viewport mode and enlarging your view for easier selection. Then delete the selected points. Now switch back into Object/Edit mode and select the side view. Select the eye lid and Rotate it to the right about 30 degrees using the right mouse button. This will tilt the upper lid far enough for the eye to appear open. Add a new material with the color you want for the eyelids, and apply it. Switch back to the Front view and select Edit->ShowAll to make the eyeball visible again. If you can't see the inside of the lid when viewing it as a solid, select Options->Backside. This makes both sides of a surface visible. Now hide both parts and make another half sphere in the same way, but this time keep the bottom half. When you're finished, unhide the other parts and your eye is finished! You might want to select all three parts and group them to keep them together. The Lips The upper and lower lips are made up of a cylinder with an altered middle direction, along with two spheres on either side of the cylinder. They are then grouped together to form to form the lip. The first thing to do again is to create a new object. Select Object->New and give it the name "Upper Lip" or "Lower Lip" using the Settings->Object menu item. First create a cylinder using the add cylinder button . After the cylinder is sized to your liking, you must now bend it. Using a couple of modifiers can really help here. First make sure you're in the front view. Click on the add modifier tool , then click on the lower part of the cylinder and drag up about 2/3 of the way. Select bend modifier from the dialog, and a yellow modifier grid appears. It may not be visible if it's narrower than the stem. If so you can either switch to wire frame or just continue and it should become visible. Next select the scale non uniform tool and click and drag the left mouse button to the right until the modifier is slightly wider than the top part of your model. Select both the model and the modifier (you can use the right mouse in point-select mode to add additional objects to the selected list) and click on Build->Modifiers->BindModifier from the menu. Double click on the modifier grid and a parameter dialog will appear. Enter something between 30-60 for the bend angle, clock OK, and see the results! Click on Build->Modifiers->EffectModifier and the change is permanent. Now if you want to make the other lip really quickly, then select the bent cylinder then go to Build->Mirror. There you will be asked for the axis you want to mirror and select the appropriate one. Now you have a top and bottom lip. Next you want to add a sphere that is around the same size as the end of the cylinder. Once your sphere is at the right size move it to the end of the cylinder and place half of it inside the cylinder and half outside of it. Do this same step for the other side of the lip with another sphere. Now that you have a bent cylinder, and two spheres on either side of the cylinder, its time to combine them into one object. Simply select all three items and then go Build->Group, and the three parts will group into one. The Glasses The Glasses are pretty self explanatory. Make sure that you make a new object and name it glasses. Then add 11 cylinders and connect them together in the square frame fashion. Remember to group them to form one large object from all of the little cylinders. That's it for all of the parts of the face. To make the head turn, the eyes blink, mouth talk, or put the pieces together in a figure, see the chicken tutorial or the manual for help. |
Disclaimer: The information presented on this page represents the personal views, ideas, and opinions of the author. This is not an official Saint Norbert College web page. Links contained at this web site to other organizations are presented as a service and neither constitute nor imply university endorsement or warranty. |