|
|


Eye Tutorial |
Disclaimer: The information presented on this page represents the personal views, ideas, and opinions of the author. This is not an official Saint Norbert College web page. Links contained at this web site to other organizations are presented as a service and neither constitute nor imply university endorsement or warranty. |
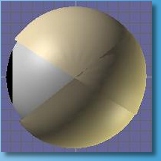
This tutorial is for non-moving eyes. If you want your eyes to move, then you will have to make the eye and lids in separate parts as separate objects, creating a skeleton and a sequence, explained through this link. Select Object->New and name the new object "Eye". In the front view, add a sphere . Double click on it to view its properties dialog, and set the diameter to 10 and the longitude and latitude divisions to 18 and 8. Convert the sphere into an editable mesh with the Build->ConvertToMesh menu command. Then make two new materials, one shiny white and the other shiny black. Try a roughness of about 50, and a specular value of 0.6 for the white and 0.7 for the black. These colors will be white of the eye, and the pupil. Select the sphere and apply the white material. Now switch to Point Edit mode and then enable Face selection . Drag Select the top most row of faces, as shown to the right. You may have to switch to a different view to see what you've selected. Then select the black pupil color from the Materials toolbar and apply it to the selected faces. Now your object has two materials at the same time. Deselect the faces by click/dragging the mouse in a blank part of the window, and switch back to Edit mode. Select the object and apply the Edit->Rotate->RotateX90 command. Move it to the center with Edit->Locate->CenterAboutOrigin so it will line up with the eyelids easier. Then hide it with the Edit->Hide menu command to keep it out of the way for a while. The eyelids are made of the halves of spheres, and are just a bit larger in diameter than the eyeball. Create a sphere of diameter 10.5, with the longitude and latitude divisions also set to 18 and 8. Rotate it by 90 degrees around the X-axis and convert it into a mesh. Center it with Edit->Locate-> CenterAboutOrigin and change into Point Edit mode. Make sure that you have Point Selection enabled, and Drag Select all of the points below but not on the center line of the sphere. You may need to zoom in by temporarily going into Object/Viewport mode and enlarging your view for easier selection. Then delete the selected points. Now switch back into Object/Edit mode and select the side view. Select the eyelid and Rotate it to the right about 30 degrees using the right mouse button. This will tilt the upper lid far enough for the eye to appear open. Add a new material with the color you want for the eyelids, and apply it. Switch back to the Front view and select Edit->ShowAll to make the eyeball visible again. If you can't see the inside of the lid when viewing it as a solid, select Options->Backside. This makes both sides of a surface visible. Now hide both parts and make another half sphere in the same way, but this time keep the bottom half. When you're finished, unhide the other parts and your eye is finished! You might want to select all three parts and group them to keep them together. |