---
May 9, 2025
The semester is drawing to a close, and with it, my time with this project (for now). The presentation went much better than I expected, and many family members were able to watch it on the Zoom meeting. I even had a CS110 student walk up to me at Phil's to tell me that he was writing his extra credit on my presentation. I am very happy to have worked on a project that brings me joy and that others can also share that same joy with it.
I have not updated the program itself since the presentation, but it isn't perfect. I have several ideas that I touched upon in my presentation and previous blog post that would really help the user experience. Threading would easily fix the program's biggest problem of seizing up and not responding whenever the user clicks off the window while the K-Means algorithm is still running. I do plan on improving the program more over time to help me learn new concepts, but those improvements will come after I am unable to update this website. Still, I learned many valuable things while working on this project, and I worked with some very wonderful people.
As for the website, I have added code for the K-Means algorithm to the main page. It is the heart of the program and does most of the hard work. Additionally, I will add a User Guide and a Programmer's Guide to the main page in the coming days.
Thank you so much for following these updates and showing interest in my project. Please continue to enjoy Cartoonify as much as I have. It really means a lot.
---
May 1, 2025
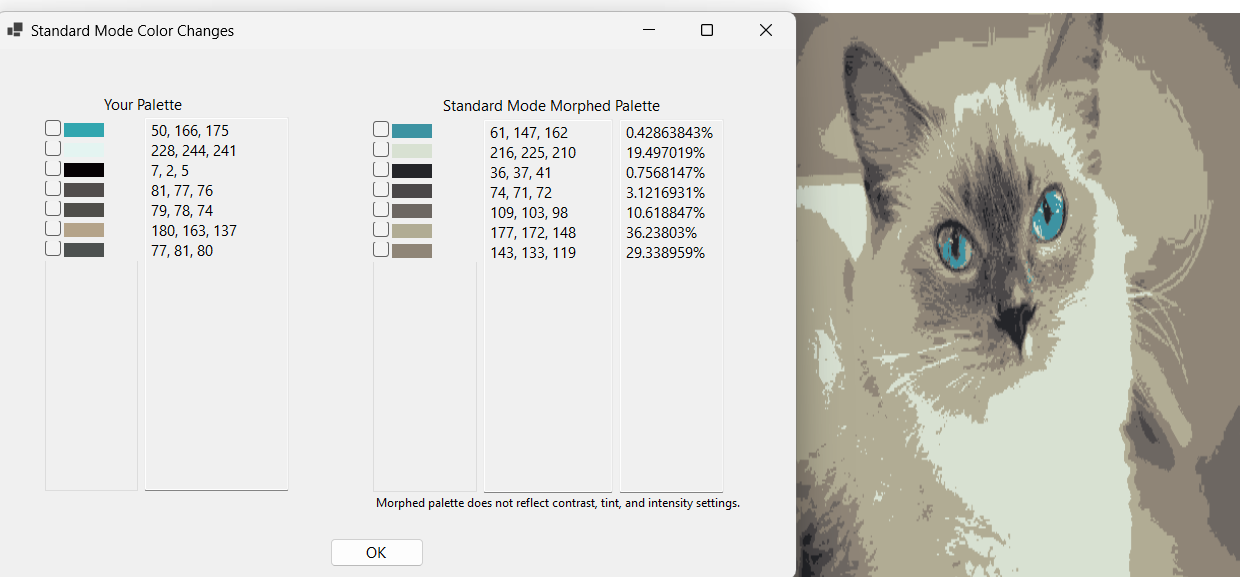
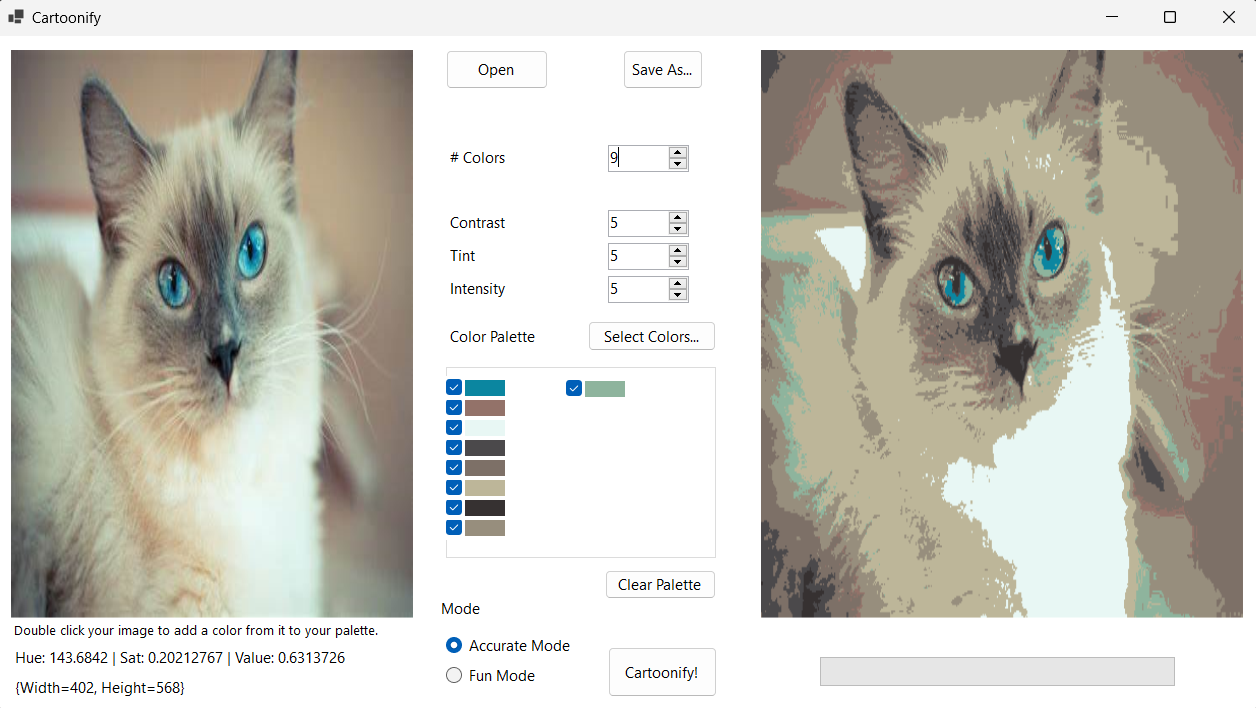
Presentations are soon and I have been busy finalizing my project. I have implemented the settings for contrast, tint, and intensity. I have also added Dr. Pankratz's suggestion of showing the user the percentage of each bucket in the cartoon. (They can be viewed from the color morph window.) I also had the idea of using my program for a collage project in another class, and that led me to finding another bug. Mysteriously, some of the lighter colors were morphing into black. Dr. McVey and I caught that issue and it was fixed. It was a problem of not resetting the number of pixels in each bucket in between passes of K-Means.
Here is an example of Dr. Pankratz's suggestion:
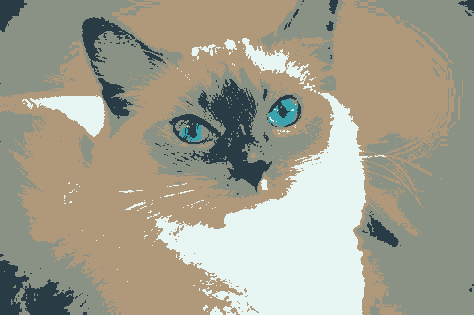
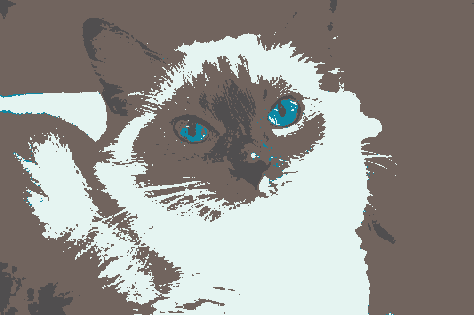
As for the contrast, tint, and intensity settings, they are now functional. Tint and intensity work using the HSV color mode, with the tint setting modifying brightness/value, and the intensity setting modifying saturation. The following image has its tint setting lowered (so it becomes darker):
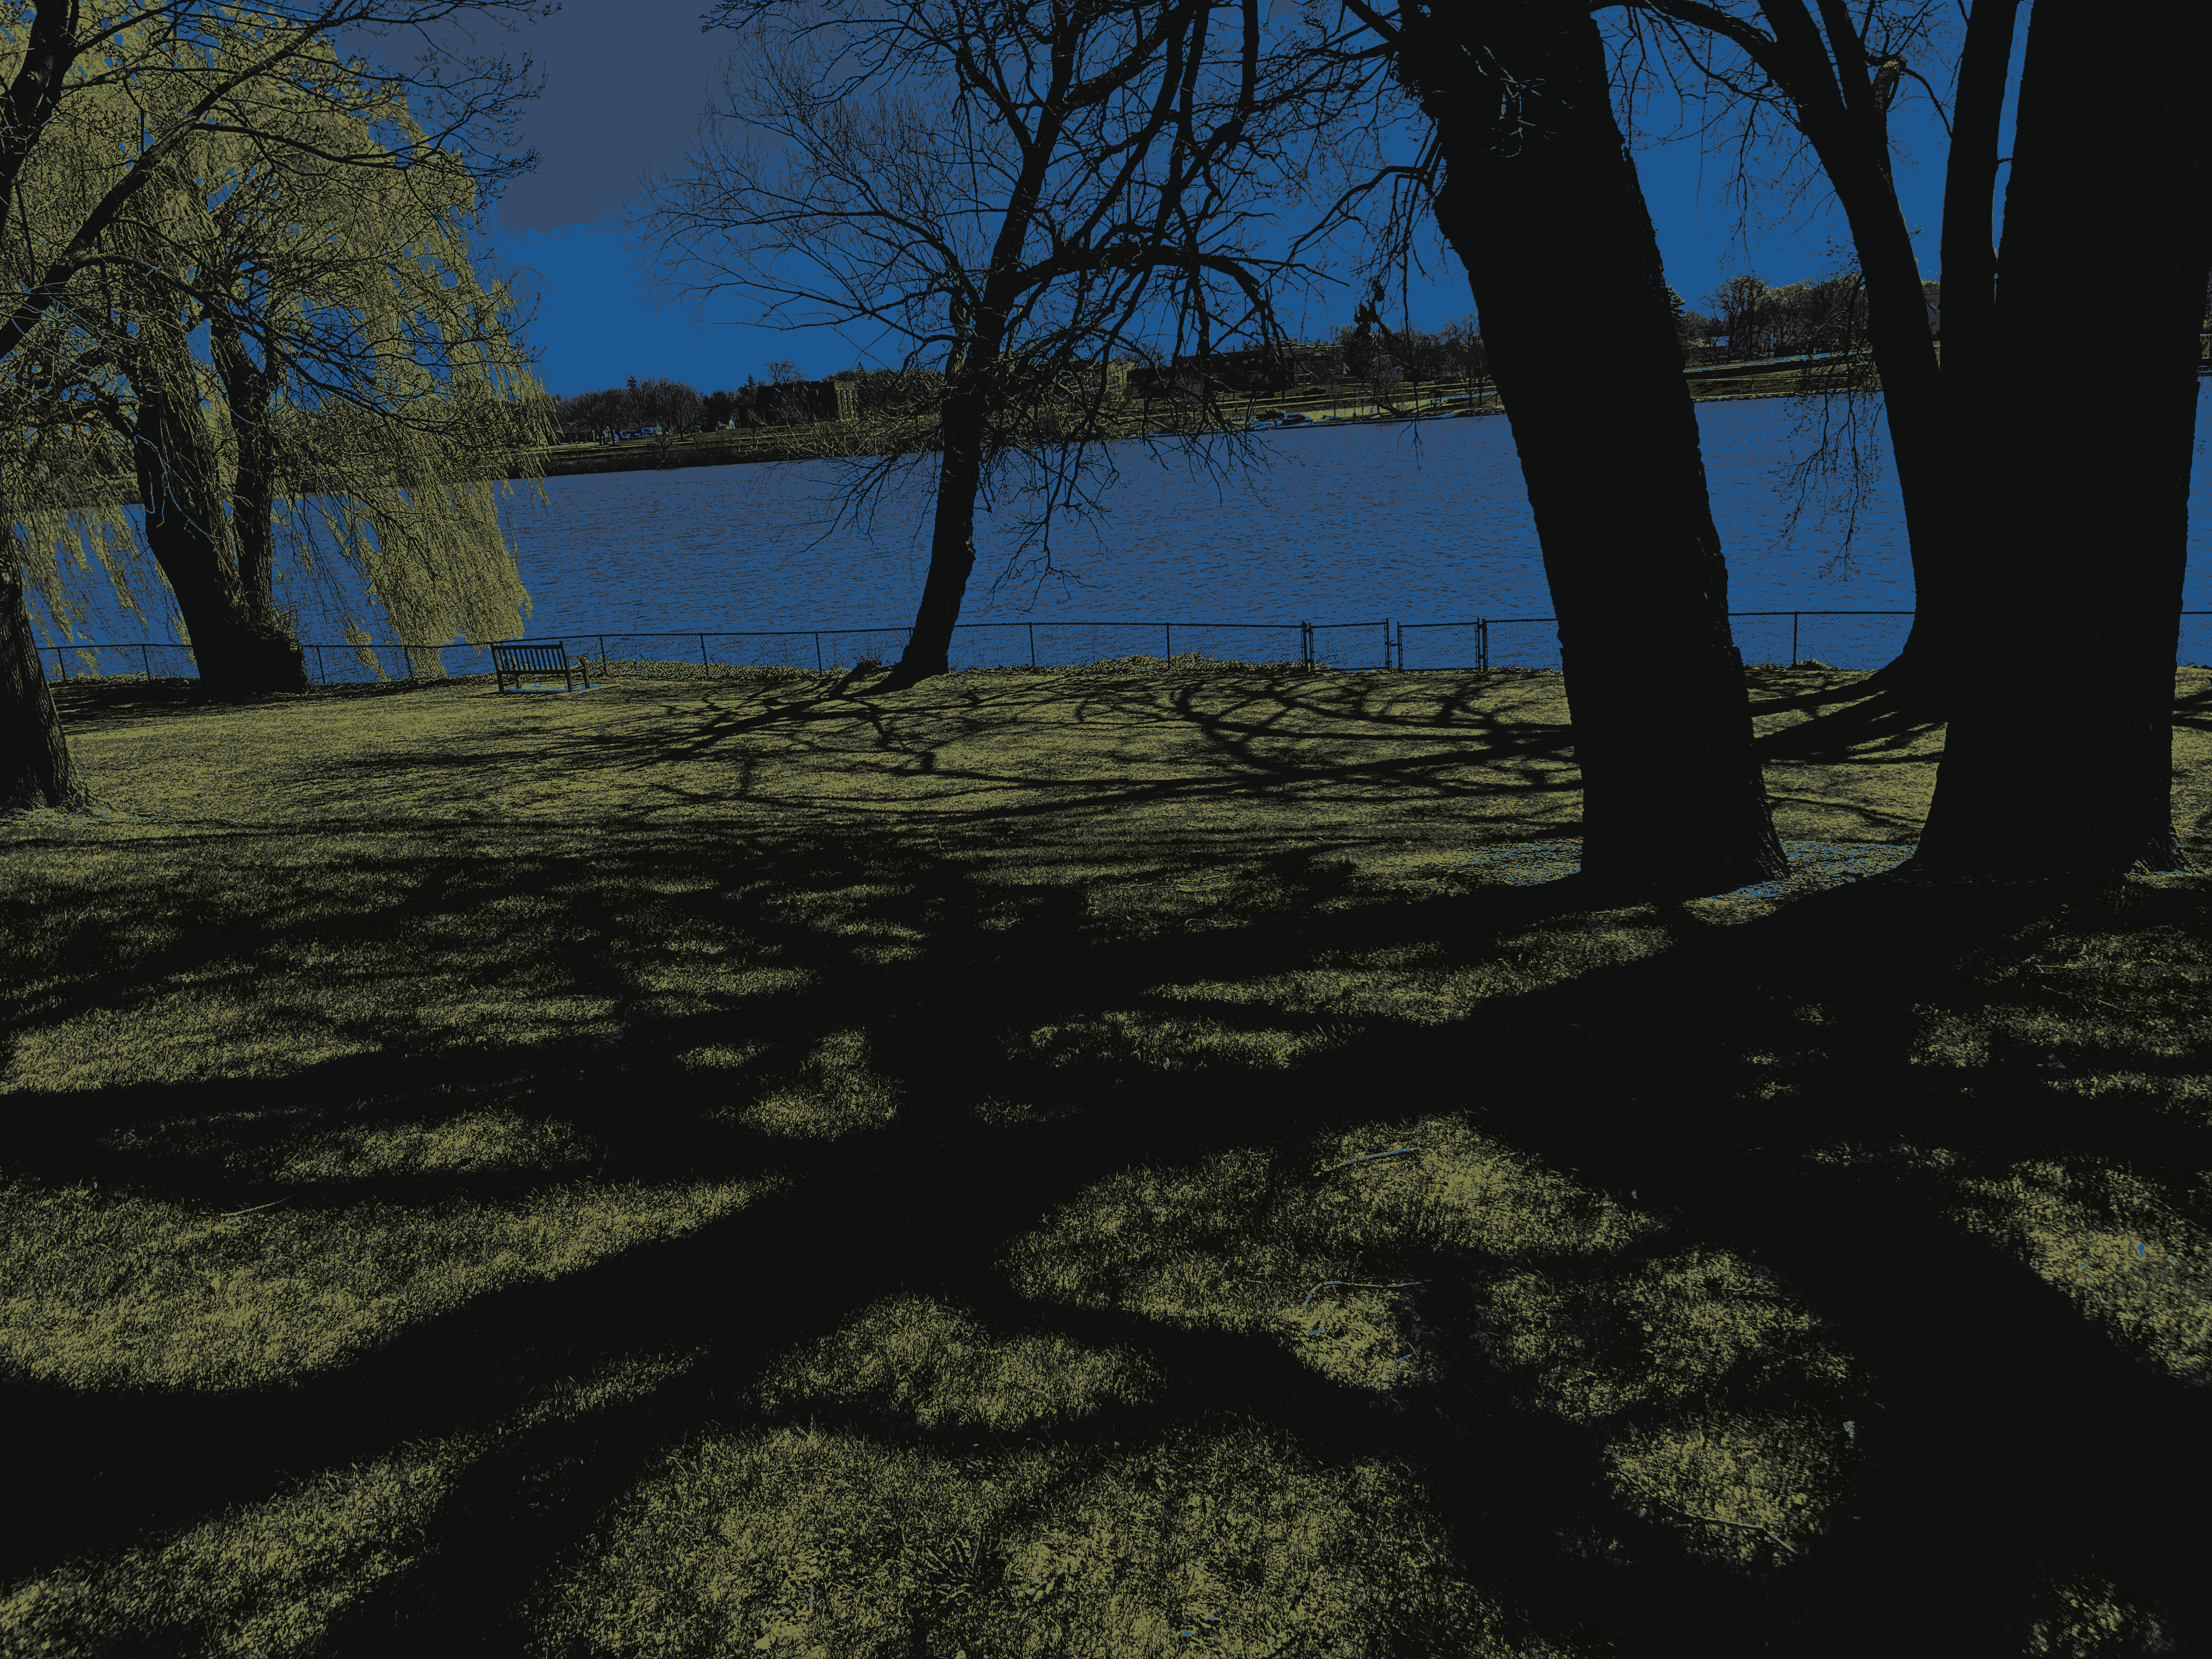
The contrast setting, however, didn't quite work the way I expected. I found an equation and even adjusted the scale of the modifier values (the equation is designed for a scale of -100 to 100 for the modifier, but my program uses -30 to 30). There's a huge leap in between the "no contrast adjustment" compared to setting it to one stage above the default, even with the lowered modifiers. I was expecting more gradual changes, not an immediate jump from standard to bright whites.
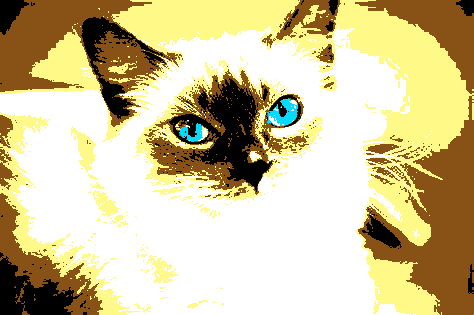
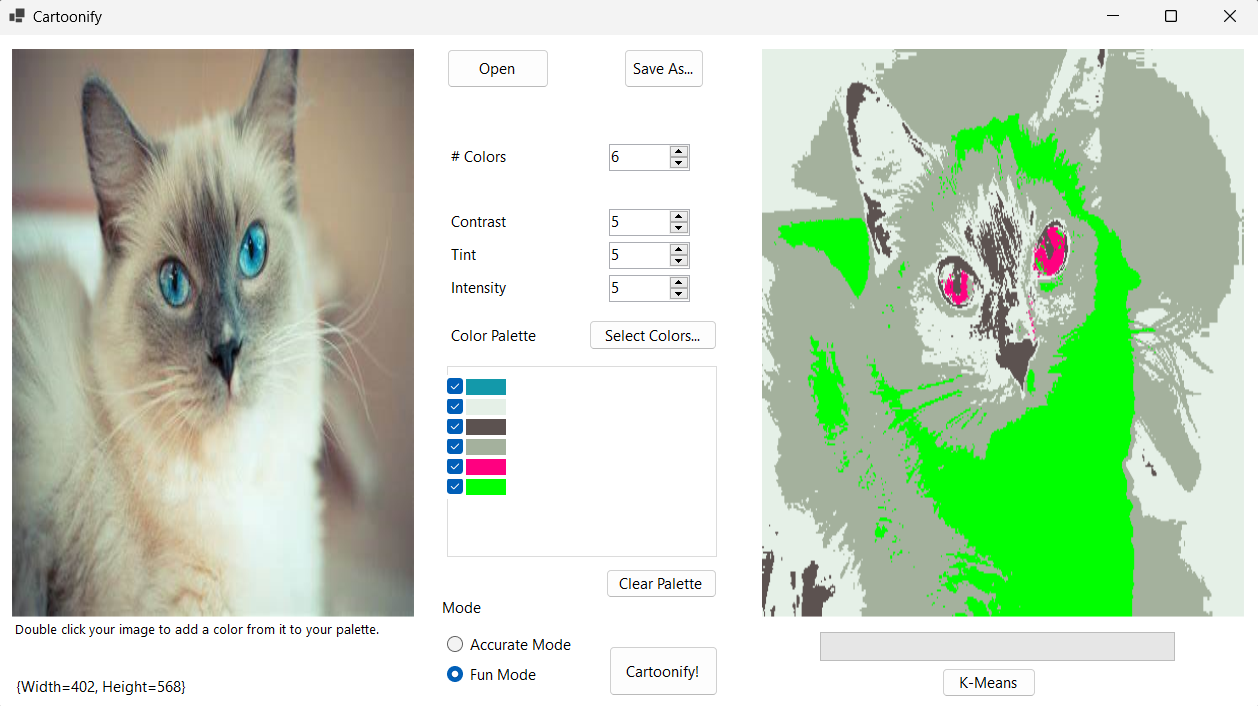
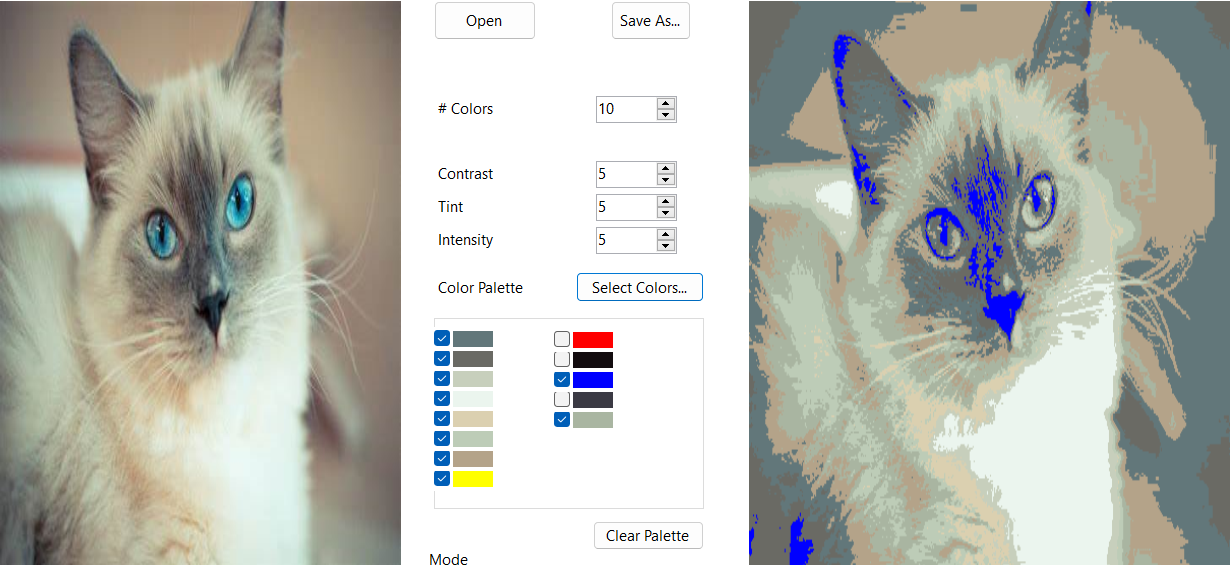
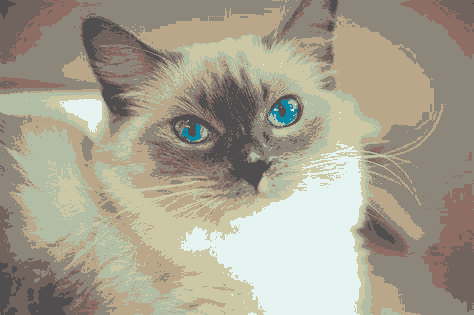
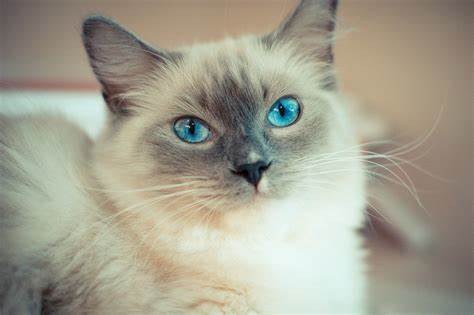
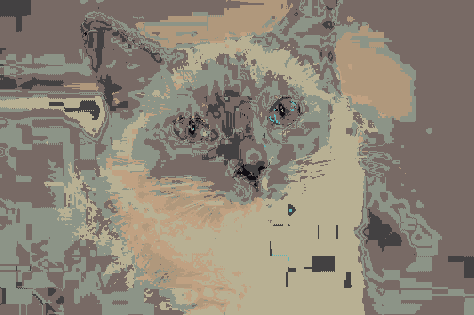
In addition, if the contrast modifier is negative, then the colors appear to invert. With this picture of my friend's cat, it appears black and light blue with the low contrast setting. Given more time, I could investigate a different method to adjust the contrast. But for now, at least the tint and intensity settings work as expected for the presentation.
In its current state, the project can be downloaded as a zip file on the bottom of the homepage. This is the build that I will be presenting. I enjoyed working on this project and I am looking forward to presenting it.
---
April 25, 2025
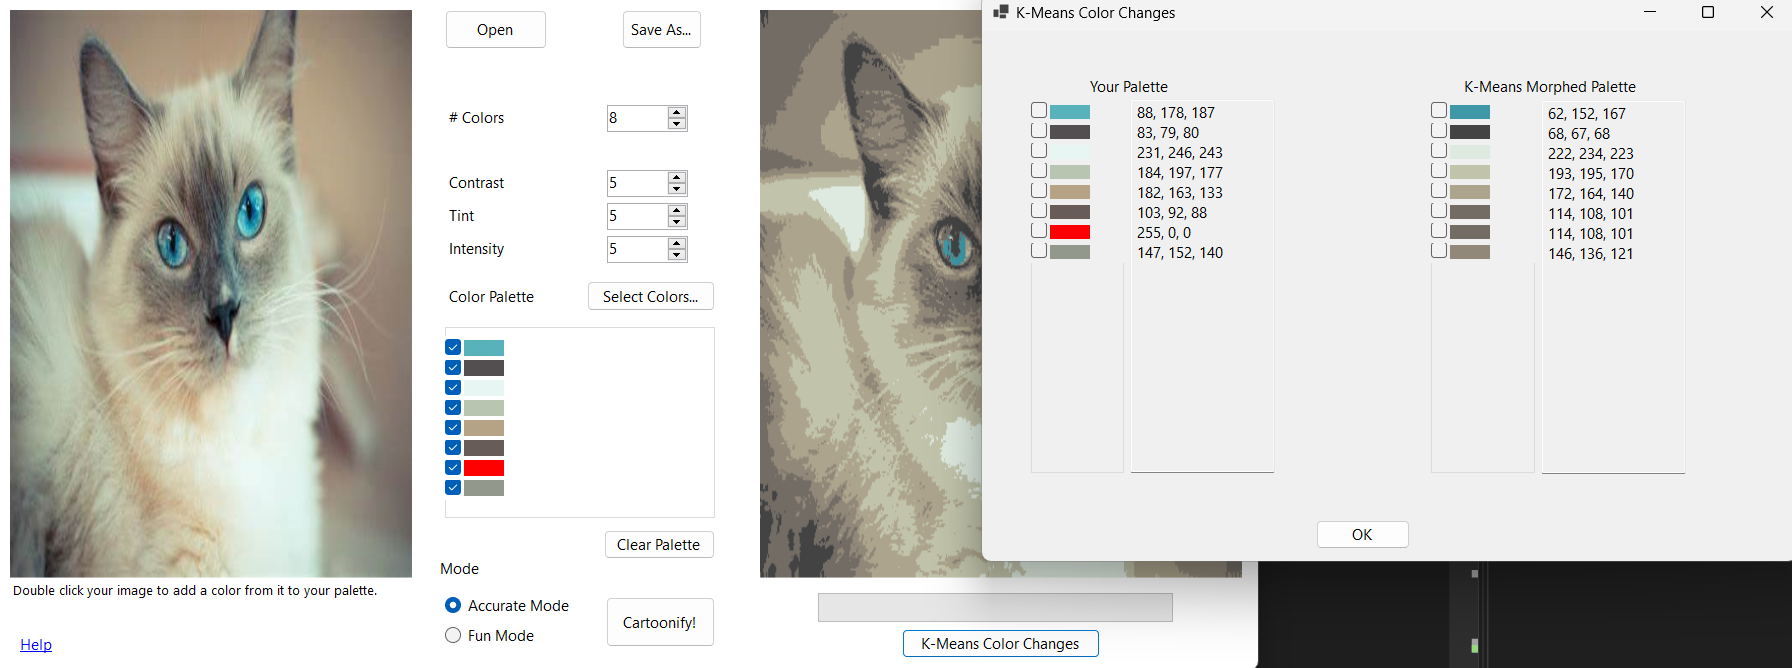
One week remains until presentations. I feel pretty good about the project, though there are still a few things I want to add. I used time this week to add a help section to explain important information to users, somewhat like an instruction manual. I also added the window that shows the user how the colors in their palette shifted during the K-Means algorithm in Accurate Mode. Both of these new windows allow the user to interact with the main application while they are still open. This is an example of the "K-Means Color Morph" window.
What I am planning to do next is implement the contrast, tint, and intensity settings. Dr. McVey also suggested starting to find isolated pixels in the cartoon and color them to match the surrounding area. Dr. Pankratz also sat down with me and suggested displaying a percentage of how much each bucket appears in the resulting cartoon. I agree with him that that would be useful information to display to the user. I am thinking about adding that information to the new "K-Means Color Morph" window.
---
April 22, 2025
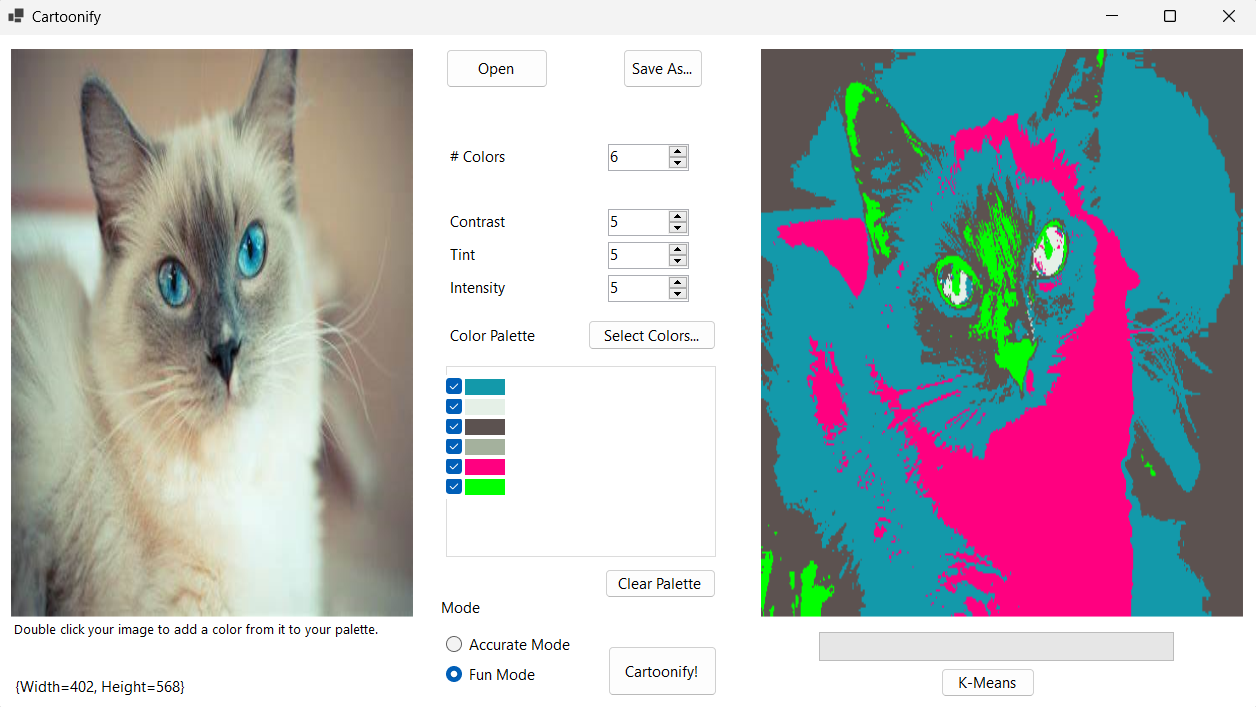
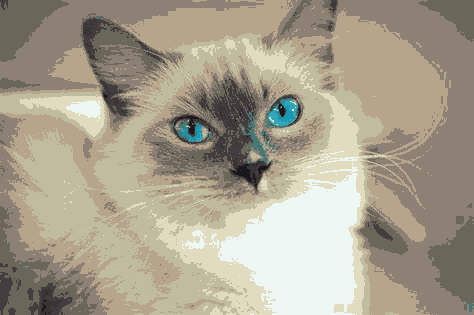
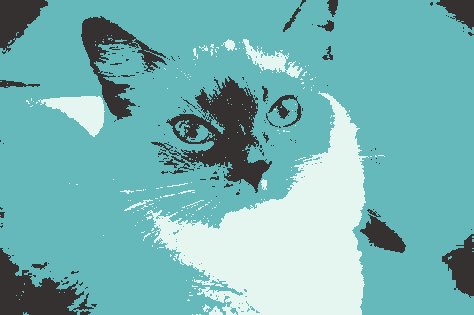
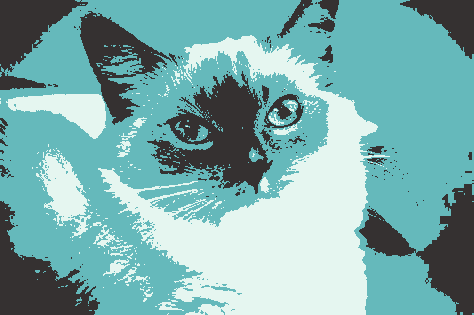
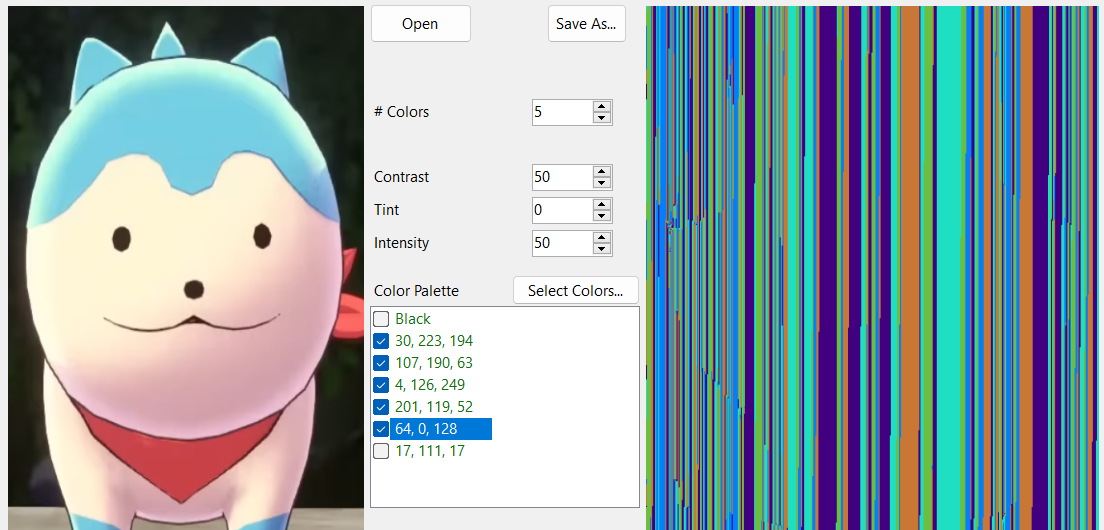
Last week, I adjusted the "fun mode" to make its results look more presentable and less like a glitchy mess. It uses the K-Means algorithm to make the buckets, but then it randomly rearranges the colors assigned in each bucket. The user can also swap between both modes without them affecting each other. Here are some examples that both use the same palette colors.
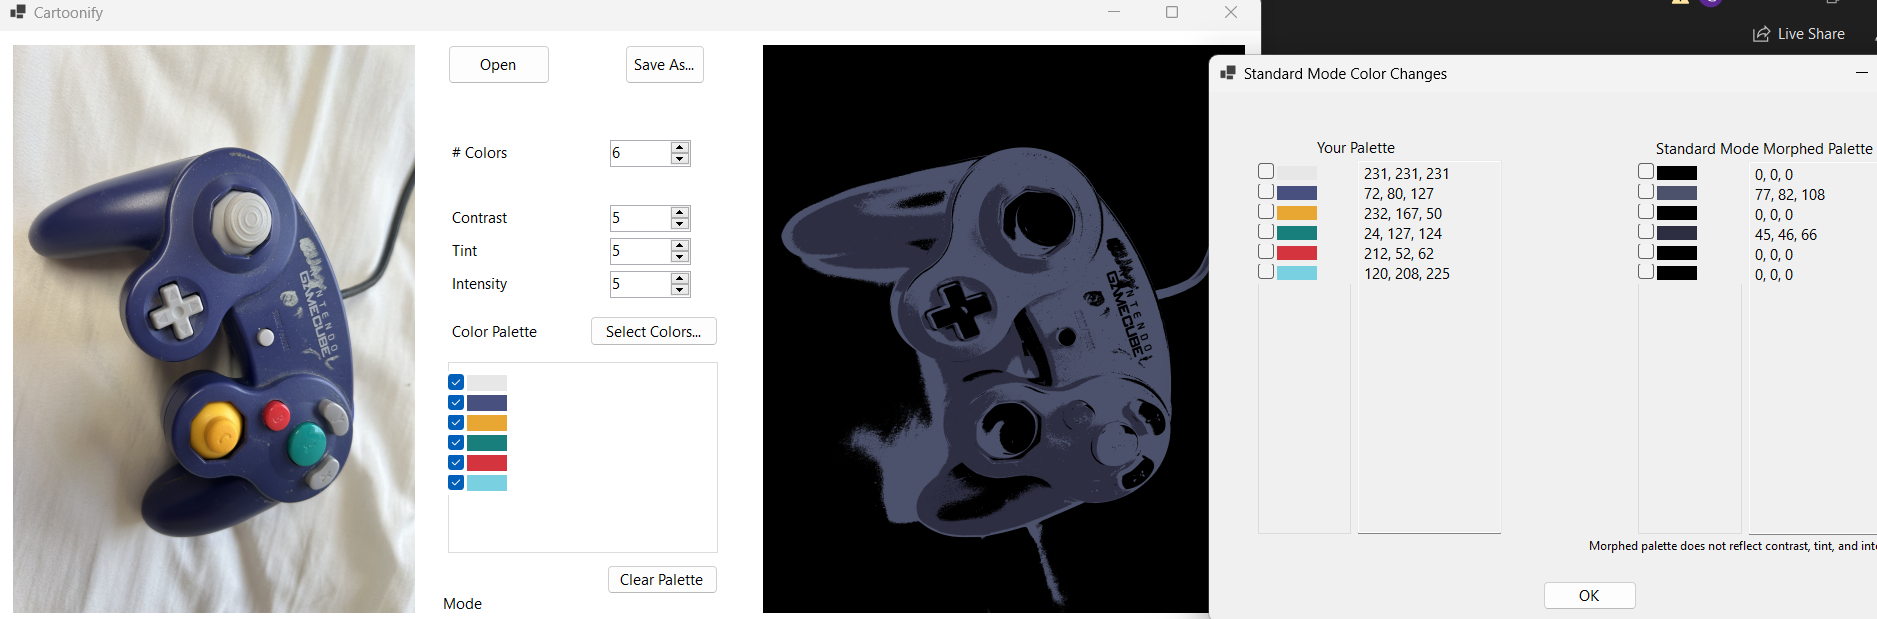
Today, I met with Dr. McVey and we were able to apply the K-Means algorithm's feature of morphing colors. The algorithm is rooted in constantly changing averages, and by changing which array is used to recolor a pixel, I was able to apply these morphed colors to the cartoon. This did bring up a new issue: how does the user know which colors the palette colors morphed into? My next step will be implementing a new window that the user can open with a button, and it will tell them the original palette colors and their respective new "K-Means morphed" colors.
---
April 11, 2025
I was able to improve my implementation of the K-Means grouping algorithm with Dr. McVey's help. I thought I would have to add a long section to account for passes beyond the first, but I just had to change which array I was using and it would work for all passes including the first. I updated the function to run for 5 passes of the K-Means algorithm, and here are the results:
Below is a comparison of how the image looks with the same three colors in the palette but using my old Accurate Mode function (left image; very similar to 1 pass of K-Means) and going through 5 passes of my current K-Means algorithm (right image). With more passes, the difference between the two is more apparent than before.
However, there is a problem with using solid red, blue, or green without a dark color chosen in the palette. These three colors have 255 in one of the RGB fields and 0 in the other two, so they are commonly mapped to the darkest colors. Numerically, the program sees those three solid colors as the closest match to black (RGB 0,0,0) if no other dark color is chosen. I will have to find a solution to this problem, since visually they are not the best fit.
Apart from the step taken on the K-Means algorithm, I made some adjustments to the interface. Before, the value in the box specifying how many colors the user wants in the cartoon did not increment if the user added a color to, or cleared, the palette. Now, the value in that box will automatically update if the user adds a color to the palette, and it will reset if the user clears the palette. However, I am still trying to find a way to update that counter whenever the user checks or unchecks a box in the palette. In another area of the program, Dr. McVey helped me out with the display of the progress bar inside the K-Means function. When running that function specifically, the progress bar kept filling up long before the cartoon was done and placed on the screen, which could give the user a false impression.
Next week, I hope to find how to solve the "solid red/green/blue mapping to black" issue in the K-Means algorithm, and keep adding improvements to the interface on the side.
---
April 4, 2025
This week was slow in terms of progress, but I received feedback from my classmates and started implementing the K-Means algorithm with Dr. Pankratz and Dr. McVey's help. So far, I have implemented the first pass of the K-Means algorithm, and the results so far are very similar to "Accurate Mode", but it takes longer. K-Means is a grouping algorithm that shines when doing multiple passes to update the groups based on averages, so I expect the results to change once I add in subsequent passes.
On the left is how the image looks when using Accurate Mode. In the center is how it looks with the current state of my K-Means function. Both use the same colors in the palette. There are slight differences (especially around the corners and on the face), but if they are hard to spot, I have included a screen recording that switches between them.

I also demonstrated my project to the class, and my classmates had several suggestions for me to think about, including:
This feedback is valuable and I believe these ideas would help improve the interface. For now, I will continue implementing the K-Means algorithm, and add these improvements on the side.
---
March 28, 2025
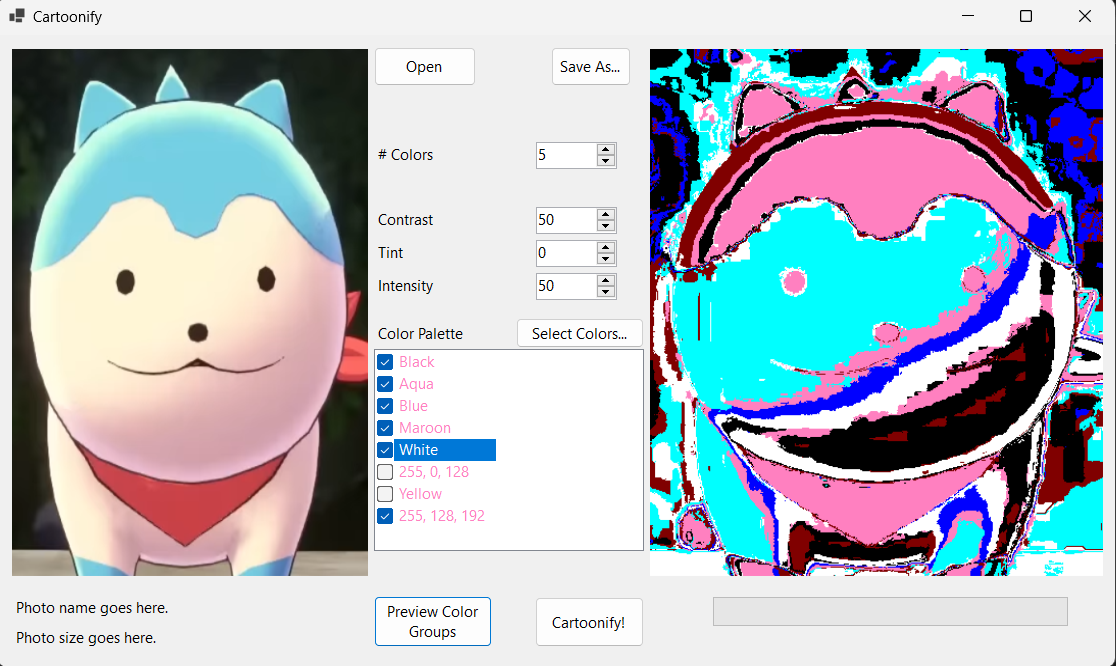
I am back after Spring Break and another week of classes. Dr. McVey helped code a way to display the colors in the user's palette as rectangles, and during the week, I implemented that code. We used a GroupBox object and added CheckBox controls to it, and with a few foreach loops, the program can enumerate through each CheckBox object and determine which options are checked off. Here is how the project looks at this stage:
I also met with Dr. McVey this week, and we tried looking for the cause of the strange dark patches over light areas that shouldn't be happening (as seen in the blog post before this one). During the meeting, I kept thinking in my head: "Do I really need some of these data structures? Both of us are getting lost and confused going through this code.". The day afterward, I had written a slimmer version of the "accurate recoloring" function with the ideas I had thought up of during the meeting, and the results were satisfactory. (Both images are derived from the same original picture used in the previous blog post. The left image uses 3 colors in the palette, while the right image uses more than that.)
There are no strange dark regions in the white areas! And the picture on the right can be passable as a photo if seen from far enough away. The images are still pixelated in some areas, but it's more a result of my algorithm recoloring pixel-by-pixel. One of my next steps is finding a way to smooth out the colors so that the cartoon appears less pixelated. I will also continue researching the K-Means algorithm to determine if there is a more efficient way to recolor an image besides going pixel-by-pixel. On the side, I also want to implement help descriptions for users to help guide them through the program and what certain terms mean.
---
March 14, 2025
I was able to make more significant progress this week. On Monday, I showed my project to Dr. McVey, and she proposed that I work on trying to map colors based on the closest color to it in the image while she would help find a solution to the disappearing rectangles in the palette checkbox. So I spent most of the week trying to figure out how to map colors in that way. Today, Dr. McVey showed me a way I could display rectangles in the palette, involving the use of a ListView object. When I implement it, I will have to align it with the checkboxes in the palette box and possibly make a second ListView object for the second column in the palette box. This will be very crucial to the UI, as it is easier for any user to understand what color they are choosing when they are looking at the color itself instead of numbers representing the RGB value of a color.
As for the alternate method of remapping colors, I initially struggled to get more than one color to display. Sometimes I would get a solid block of one color, other times I would get one color with other regions of the image becoming transparent. I eventually found the issues -- that I was not using absolute value when calculating the Euclidean distance between colors, and that I was not resetting the variable used to check the minimum average in the correct place. The absence of absolute value in my calculations meant that black (RGB 0,0,0) always had the lowest average, especially when the variable used to check the minimum was not reset properly. Today, however, I fixed those issues and this method works closer to intended!
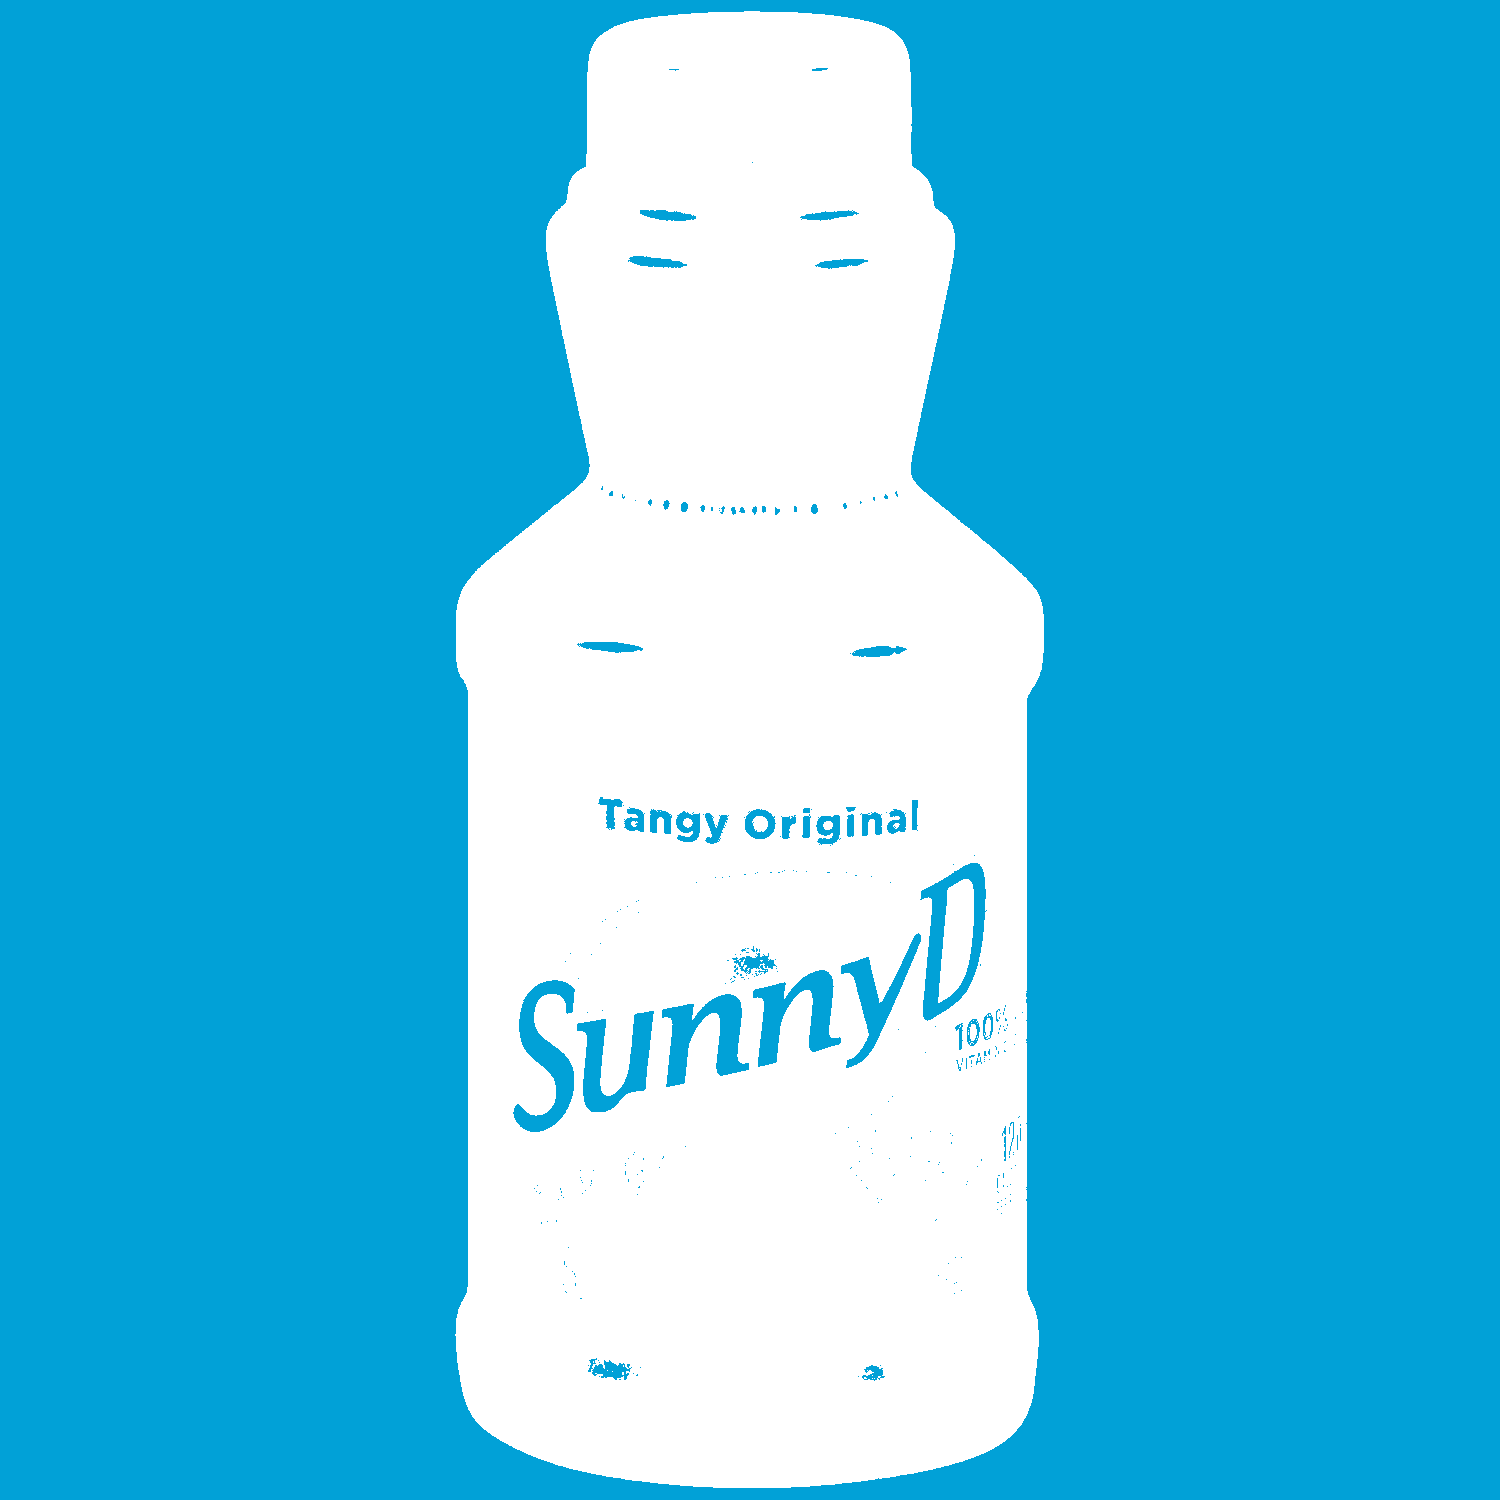
Left: An attempt with the SunnyD bottle that only mapped one color and left the other areas transparent. Right: The same SunnyD image with the most recent version of the "closely mapping" color algorithm.

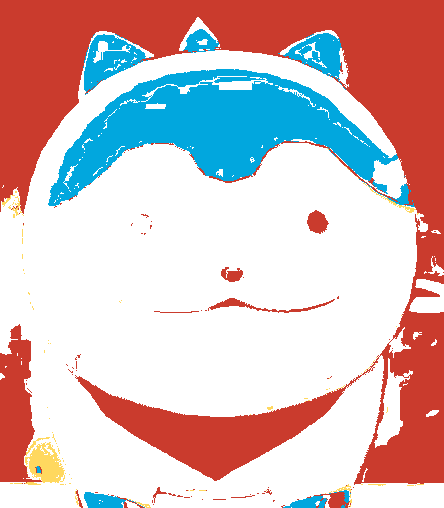
Below is the pet from an earlier blog post, recolored using the same colors as the fixed SunnyD bottle above.
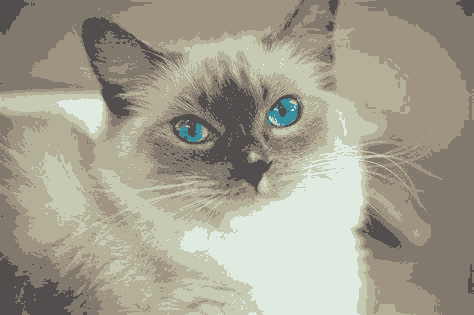
However, like the previous recoloring algorithm, I am still getting strange square areas of colors that shouldn't be expected in that particular area. I tested the new algorithm on a picture of my friend's cat (left), and got brown blocks in an area that should be a lighter color. While both my algorithms work, they both share that issue of very blocky regions of color.
I also tried calculating the Euclidean distance using a color's HSV values instead of the RGB values. However, I found that the results were better when I calculated it with RGB values. When I tried with HSV, reds kept getting mapped to whites, which I'm assuming is because red can have the hue value of 0.0, and so can white. I tested it on the SunnyD bottle, and the background and SunnyD logo got recolored to red even when white was checked off in the palette. As the image above shows, the white was mapped properly when calculating Euclidean distance using RGB values.
Aside from getting the alternate coloring algorithm to work, I have made slight adjustments to the interface. I replaced the button that was originally next to the Cartoonify button with two radio buttons that determine which coloring algorithm the program will use. One radio button uses the "map to closest color" algorithm, while the other uses the algorithm in my previous blog posts (recolor based on occurences of new colors in the original image). When the user clicks the Cartoonify button, the respective recoloring algorithm then executes.
My next steps are applying the ListView objects to draw rectangles in the color palette as intended, research and apply the K-Means algorithm, and figure out what is causing the blockiness in some of the resulting images.
---
March 7, 2025
This week, I was able to demonstrate my project to the professors and we discussed my next steps. Dr. Pankratz and Dr. McVey introduced the K-Means algorithm to me. It's a clustering algorithm for grouping similar components together, and if I apply it to colors, the program can make "buckets" of sorts to be used for recoloring. I still have to do more research on how I can implement it to my project, but it is good to have a basic understanding of what it does.
Today, Dr. McVey showed me a way to more efficiently draw to the screen using Graphics and Bitmap objects. Previously, I was making a new Bitmap object based off the selected image and recoloring the pixels of the Bitmap object, and then using the Image property of the PictureBox control to display it to the screen. Drawing elements directly to a Bitmap object should be useful for multiple parts of the project, not just advanced recoloring. Right now I am trying to use this method to display colors in the palette as a rectangle of that color instead of their RGB values that aren't very relevant to the user.
I also spent this week making minor interface adjustments. The progress bar actually works now, and I made a functioning eyedropper feature. I also added an option to clear the user's color palette. Here's a recording of a demonstration of the (almost) current stage of the project.
I recorded this demonstration before Dr. McVey showed me the Graphics and Bitmap objects, so you may be able to see my previous attempts at drawing rectangles to the color palette flicker on the screen.
Next time, I hope to display the color palette the way I want it to, and gain a better understanding of the K-Means algorithm so that I can properly add it to the project.
---
February 27, 2025
Yesterday, I made a great amount of progress. After getting pointers from the blog of 2021 graduate Colby Wall, I researched the HSV color mode and added the ColorMine package to my project. I have gone past remapping pixel's colors with hardcoded values to remapping colors based on the ones the user selected! The algorithm has much room for refining, as it still goes through the image pixel-by-pixel, and it could use a better way to determine the HSV range in which one color could be considered the same as another. Testing this algorithm also gave me an idea for a feature I could add, as I thought it would be nice to be able to shift around the colors in the check box. I have also adjusted the interface slightly, and added an area for a progress bar.
Below are some screenshots of my initial testing as I was starting to get the new algorithm working. (The original image used in these examples is not one of my own creation.)
I accidentally turned the pet into a Game Boy crash screen. One removal of a break; later and I get something that still looks garbled, but also has a coherent outline of the subject. I would share the image of this stage, but it has a lot of bright and repeating colors that may not be welcoming to some viewers.
After some tinkering, I get to where I am now. In the previous stage, the algorithm switched to the next checked-off color whenever it found a completely new color in the image. Now, it uses parallel lists to map the corresponding index of a checked color to a color in the image, and uses that index once a color is found again in the original image. It looks rough but this progress is a large step for the project as a whole.
As for my next step, I want to reduce the squarelike edges between color regions and improve the algorithm in general. Colby Wall's blog also mentioned the Kmeans algorithm and buckets, two terms I have heard before while meeting with Dr. McVey. It would be important to start researching those as they may be key to improving my algorithm. Buckets in particular sound helpful to solving the "can this color be considered the same as another" issue. On the side, I may make edits to the interface such as adding the aforementioned "shift around colors in the checkbox" feature. I also need to adjust the checkbox so that it displays a rectangle of the corresponding color, instead of switching the font of every entry to the most recently-picked color.
---
February 19, 2025
Progress on the project is currently slow, but since last week, I have determined a RGB value range at which two colors would be considered to be the same. I have not fully implemented this idea yet, as it still faces a few challenges. The ColorMap class has two properties (OldColor and NewColor), and creating separate instances of it just to account for a slightly different shade of a color sounds like an unwieldy task. I also tried out the ColorPalette class I mentioned in my previous entry... and it did not work very well. Dr. McVey has provided a few ideas as to where I can find inspiration on how to implement this RGB value range idea and others. Additionally, I learned that HSB (Hue, Saturation, Brilliance) is a color mode that can be used in C# as an alternative to RGB. I will have to investigate how to tinker with colors using that system.
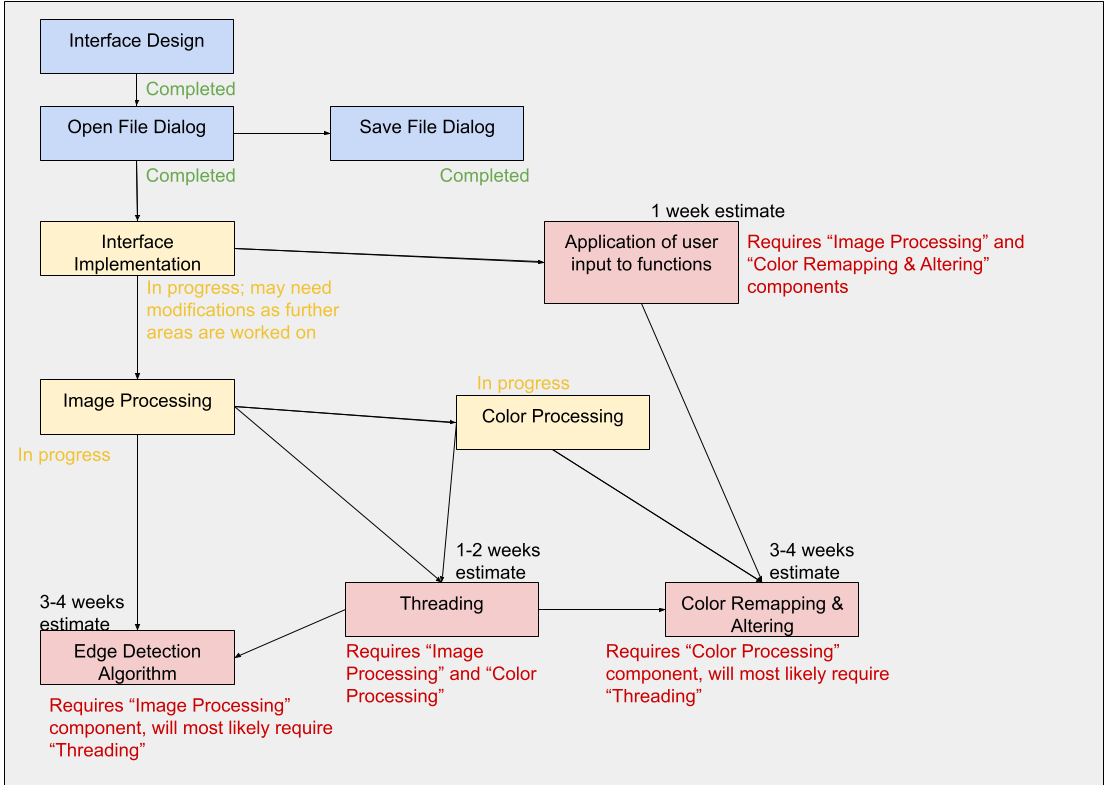
Below is a chart of the required scope of my project and how long I think each portion will take:
Next, I will continue research on color processing algorithms, as well as adjusting my user interface. I have also started researching the System.Drawing.Drawing2D namespace in case I need it for my edge detection algorithm, so I may continue that on the side while I research HSB color processing.
---
February 11, 2025
Yesterday, I made more progress on my program. I implemented the save button, and I also experimented with recoloring images. The save button works properly and can save images as bitmaps. As for the image recoloring, I played around with ideas like "what if I used this pixel's red value as its blue value?". As a result, I had fun making images into green and purple versions of themselves. I used other combinations of pixel color value swapping, but I had the most enjoyment with the "Joker" configuration. This method of color-swapping was purely experimental and likely won't be included in the final project. It goes through the image pixel-by-pixel, which is largely inefficient for what the project needs to do! I also found classes such as ColorMap and ColorPalette that might come in handy when I make the color replacement algorithm. My main challenges so far are:
As for today, I received feedback on my current plan from my peers as well as Dr. Diederich and Dr. Hagedorn. These are a few of the improvements they suggested:
This feedback is valuable, and I will make an effort to ensure that these features will be implemented in my project. As a digital artist, having a feature to grab a color from what I'm working with is extremely useful, so I know it will be equally as helpful for my project.
Thank you for reading! I hope to make more progress on color processing throughout the week.
---
February 7, 2025
Subtask Analysis:
1. Upload a photo and convert it to a cartoon-like image. Before any uploading is done, the basic interface needs to be created, which includes the upload button. My upload button is currently functional, but will need more added to it down the line such as checking the image's size (which can affect how much processing the program does). As for the second part of this subtask, the other subtasks are required to accomplish it. Color data and other user-entered information are needed for the task of converting.
2. Examine various algorithms and consider designing your own. I will need an algorithm to ensure that the project does its job correctly. I am planning on using an edge detection algorithm, which will require data from the selected image in addition to color information from user inputs in order to work.
3. Control the contrast, tint and intensity of the cartoon. These settings will affect how the colors in the final image will look. As such, it requires anything involving color selection and detection to work.
4. Allow the user to specify the number of colors in the cartoon image. This will be an option on the interface. However, in order to fully test it, I will have to get colors fully working. It will also interact with other elements in the interface.
5. Allow the user to specify which colors will be in the cartoon image. This portion will require use of the color dialog. So far, my interface has a button that opens the color dialog and then adds the chosen color to a checklist below. The checklist will not allow more colors clicked than the number of colors the user previously specified.
6. Implement save and open functions. The open function is crucial to this program, as image processing is at the core of it. The save function will require the open function to be operational to save a modified version of the opened file (it will not overwrite the original). In my design, the save function will become enabled after the image has been fully processed. It will be tied to the "cartoon" box, which contains the image post-processing. Disabling it before image generation will help prevent the user from saving nothing.
Quick Overview
Anything separated by a " | " in the same step can be done separately within the same step, but everything in the next step requires elements from the previous steps.
Interface Design | Algorithm Design ->
Interface Implementation
Open/Save Function | Interface Functionality | Basic Color Information | User Inputs ->
Applying Algorithm Research & Design ->
Color Processing | Image Processing
---
February 6, 2025
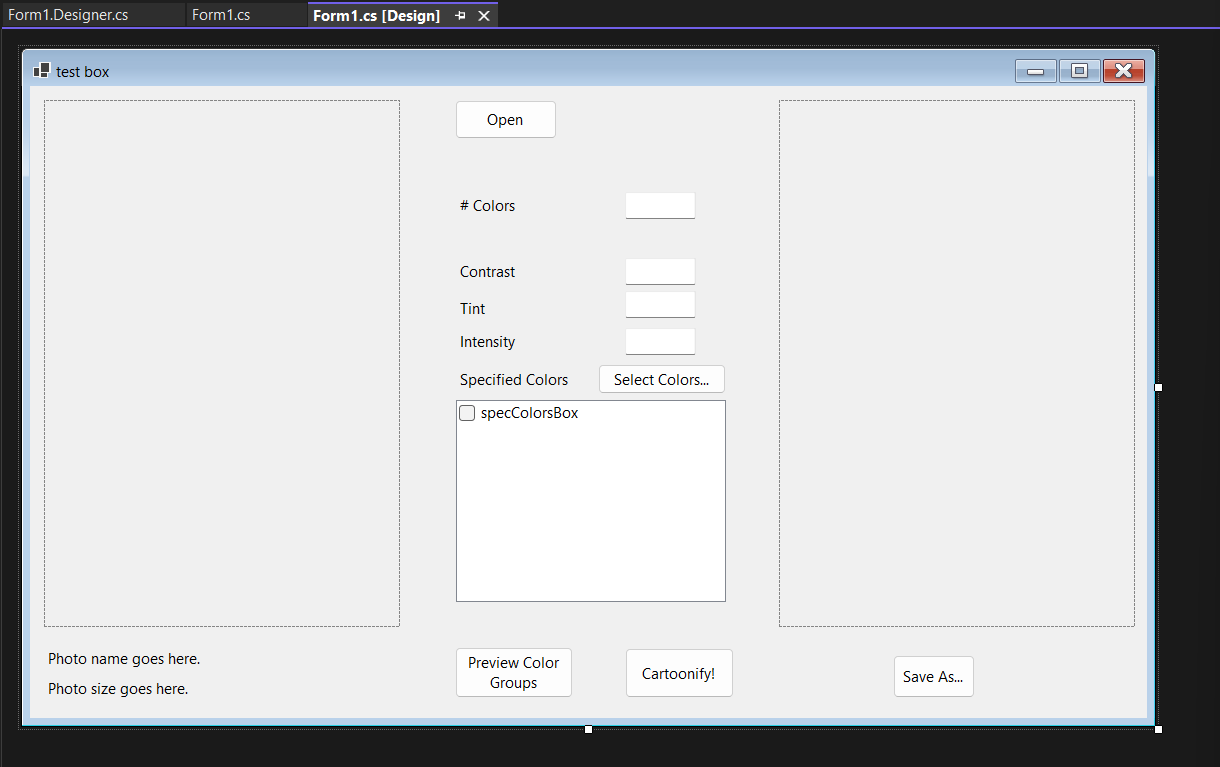
Today marks about two weeks since receiving the project. So far, I have drawn up several concepts for the UI and wrote an outline of what I will need to code. I have created a prototype of one of my UI concepts as a way to teach myself C#, but I still have much work to do. So far, I have gotten the Open File dialog to work and properly display a picture to the window. Additionally, I found out how to enable or disable options on a button click. Next, I plan to research how C# does image processing. Dr. McVey kindly provided me a few C# labs, and I plan to use those to learn!
Below are the UI concepts I have drawn up.
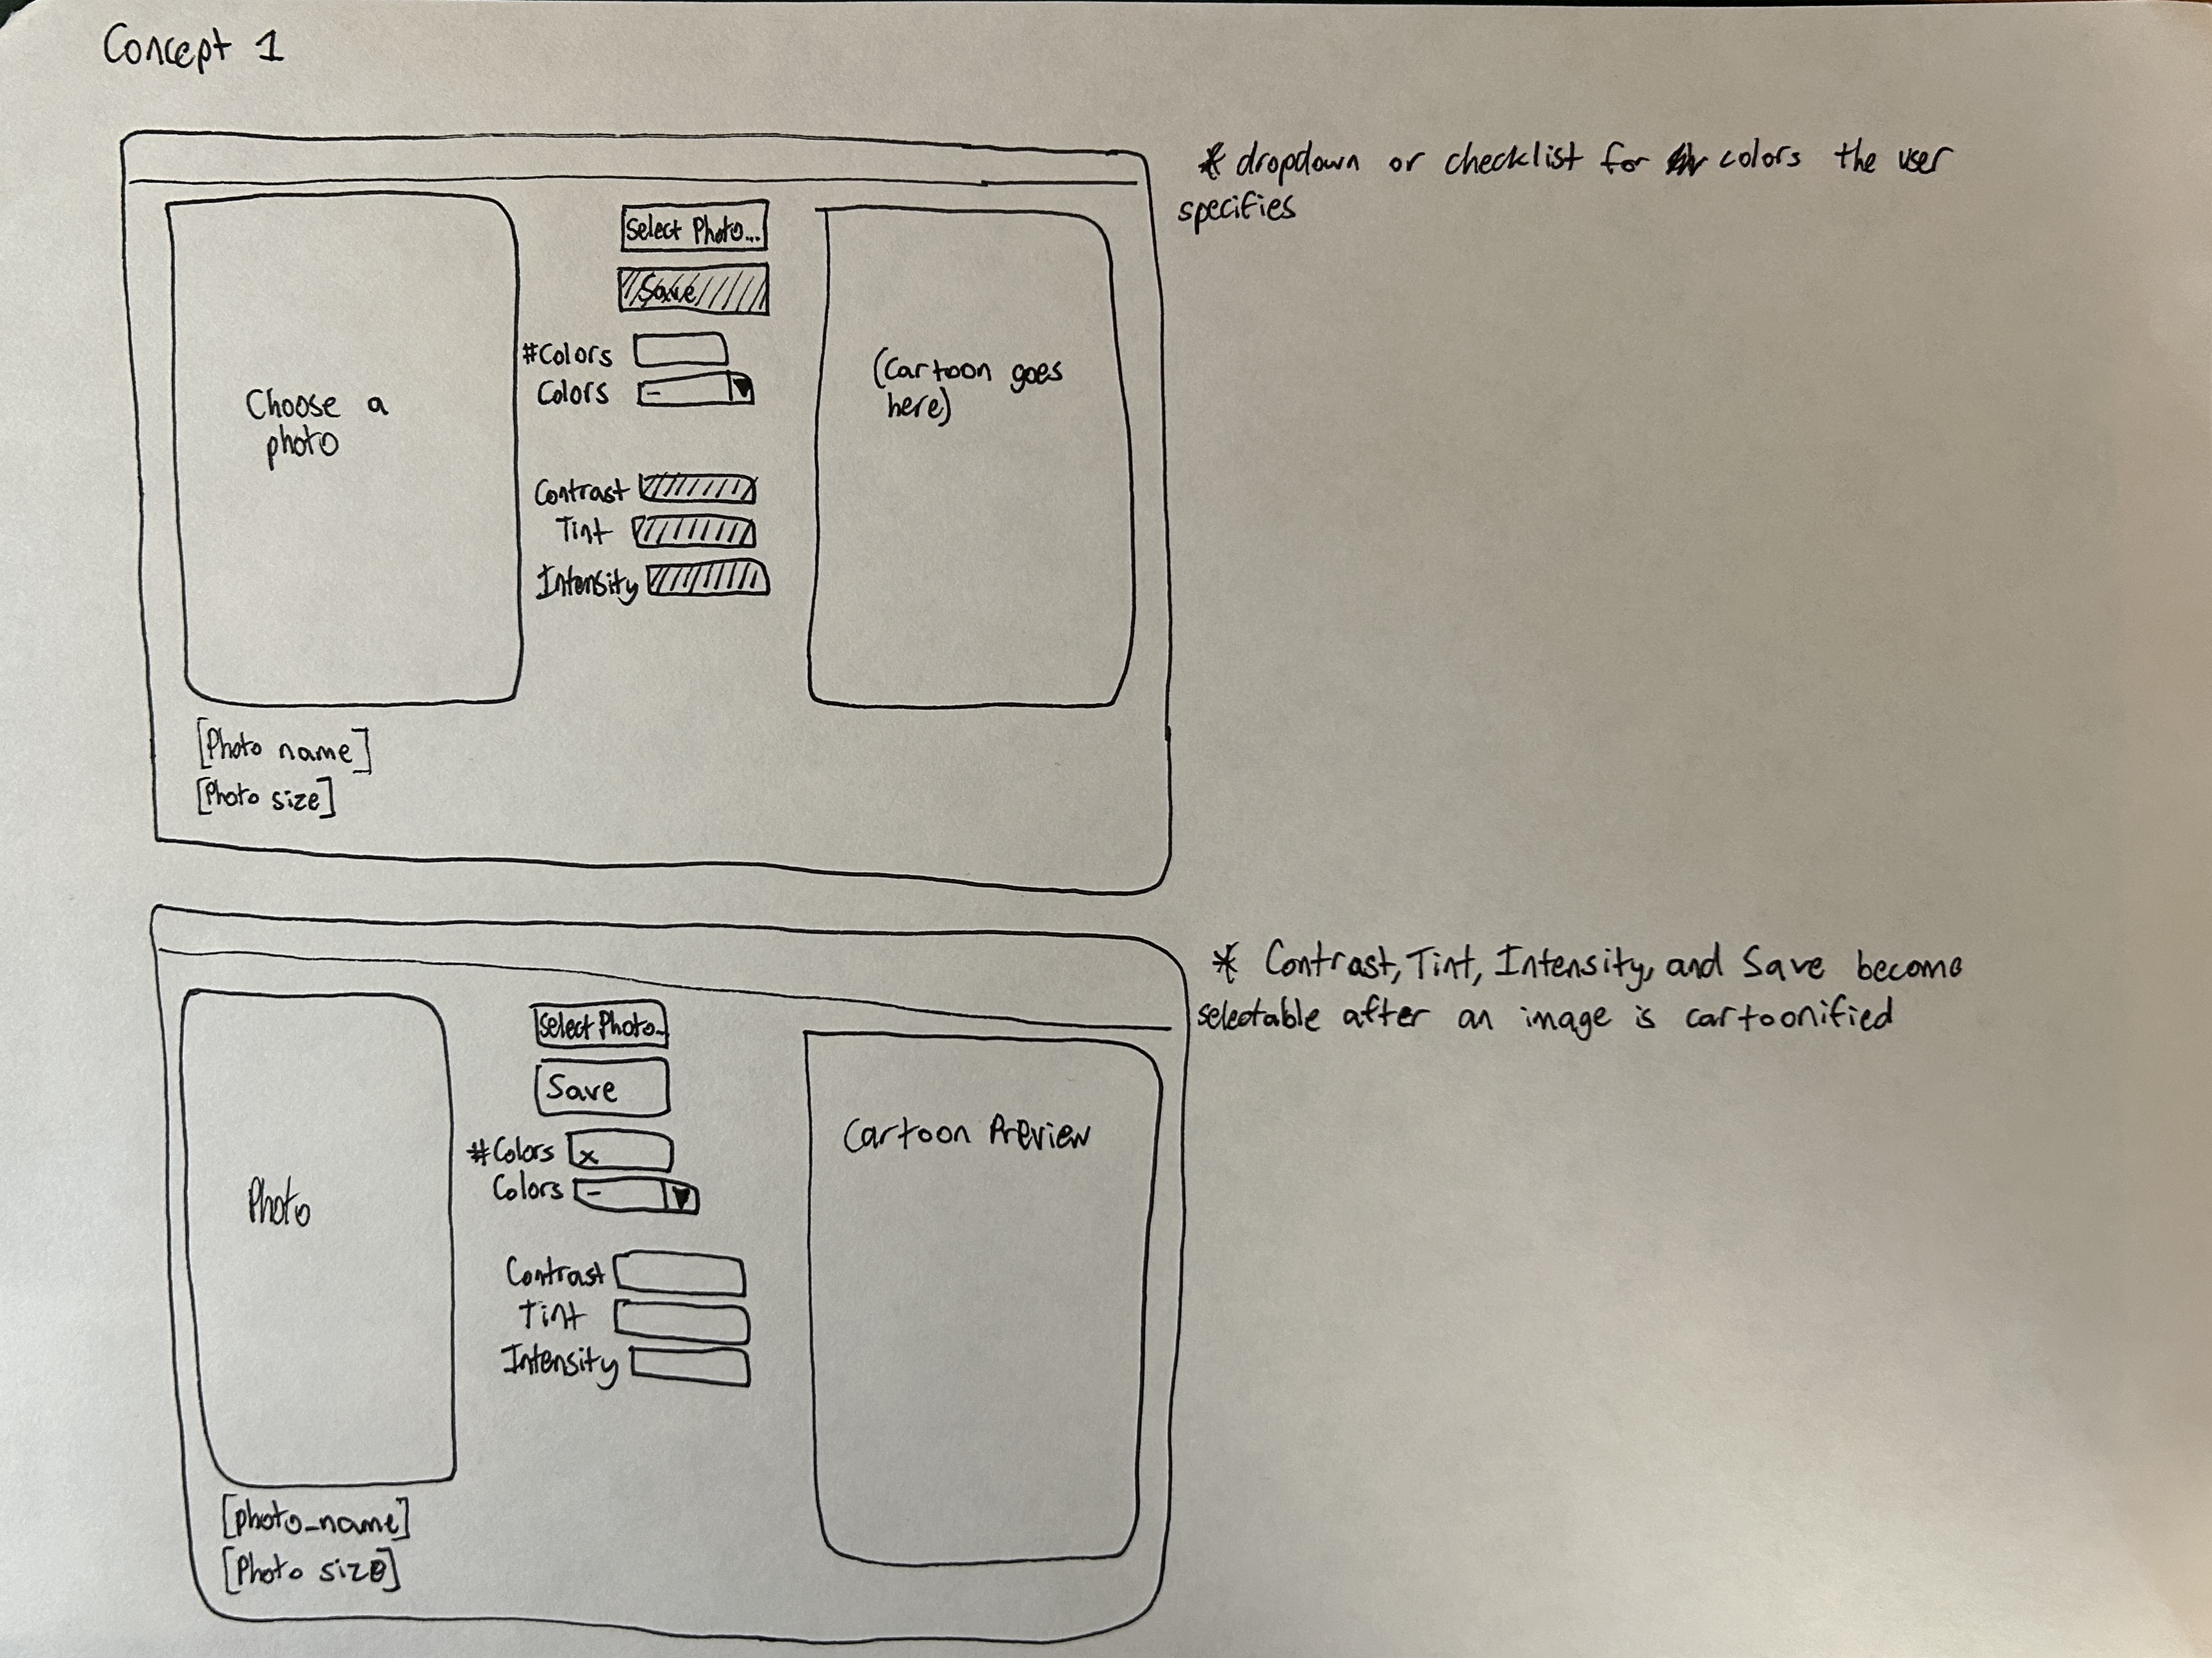
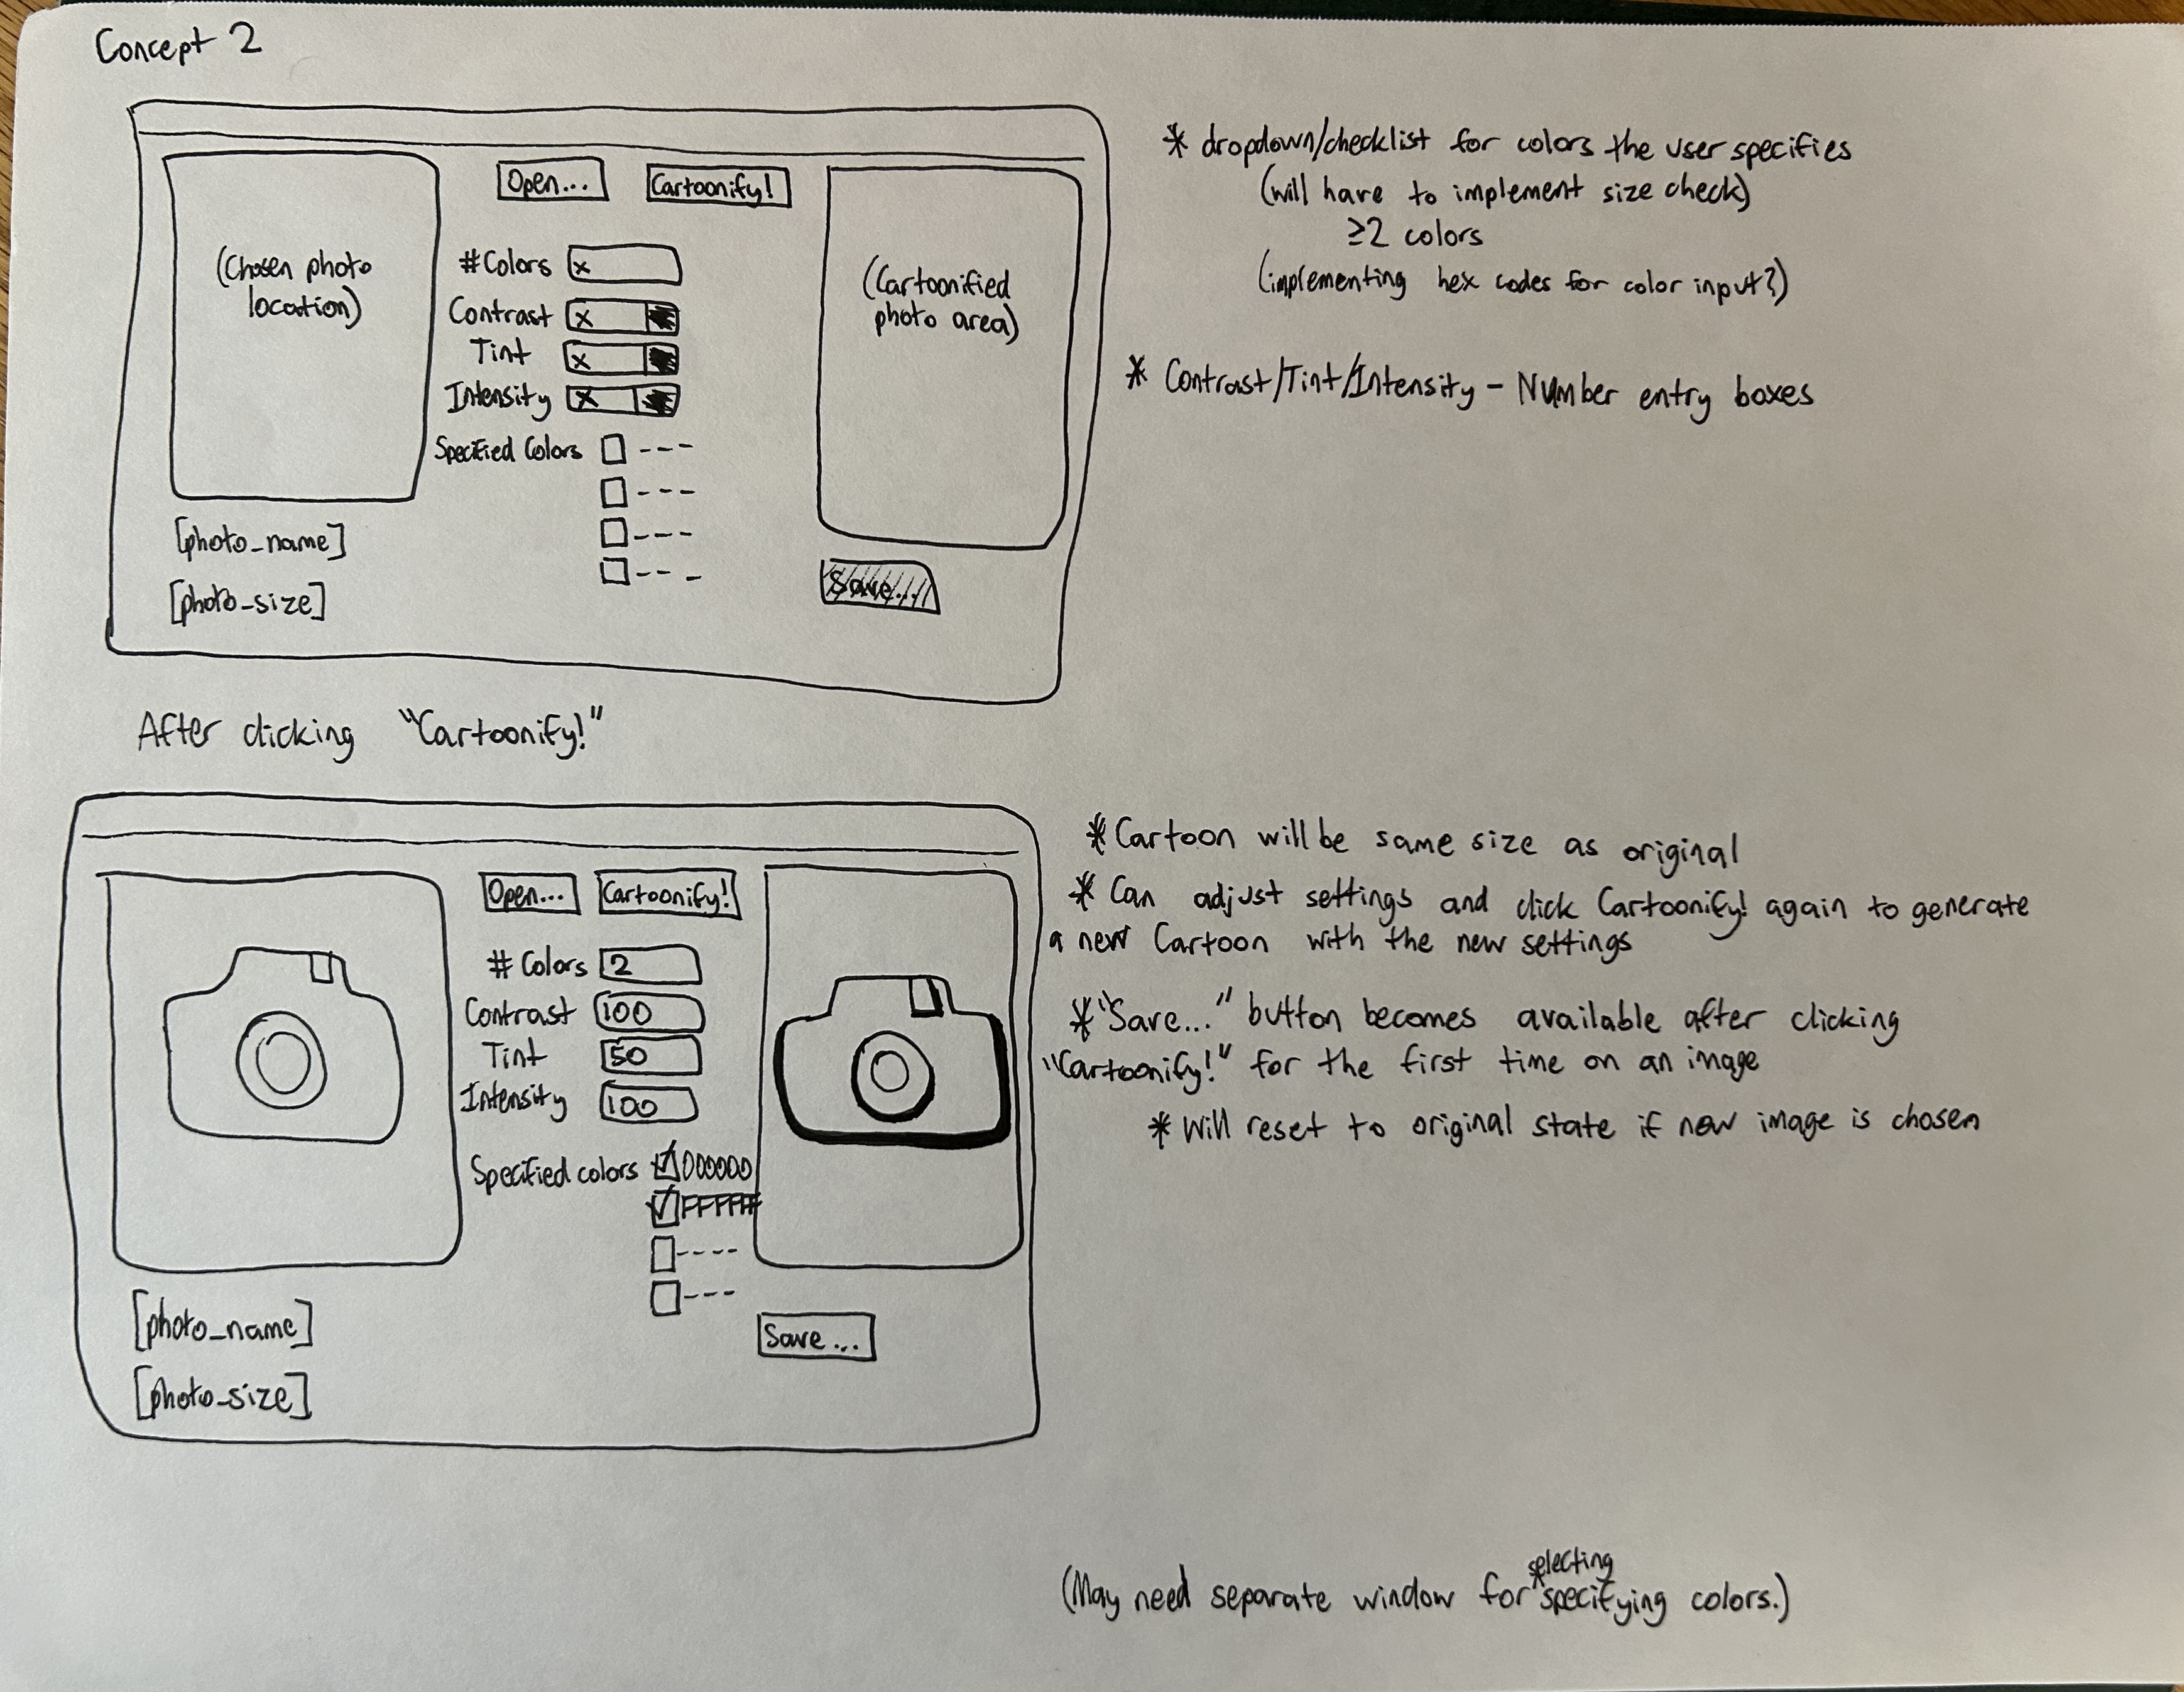
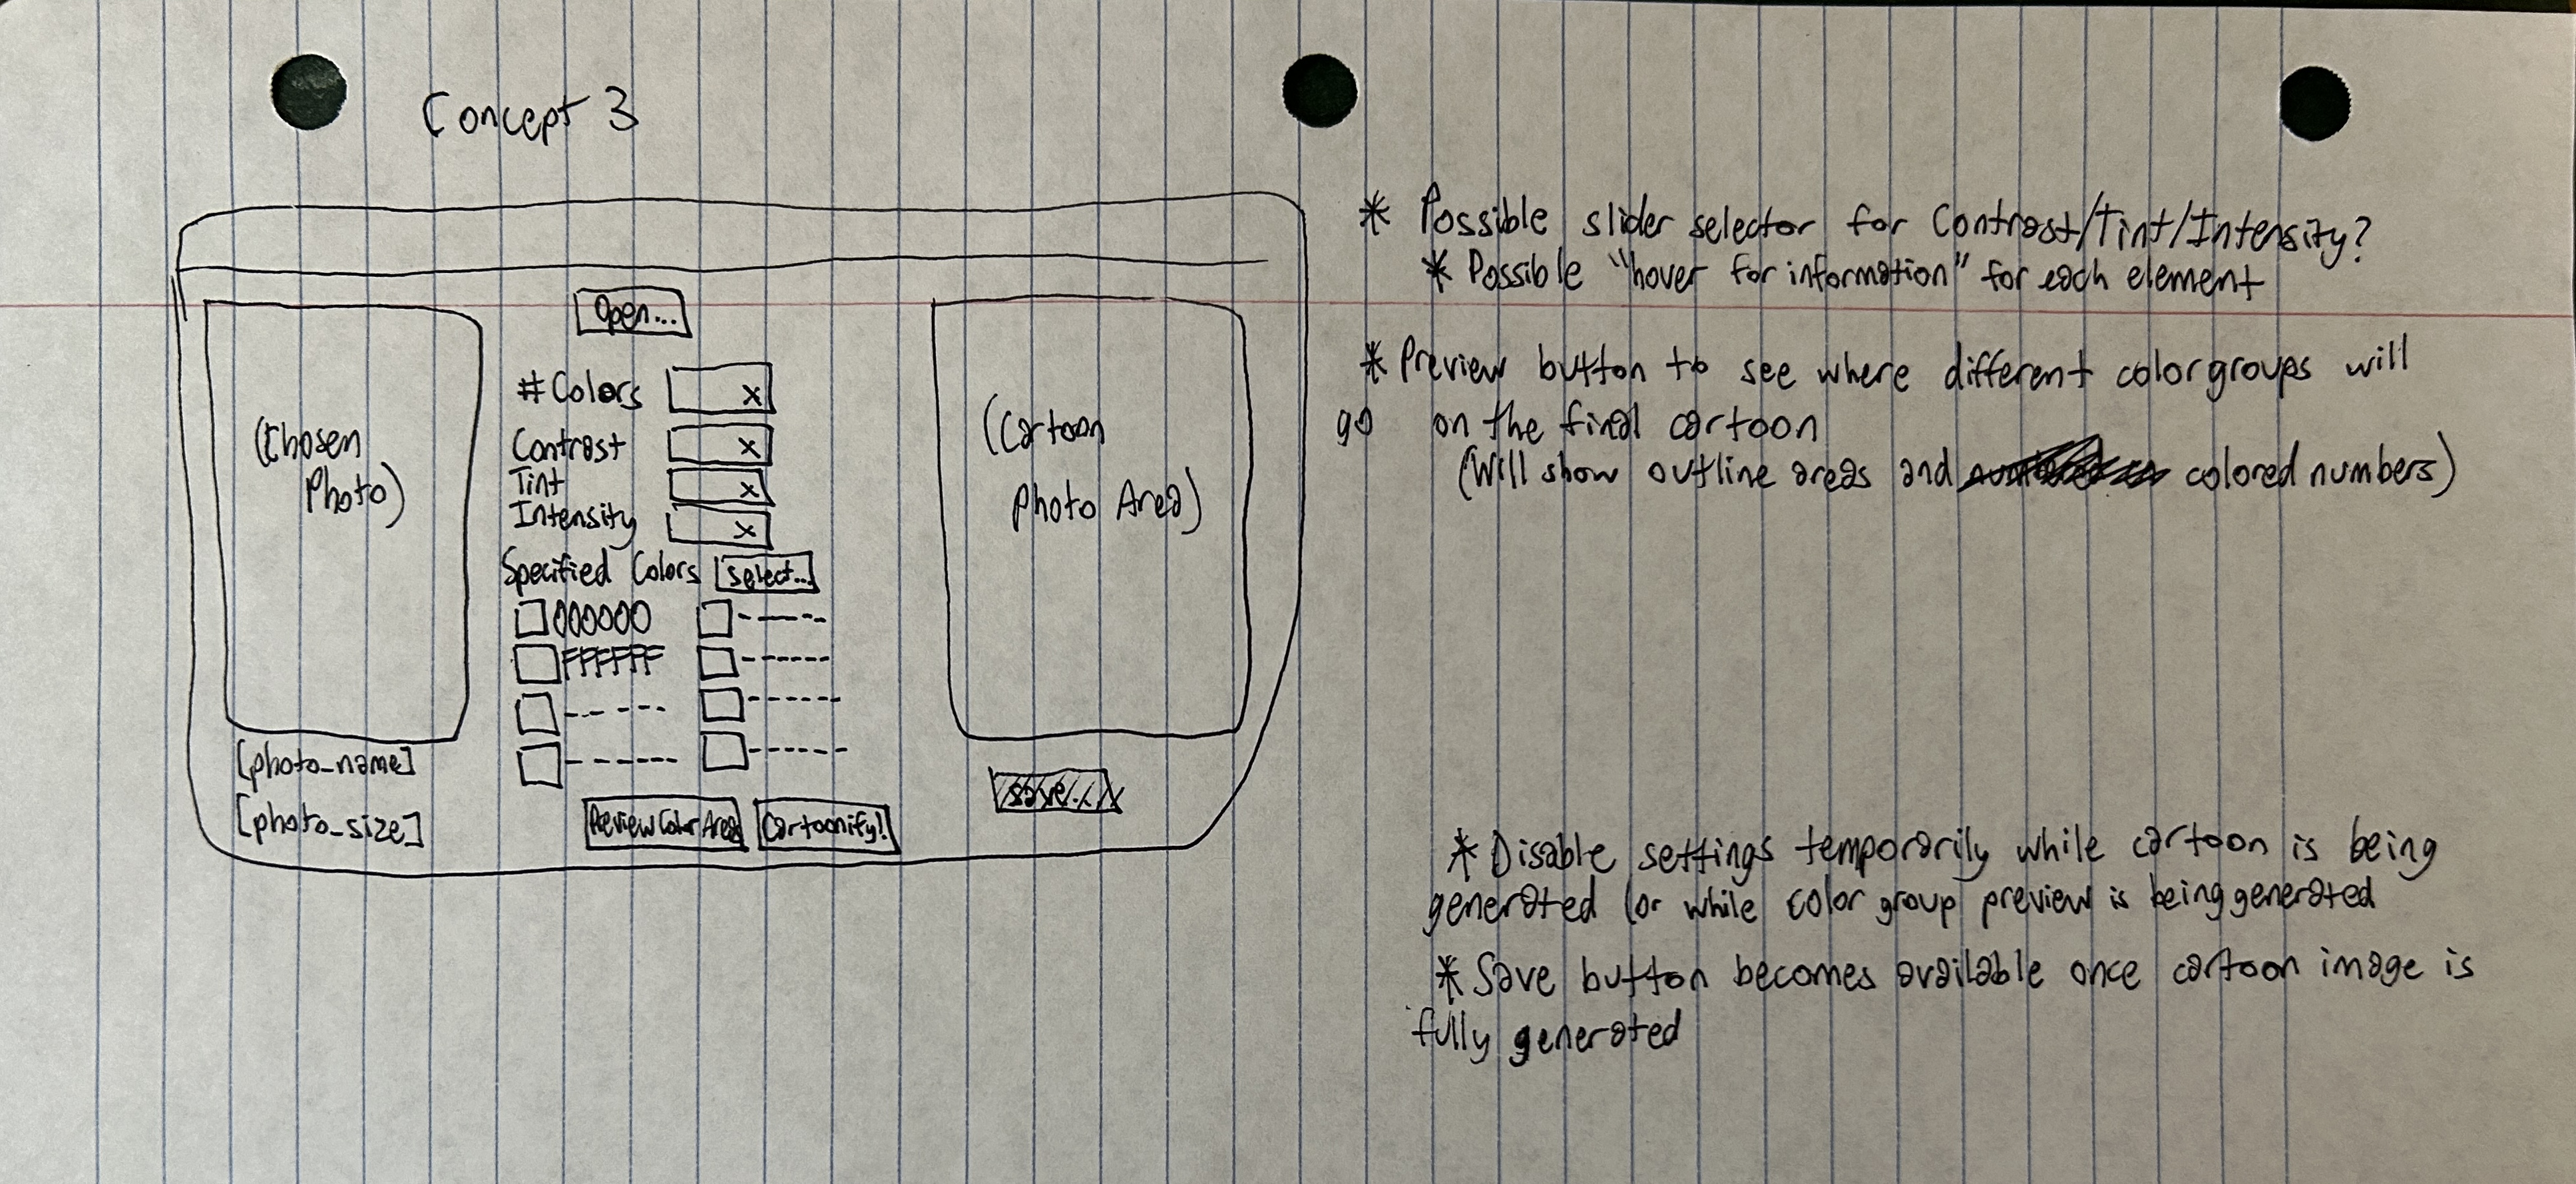
Below is the current prototype of the UI design, based on Concept #3.