5/8/25
Demo day went really well! I got my last feature with the images showing up in the Vision to work late on Thursday
night, which was huge. It was more of a proof of concept than anything, but it was cool to show during the presentation.
This week I've been taking some time off, which has been strange because I've pretty much been working on and
thinking about my project 24/7 for 3 months. I will have my defense today, and probably complete some sort of
documentation manual for my project. I get to continue my project this fall, which I'm happy about. Otherwise,
this is my last blog post so thanks for reading!
Week 12: Finish line (not really)
5/2/25
I will be continuing this project as an independent study next semester, so it's not really the end for me.
Which is good because I think it's an awesome project!! This week I ran into a ton of issues when I was trying
to get my voxels read in and displayed in Swift. We think that it's just too many entity objects for Swift to
handle at once. My program killed itself at about 100,000 voxels. Currently I am working on getting simple planes
loaded into Swift with the DICOM images as .jpgs pasted on their faces. Hopefully with this I will be able to
have a sequence of images loaded in with their face data displayed and be able to transparency them out one at
a time as the user slices through. Otherwise the majority of my capstone time this week has been polishing my
presentation and working out how to display someone using the app on the VisionPro in real time for demo day.
Week 11: Fires
4/25/25
We keep using the metaphors of putting out capstone fires this week, and I'm feeling that with my project. I
sat down with Dr. Meyer and we were able to fix the VisionPro so that I can actually upload the code for my
apps, which is a relief. I've been having issues with getting the DCMTK library installed for Visual Studio,
which contains functions that allow me to read in DICOM image data. That is still a work in progress, but
thankfully Dr. Meyer has a Python script that does the same thing, so I can at least obtain the data to move
forward. Reading it in myself is going to have to wait. Last weekend I modified my Swift program that displays
voxel data so that it reads into a 3D array instead of a normal array. It took a while, but it will be worth
it when I run the program with a number of voxels several times bigger than the number I've been using. That
way, when the user slices through the object, the program will only access the plane of voxels in the 3D array
that need to be changed as opposed to accessing every single voxel in the model individually. My other focus
this week has been getting a start on developing my slideshow for demo day and figuring out how the presentation
will be organized, because my project has taken a few turns throughout the semester.
Week 10: Going bigger
4/17/25
The user can now slice through cubes made of voxels in the VisionPro (only from their x, y, and z orientations),
which looks really cool. I have been running into some problems when I try to get the project loaded onto the
VR, which is not ideal because I can't see how they look on anything besides my simulator. We will hopefully
get that figured out before demo day. As of Tuesday this week, I have been tasked with getting an entire MRI
image displayed in Swift, where each voxel corresponds to a pixel on the original image. Since I have voxels
displaying currently in cube formations, I have a better understanding of the coordinate system that VisionOS
uses to render 3D models. I am looking into C++ libraries to help me read in DICOM-format MRI images to output
to a readable file by Swift. Then I will work on actually accomplishing this. If I can get one MRI image into
Swift, it wouldn't be hard to get another, and then a whole sequence of images at once.
Week 9: Voxels in space
4/11/25
This week I built a C++ program to calculate what the density of each voxel should be based on a series of test
cases (see below), as well as a Swift program to read in the voxel data and output it as 3D cubes in space. I
have it outputting the cubes at their x, y, z coordinates and the color of each cube is the grayscale version
of the calculated density value (so r, g, b are all the same amount). Then the program determines how big the
voxels should be to create a larger cube of the same size each time. I have yet to test it on the VR, but will
be doing that soon. I am also working on being able to "transparency out" the black voxels that wouldn't be a part
of any surface in the MRI, in order to see the shape of the lighter voxels better. This is just a rough sample of
what might be done with a real MRI to interpolate voxel densities between each of the pictures! The scale would be
much larger than what I'm doing now, since each cube would be 14x14x14 voxels and there would be tons of cubes.
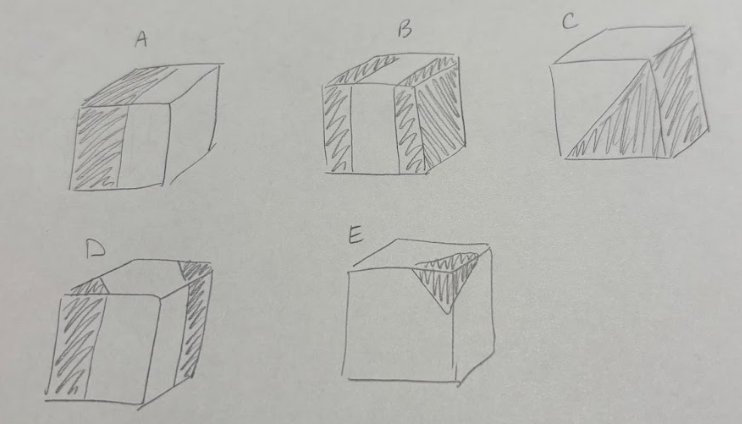
Week 8: Preschool throwback!
4/4/25
I say preschool throwback this week because the majority of my capstone time was spent playing with my blocks.
Dr. Meyer reached out to a physics professor to 3D print several oblique pyramids for me to use, and I've been
playing around with test cases all week. My original vision was to have all the pyramids orientated the same way
on one image, and fill in from one corner to the other, but that doesn't seem like it would yield the most
accurate result. I know this because I had a test case where I had all the pyramids orientated one way,
filled in the space, then did the same with the pyramids orientated 180 degrees and filling in the space
from the opposite corner, and the resulting color pattern was completely different. That was when I started
trying to fill in the middle from all corners at once to try and get the most accurate result possible (and
when I say accurate, I mean the result that matches what I think should fill the cube based on my test cases,
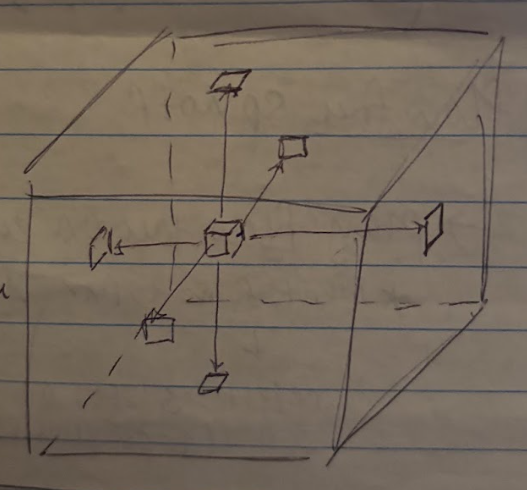
since there is no "right answer" to refer to). I'm working on that, and then I had another idea that may or may
not work but I'm going to find out. The basic idea is to take any voxel in the middle of the empty cube and
take a weighted average of the pixels directly facing the voxel on each of the cube faces (see my illustration
below). The weight would be based on how close the voxel is to each face. I am working on a program in C++ to
calculate this data for an NxNxN cube and will compare it to test cases. Then I plan on getting my results loaded
into SwiftUI for visualization on the VR headset!
Week 7: Marching cubes exploration
3/28/25
From last week, I had a couple of options on how to move forward with my project. I thought about it a lot and
ended up choosing to explore how I might fill in a 3D cube only knowing what the faces look like. Since the 3
sequences of MRI images are taken at 3 predetermined angles and the images in each sequence have space between
them, then when you put the sequences on top of each other it forms a 3D grid with hollow centers. The problem
is to figure out how to fill in the center of each cube using the pixel data provided by its faces.
There is an algorithm called Marching Cubes (Lorenson & Cline 1987) that only requires one sequence of images to
construct a surface between each image, but the main problem with Marching Cubes is that it only assumes that
there's one surface present when in an MRI, there are several different structures in play. I have some ideas
about how to modify Marching Cubes so that several surfaces are created, and have started developing some small
test cases where I can test any algorithm that I make. I will also be looking for ways of visualizing cubes in
code so that I can easily communicate results.
Week 6: Pivoting?
3/14/25
In an effort to make my 3D MRIs look more like MRIs, I worked on getting Slicer to output more detailed models.
Slicer supports objects called volumes that look promising, but unfortunately they did not import into my code
well. I pivoted to working on getting a color selection feature going, which would allow users to color certain
structures of the model at runtime. There was a weird bug with that which I'm currently working on, but I hope
to get it working soon. The potential solution I have is to limit the color selection to a few preloaded colors
instead of any color of the rainbow that needs to be calculated at runtime.
On another note, I may have a little bit of change in direction going forward. This week, we found out that the
Slicer software that I've been using to render 3D models isn't actually combining all 3 MRI orientations into one
composite model like I thought. Instead, it uses just one sequence of images to create the 3D object, which isn't
the goal of the project. I have some options on how to move forward, and will need to select one as soon as possible.
Some include sticking with what I'm doing right now and working to get my UI as clean as possible specific to one
model in particular, but that wouldn't allow users to input any MRI data they want. Another option would be to
delve into how to combine 3 sequences of images into a 3D model, essentially more of a research project that
wouldn't necessarily produce anything that I can use in my code. More updates as I decide!
Week 5: UI design and model quality
3/7/25
This week, I spent a lot of time fixing UI bugs and working on scaling the 3D models so
that they're all the same size in the application. Depending on the size of the .stl file
that is exported from Slicer, the resulting 3D models are different sizes and that makes
it hard to create one program that displays all files in the same way. I was noticing that
some of the larger models would exceed the edges of their invisible bounding box by default,
whereas some fit just fine. This was a problem because while the gestures and everything
still worked, the model would come in already "sliced" and that's not what I wanted. I
had to do some work to scale the model as it comes into the program no matter what the
original size is in order to fit in the bounding box. Other UI decisions included a
collapsible navigation menu on the side that doesn't clutter the 3D VR space too much,
as well as a list of buttons that can toggle each structure to be transparent/opaque
individually. The goal there was to provide users with as much control over their model
viewing experience as possible. Next, I will be focusing on trying to get better quality
3D models from Slicer. Currently, we think that there's some downsampling happening
because the models aren't as high resolution as the raw MRI data. I will be playing
with Slicer a little bit to see if I can create models that slice in a cleaner way in
the app, and that are more detailed. The potential time cost of generating higher resolution
models for a better/more detailed viewing experience is worth it.
Week 4: Manipulating space
2/28/25
Being able to get my app working on the actual vision pro device has been really
helpful. I've been able to use what I see on the headset as feedback for improving
the design of my interface. For example, one of the Apple vision pro features is
being able to look at a button and pinch your fingers to click it, and in the app
my buttons were too close together for the device to register which one I was
looking at. This isn't something that I would have been able to know just by using
the simulator, so now I’m able to fix those kinds of bugs as I go. In my last post
I described how I needed to rework my objects to be Entity objects instead of
model3D objects, and this week I was able to get user gestures working for Entities.
I am now caught up to where I was when I was working with model3Ds, which is nice.
I created a custom user gesture for slicing away parts of the model to see the
inside, which I'm still trying to debug. Another thing that I've been working on
is trying to fill in the interior of some of the models. When I create a "segment"
(as it's called in Slicer), I've been using a threshold value to decide which
pixels to use in the 3D model. This week, I tried to create two thresholds that
were opposite each other so that all surface area of the MRI image is used but
there were two different colors. This didn't look very good in 3D, unfortunately,
so I'm trying to find a way forward. Otherwise, I am working on some of the other
user experience bugs that emerged as a result of seeing my app in the vision pro.
Week 3: Revising the plan...
2/21/25
I got slicing to work shortly after my last blog post, so that the 3D model layers
look like they're being peeled away from the front as the user moves the slider bar!
The next feature I wanted to implement was "highlighting structures". This means
that the user should be able to press a button and make the majority of the model
transparent except for a few key structures, which look like they're being
highlighted because they're still opaque. However, I was using SwiftUI objects
called model3Ds to render the MRIs, which treat the model as one object whose
physical properties cannot be changed at runtime. I did some more research and
found that SwiftUI also supports objects called entities, which can contain
subentities and their properties (Swift calls them "components") can be altered
at runtime. This means that, for example, I can create a knee MRI entity which
contains subentities of the bone, meniscus, and any other structures inside the
knee. Then I can alter the opacity component of any given subentity at runtime!
Which is exactly what I did this week. However, this also means that I had to go
back and change all the code I already wrote to convert anything that has to do
with a model3D object to code that does the same thing to an entity object. I'm
still in the process of doing that, but I will hopefully get everything working
by next week. One last update- yesterday I got to transfer my code to the vision
pro for the first time! It was really exciting to see my models in VR. It gave
me a little boost of confidence.
Week 2: My rotating head
2/14/25
This week, I focused on learning the Swift language as much as I can. Swift
was created by Apple for the purpose of developing IOS apps. I spent some
time doing Apple's developer tutorials and creating a first prototype for my
application, which now includes a navigation bar and MRI preview window, as
well as a way to view each 3D model individually. I'm still using the sample
MRI head data that I got off 3D Slicer (see last week) and I was able to get
the head into my application! Xcode supports a visionOS simulator app where you
can load in Swift code and it will simulate using the Vision Pro device, instead
of having to get out the Vision Pro every time you want to test your code. I
started adding some user gestures to rotate and zoom in on the model. I haven't
yet tried it with the actual headset, but hopefully soon I'll get to do that.
Currently I'm trying to figure out how to best "slice" the model in a user-friendly
fashion so that you can see the interior of the head. I worked on a slider bar
where more of the interior is sliced away as the slider moves to the right, but
it's not fully functional as of now.
Weeks 0-1: Research
2/7/25
The majority of what I've been doing so far is research into how SwiftUI works, which software applications I can use for
creating 3D models, and how to make 3D content interactive in the Apple Vision Pro device. I have a rough mental image of
what I want the user to see and be able to do, and I've been keeping that in mind as I read documentation of different features
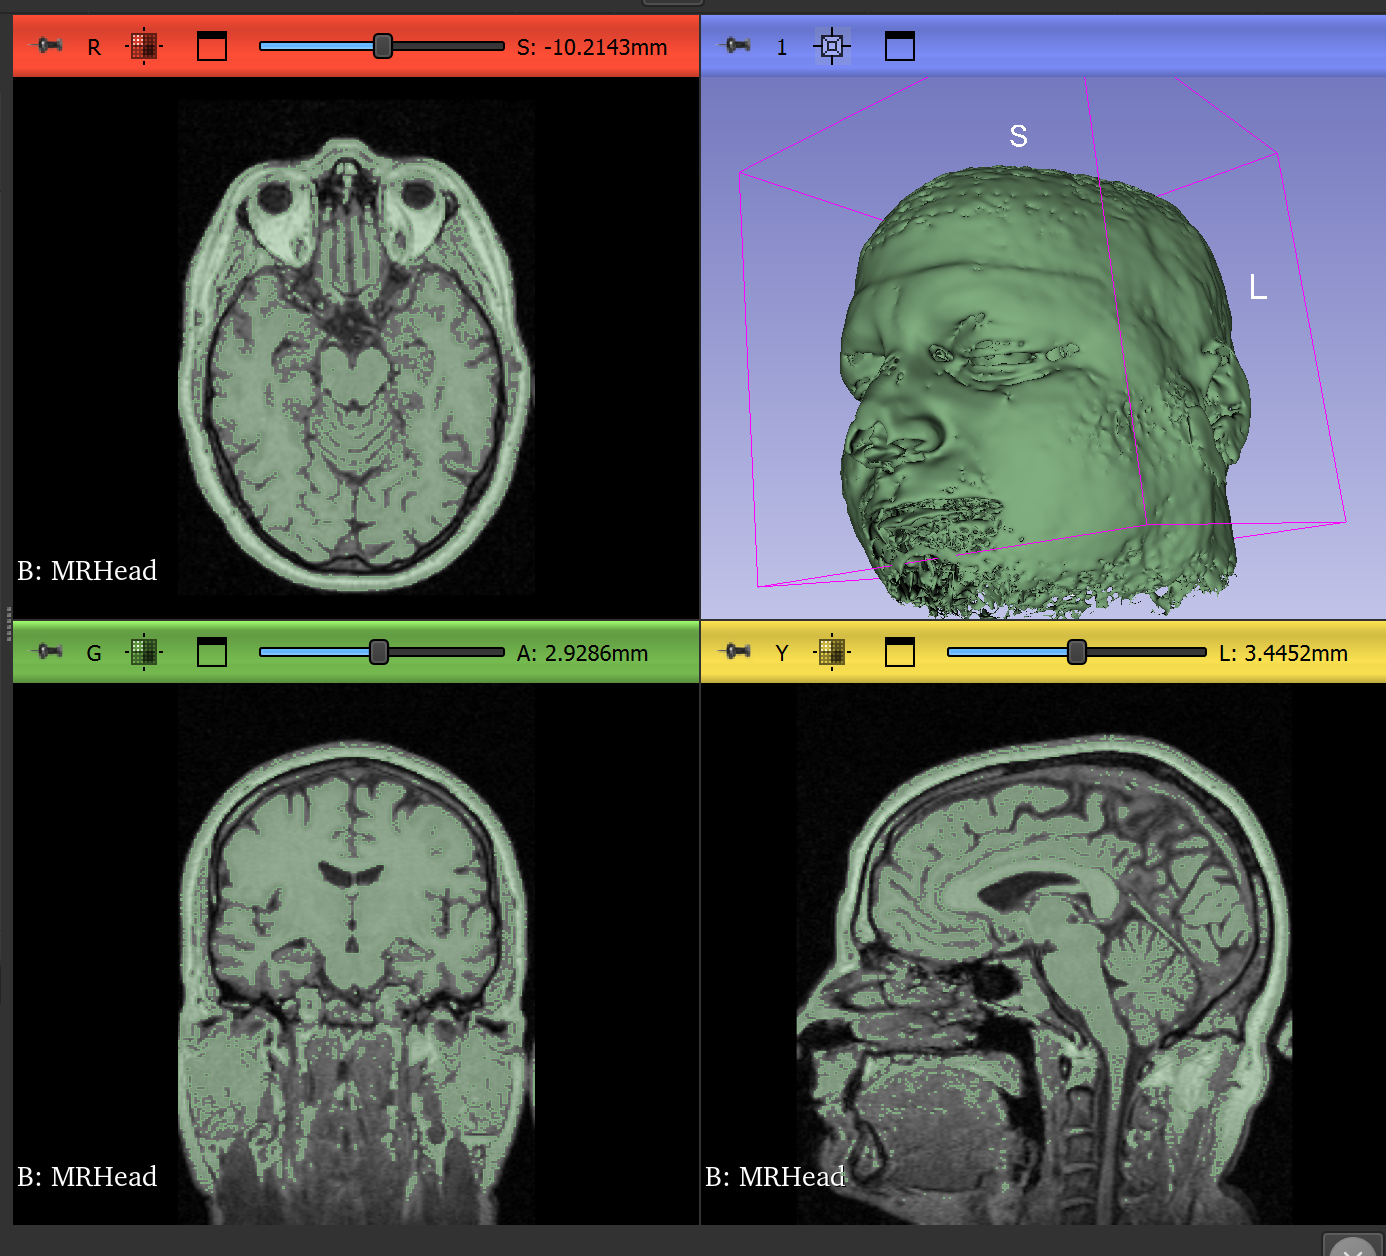
available to me in VisionOS. I found a software called 3D Slicer that I think looks promising. It allows me to import
sequences of MRI images at different angles, and create a 3D object out of those sequences (see image). The software has
a segmentation tool that allows you to use different methods, such as thresholding or manually painting, to determine which
pixels of the MRIs to use in the 3D model. This may be useful for isolating structures of the model in the future if other
methods fail, since it requires more manual work ahead of time to prep the scans. I was successfully able to import a sample
3D model into SwiftUI and get it to show up in an Apple Vision simulator, but I'm not yet able to get user interactions
(rotate, zoom, etc) to work on it.
Slicer's sample MRI data in 3D