Automatic Multi-touch Software System - rp-mt-scripts
Download and install it! - Visit the rp-mt-scripts project page on GitHub for history, bugs, etc.
Download the Quick Guides and User Manual book for Desk #1 for illustrated basic end-user instructions.
The rp-mt-scripts package is a software system that enables straightforward installation and use of the standard multi-touch software on Ubuntu Linux. The scripts are tuned for the recently-released Ubuntu 9.04, though they might work on earlier versions. (They seem to at least partially work on Ubuntu 8.10.) On all derivatives of Ubuntu and Debian, the software will attempt to install the distribution packages needed as well as the non-packaged software that this system was written to manage. If you aren't using Ubuntu, it will let you know what packages it is attempting to install, and if it can't find apt-get or aptitude, it will just display package names so you can manually install those using your distribution's package manager. This means that the scripts are portable across a wide variety of Linux distributions!
General features:
- Fully self-contained multi-touch system: When you download the system, it unzips into its own directory with subdirectories. All software is installed entirely within the system, with the exception of PyMT (a standard Debian/Ubuntu package is built and installed so that the libraries can be used by your own PyMT-based programs, and removed with a simple "sudo aptitude remove pymt") and a workaround for tbeta which defaults to a local install but can optionally be installed system-wide.
- Automatic installation: Download (either from git version control or a tar.gz file), extract to its own directory, and run ./configure to start the process. You'll be given the option to automatically proceed to a standard default install. All you have to enter is the word "install" to confirm you want to start the install, and your password once. You can walk away, get a cup of coffee, and when you come back you have a fully-functional multi-touch system set up. Or, you can install just individual pieces: the automatic full installer just calls the parts installers in the proper order.
- Graphical Interface: A tab-based interface to the scripts has been provided for your ease of use - it lets you run all of the same script you would in a terminal environment, but without needing to remember or enter commands.
- Launcher scripts: If it can install it, it can launch it: the entire mt system is run by a directory of scripts, named sensibly, to let you run whichever programs you like without digging around. Most launcher scripts are brainy in one way or another, with the goal that you just double-click/run the script for the software package you'd like to run, and all the behind-the-scenes steps are taken care of.
- GUI and terminal compatible: These are terminal scripts, but you can double-click them and choose "Run in Terminal." For those whose output you might be interested in, the script will pause for 10 seconds before exiting (and closing the window), letting you take a peek.
- Camera control: For those of you with a Logitech QuickCam Pro 4000 like mine, or other webcams using the pwc module (Phillips web cam), a script based on setpwc is included to prepare the camera for multi-touch before launching tbeta. It automatically detects the /dev/video* device file to use based on your system's log. The launcher script for tbeta always runs this first. In the future, it would be nice to detect the current camera, and call a script based on the camera, but I only have one and only need to use one right now.
- Logging: Each install or update script has logging turned on, which places a date-ordered file in an internal logs directory, so you can see what was done and when. The run scripts also have logging commands, but they can be turned on or off by commenting/uncommenting a line at the top of the file. In some cases, errors force a log disable override: if your run script normally has logging disabled because it normally works, but something goes wrong, for instance. These logs are useful in remembering what has been done to this particular 'enclosed system' of MT tech, as well as in troubleshooting.
Third-party software
The rp-mt-scripts system makes it simple to install and run the following software.
- tbeta v1.1
- Install script: Downloads, installs locally, and creates symlinks allowing it to run on newer Ubuntu versions (it seems to be built for Hardy 8.04 - the workaround fixes "libPoco" errors, either locally or systemwide). Also installs all dependencies needed from the Ubuntu repositories using the standard package tool. If you already have the .tar.gz downloaded, placing it in the downloads directory of the script system will use it instead of a new download. Planned features include replacing bundled libraries with system-wide updated ones, and making sure that all required dependencies are installed by the script.
- Launcher script: Before running tbeta, it will run a set_camera_parameters script (currently designed for setpwc and a QuickCam Pro 4000) to set framerate, size, and other features. Can also can startup/shutdown the FLOSC Java-based gateway to allow Flash multi-touch apps to receive TUIO/OSC data from tbeta. In case of a tbeta crash, it will re-launch automatically after a timeout to permit the user to exit. (Normal exits are recognized and not relaunched.) This script generically launches any version of tbeta that has the same basic structure, and has extra flexibility in launch locations for tbeta.
- Adobe Flash Player Standalone
- Install script: downloads (based on download page, always the latest version!) and installs the player locally from the Linux Flash dev tools. If you already have the .tar.gz, placing it in the downloads directory of the script system will use it instead of a new download.
- Launcher script: By default will launch the FLOSC gateway before the Flash standalone player and shut it down after, and allows startup of the player with or without a flash file specified on the command line. Player is started with the tbeta demos directory as the current directory, and thus the default for File:Open.
- PyMT
- Version control based: This software is very new and constantly evolving, so the scripts are set up to work with the very latest development version, while saving packages of older versions to fall back on if you find temporary unreliability.
- Install script: Checks out the latest trunk PyMT from SVN, builds and installs a Debian package (using checkinstall) containing the modules required to let you write your own PyMT-based software. The version of the package is automatically set to include the SVN revision number and the date and time that it was built.
- Update script: Updates the previous checkout, uninstalls the old PyMT package, and builds and installs a new one, also marked with the revision and date/time
- Run script: Can easily start the examples launcher desktop, or optionally some of the individual demos themselves. Your own PyMT software can be run from anywhere on the system, due to the system-wide package installed.
Overall System Design

Download/view other formats:
Scalable full-page PDF (148 KB) - Inkscape SVG original (24KB)
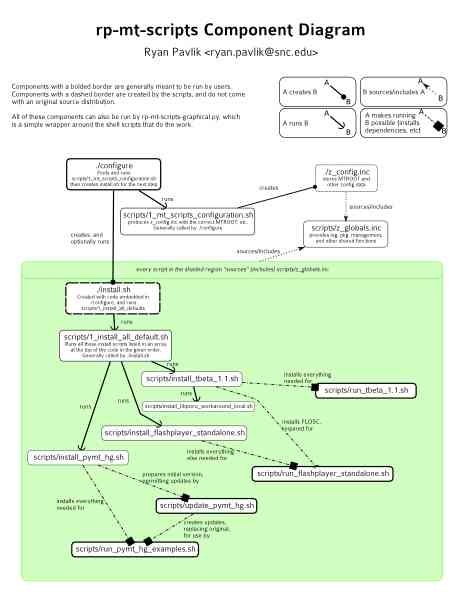
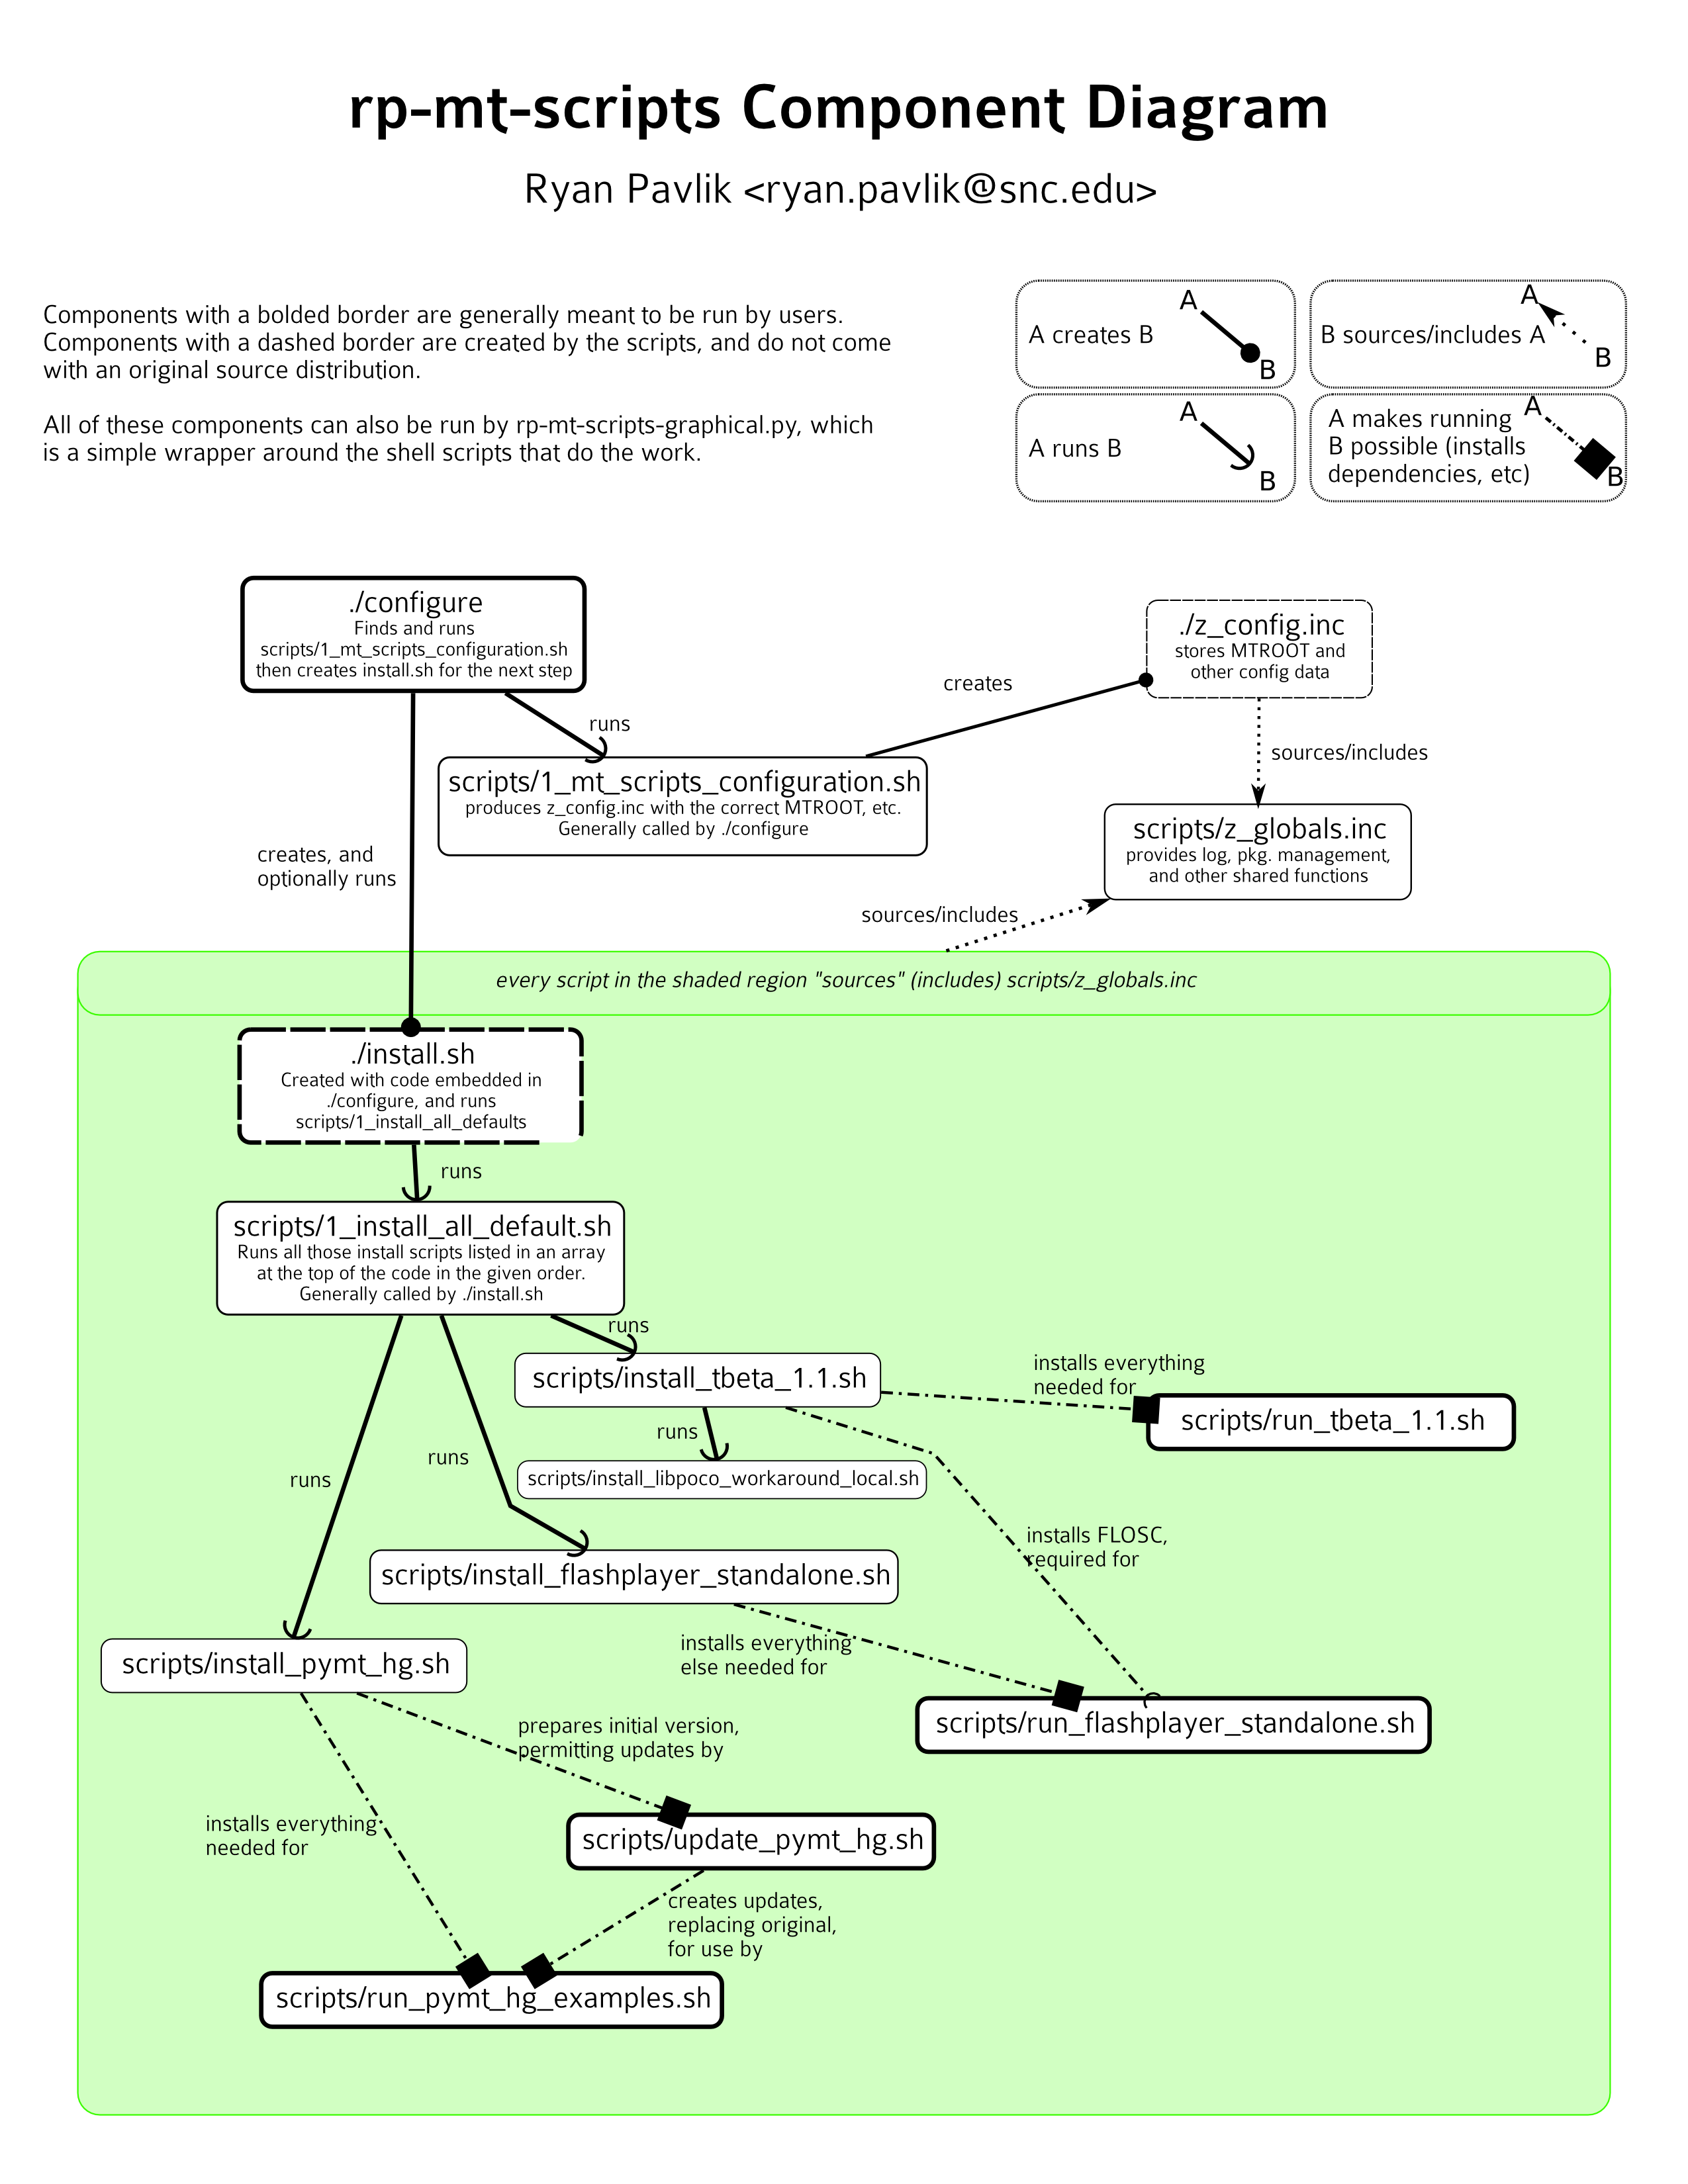
This diagram shows how the rp-mt-scripts are responsible for ensuring a complete, up-to-date software platform is available. In addition to the software shown as installed locally by rp-mt-scripts, all dependencies provided in the Ubuntu repositories that is required for these applications is also installed automatically by rp-mt-scripts.
Component Diagram for rp-mt-scripts
The images below link to a scalable PDF (Adobe Acrobat) document of the diagram for on-screen viewing or printing. You can also view a high-resolution bitmap graphic export ("PNG") or download the original SVG (scalable vector graphics) version: free software Inkscape and the font package "Colaborate" (sic) recommended.
Download/view full-size (8.5"x11"):
Scalable PDF (204 KB) - PNG bitmap image (788 KB) - Inkscape SVG original (64 KB)
This diagram shows how each of the script files interacts and how they depend on each other or enable each other. While the availability of the GUI wrapper makes it less important to know, the diagram also shows which scripts are generally run by an end-user.
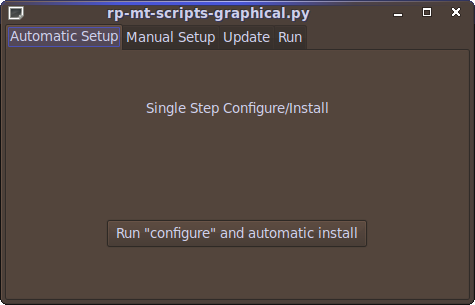
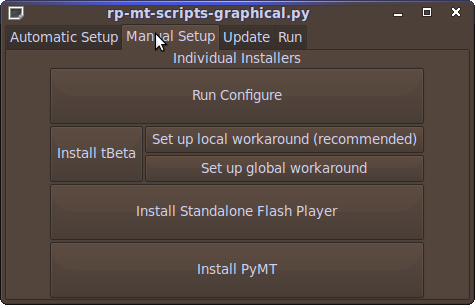
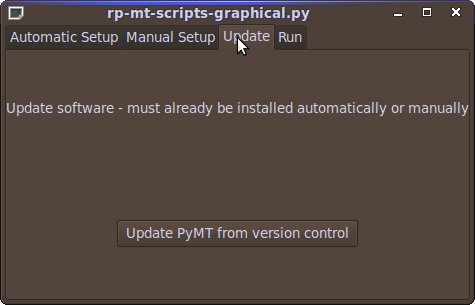
Screenshots of the Graphical Wrapper
There's nothing you can do here that you can't do from the command line, but some people are more comfortable in a graphical interface, and that's OK!
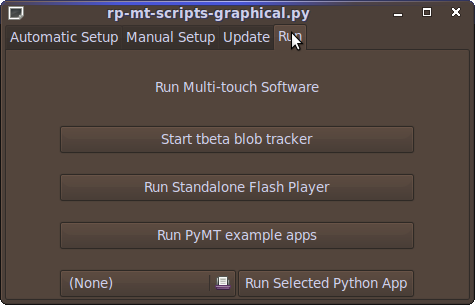
Tabs: Automatic Setup - Manual Setup - Update - Run
Install Instructions
You have two options: either download a "live" copy from version control, so you can always painlessly upgrade (recommended), or get a one-time version with no history by download a zipped (tar.gz) file. I'd recommend the live version control option - they're both just about as easy, but that one lets me fix bugs and get those fixes to you.
Downloads with revision history (accessible with "git" software): Release Versions on SNC servers - Latest snapshot on GitHub (see below for instructions)
Minimal downloads (without history): Release Versions on SNC servers - Latest snapshot on GitHub .tar.gz (for installation and use) .zip for source viewing by Windows/Mac users
Version Control (Live/Git) method - recommended
A video of this method is available! It will open in a new tab or window. Note that now with the GUI you can run the configure and install step from rp-mt-scripts-graphical.py!
- If you don't have git installed already on your computer (or aren't sure), do this in a terminal:
sudo aptitude install git-core
sudo aptitude install giggle
- Change to the directory under which you want your system, and run the download: (so cd ~ to get ~/rp-mt-scripts/ as the root of the mt system)
       			cd ~

git clone git://github.com/rpavlik/rp-mt-scripts.git - NEW: Try the graphical interface to the scripts by double-clicking "rp-mt-scripts-graphical.py" and using it to run the same basic commands! Otherwise...
Go in to the rp-mt-scripts folder, and run the configure script. If you're doing this graphically, make sure to choose "run in terminal" when it prompts you. If you're doing this in a terminal,
       			cd rp-mt-scripts

       			./configure
- See below for upgrading instructions - you have it easy!
Tarball (Single Version) method
While there's no video available for this version, you can just ignore the first part of the Git Install version video above!
- Download the latest tarball of rp-mt-scripts from GitHub (rpavlik-rp-mt-scripts-something.tar.gz) to your system.
- A zip file is available for Windows users to look at, though it won't do anything, and the scripts won't run on Linux from the zip file.
- Move the file to the directory under which you want your system: (so in ~ to get ~/rp-mt-scripts/ as the root of the mt system.) Unzip the .tar.gz file, either with a graphical tool or the terminal:
tar xvzf rpavlik-rp-mt-scripts-*.tar.gz - Because you chose a downloaded snapshot, the directory has an ugly long name. Pick a nicer one, by renaming in the graphical environment or in a terminal,
mv rpavlik-rp-mt-scripts-[HIT TAB NOW]/rpavlik-rp-mt-scripts-[HIT TAB NOW] rp-mt-scripts - NEW: Try the graphical interface to the scripts by double-clicking "rp-mt-scripts-graphical.py" and using it to run the same basic commands! Otherwise...
Go in to the rp-mt-scripts folder, and run the configure script. If you're doing this graphically, make sure to choose "run in terminal" when it prompts you. This is a quick step, and it will give you the option to install defaults by typing "install" - do this! That will auto-install a "standard" system and leave you good and ready to go! Here's some excerpts from what this looks like in the command line: the bold stuff is stuff you type. Click here for a more detailed log, this is just enough to get you started. These logs are from a slightly older revision of the scripts - don't worry if it doesn't look exactly like this for you.
       			ryan@hardy-vm:~/src/cs460/multitouch/test/rp-mt-scripts$ ./configure

----Configuring (running /home/ryan/src/cs460/multitouch/test/rp-mt-scripts/configure/scripts/1_mt_scripts_configuration.sh)...


Building stack of search locations...


Searching stacked locations for a suitable directory tree...


Multi-touch root path found: /home/ryan/src/cs460/multitouch/test/rp-mt-scripts

Writing configuration file into that tree...

Creating barebones directories needed by other scripts...

All done with 1_mt_scripts_configuration.sh!

-----Configuration apparently successful.  Setting up next stage.

-----Install stage generation complete!

If you ever move the location of this directory tree,

please run scripts/1_mt_scripts_configure.sh in the new location

to update the configuration.


Next step: run ./install.sh for a default install

or run individual install scripts in scripts/ as desired.


Press enter or wait 10 seconds to return to command line, or

type 'install', no quotes, and hit enter to start a default install

install

Starting a default install...

-----------------------------


This script will install all sensible defaults for a full multitouch setup.

It will run these install scripts, in this order:

 - install_flashplayer_standalone.sh

 - install_tbeta_1.1.sh

 - install_libpoco_workaround_local.sh

 - install_pymt_svn.sh


Once the installations start, you should not cancel them.

This is your 'last chance' to cancel.

Type 'yes' and press enter to continue, type anything else

and enter to cancel.


Do you want to continue? yes

  ...
Moving or Upgrading
You should not move any folders around inside the rp-mt-scripts folder. If you move that whole entire folder, you need to reconfigure - just type the bold command into a terminal, or double-click that file in your scripts folder:
  ryan@hardy-vm:~/src/cs460/multitouch/test/rp-mt-scripts$ scripts/1_mt_scripts_configuration.sh


Building stack of search locations...


Searching stacked locations for a suitable directory tree...


Multi-touch root path found: /home/ryan/src/cs460/multitouch/test/rp-mt-scripts

Writing configuration file into that tree...

Creating barebones directories needed by other scripts...

All done with 1_mt_scripts_configuration.sh!
Upgrading is easy if you chose the Git method of installation. Just go into that directory and run the "git pull" command, which will look like this:
ryan@vm:~/rp-mt-scripts$ git pull

remote: Counting objects: 7, done.

remote: Compressing objects: 100% (4/4), done.

remote: Total 4 (delta 3), reused 0 (delta 0)

Unpacking objects: 100% (4/4), done.

From git://github.com/rpavlik/rp-mt-scripts

   7c4c0fb..e742162  master     -> origin/master

Updating 7c4c0fb..e742162

Fast forward

 scripts/1_install_all_default.sh |    8 ++++----

 1 files changed, 4 insertions(+), 4 deletions(-)

ryan@vm:~/rp-mt-scripts$
If you chose the single file method of installation, you'll need to download a new snapshot, unzip it, and copy the files from the new folder into your original folder, overwriting the older files. Data isn't stored in any files that are distributed, so this is safe, just a bit of a bother. You will want to re-configure, as explained above.