Multi-touch Window Navigation - tactus-navigator
Code and Installation Instructions - tactus-navigator Project Page on GitHub (for history, bugs, etc.)
Download the Quick Guides and User Manual book for Desk #1 for illustrated basic end-user instructions.
Jump to: introduction,Interaction Design and Gestures, System Design and Diagrams, Screenshots and Additional Videos
Download video or open in other media player.
Introduction to tactus-navigator
tactus-navigator forms the highest-level piece of the entire hardware-software project. It uses the hardware built based on public design principles with innovations and adaptations where useful.
The multi-touch display is not the only interface, or even the primary interface, for a user of this new hardware-software system. The multi-touch surface embedded in the desk to the left of the keyboard serves as a "navigation display" helping the user to better manage the use of their primary display and more precise input devices. The navigation display shows icons or thumbnails of currently-running windows. The bar at the top corresponds with the primary display and currently-visible windows, while the rest of the area is a canvas for manipulating minimized windows. Rather than being accessed one at a time, windows are minimized from or restored to the primary display in groups, represented as piles on the navigation display. These commands are carried out by direct gestural interaction: the most important gestures are illustrated in mockup form below.
Interaction Design and Gestures
Basic Concepts
The navigation display forms a secondary display to the left of the keyboard (opposite the traditional mouse location) for bi-manual input use. Bar representing the desktop/current windows located at the top of the nav display, with the idea that "up/away" is generally toward the user's primary display. Icons and piles can be manipulated by touch, and are in a kinetic context: that is, if released with velocity, they will glide to a stop.
Implementation status: Hardware meeting design constraints completed. Pile canvas allows direct manipulation of icons representing windows, and comfortable kinetic parameters have been set up. "Current display" bar implemented, though with a slightly different visual appearance than in mockups. Piles as window groupings capable of moving multiple windows are implemented, with some visual indication of pile status. Pile manipulation implementations are generally extensions for the future - re-clustering algorithm designed but not implemented.
Gesture: Pull Down From View
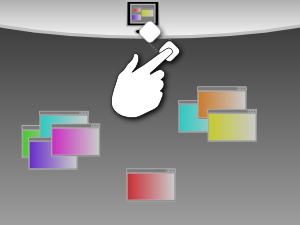
This gesture starts with the user touching in the "current display" bar at the top, and dragging down on to the dark grey area. The user will see representations of their windows (icons or thumbnails) being dragged down and placed into a "pile" on the lower part of the "pile canvas" - the large dark grey area.
Implementation status: Fully functional for individual windows. Pile manipulations limited - see above.
Gesture: Flick Back To View
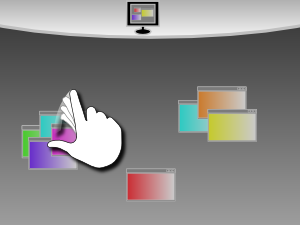
This gesture starts with the user touching a window or window pile, and dragging them up to the top bar. They can either be dragged the full distance, or the user can stop touching while still moving their fingers - a "flick" gesture. The associated window pile comes into view, leaving the lower section of the pile canvas.
Implementation status: Fully functional for individual windows, including kinetic "flick". Pile manipulations limited - see above.
Gesture: Move Windows Between Piles
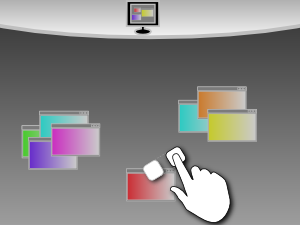
This gesture starts with the user touching a window and dragging/flicking it elsewhere in the pile canvas, whether between piles or to a blank space between piles. If dragged to an area far from an existing pile, the window becomes a singleton pile.
Implementation status: Individual windows can be freely moved on pile canvas, though pile re-clustering does not yet occur. Kinetic manipulation enabled.
Gesture: Spread Out A Pile
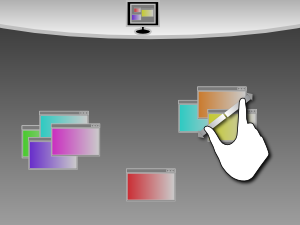
This gesture is based on a two-finger "spread" motion (the opposite of a "pinch"), usually associated with "zoom in". Like "zoom in" this gesture provides a better view of the manipulated item: it is performed on a window pile to remove overlaps between icons to allow easier manipulation of individual windows in that pile. Designed as a probable extension.
Implementation status: Left as an extension for the future.
Overall System Design

Download/view other formats:
Scalable full-page PDF (148 KB) - Inkscape SVG original (24KB)
This diagram shows clearly that tactus-navigator is the highest-level component in the system, depending directly on PyMT, Python, and libwnck (and its Python bindings). A small amount of Pyglet is also used directly to handle automatic dual-screen sensing and configuration of PyMT, and a small shell (bash) script is included to install dependencies and create a symbolic link ("shortcut") to the main application as of v1.0.1. Directly or indirectly, all components in this diagram are required except for Flash Player and FLOSC.
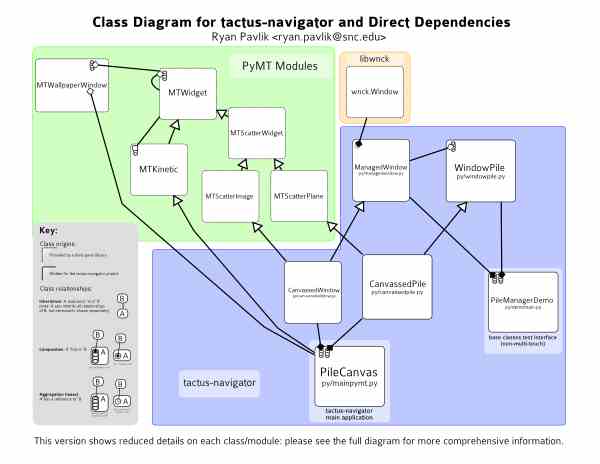
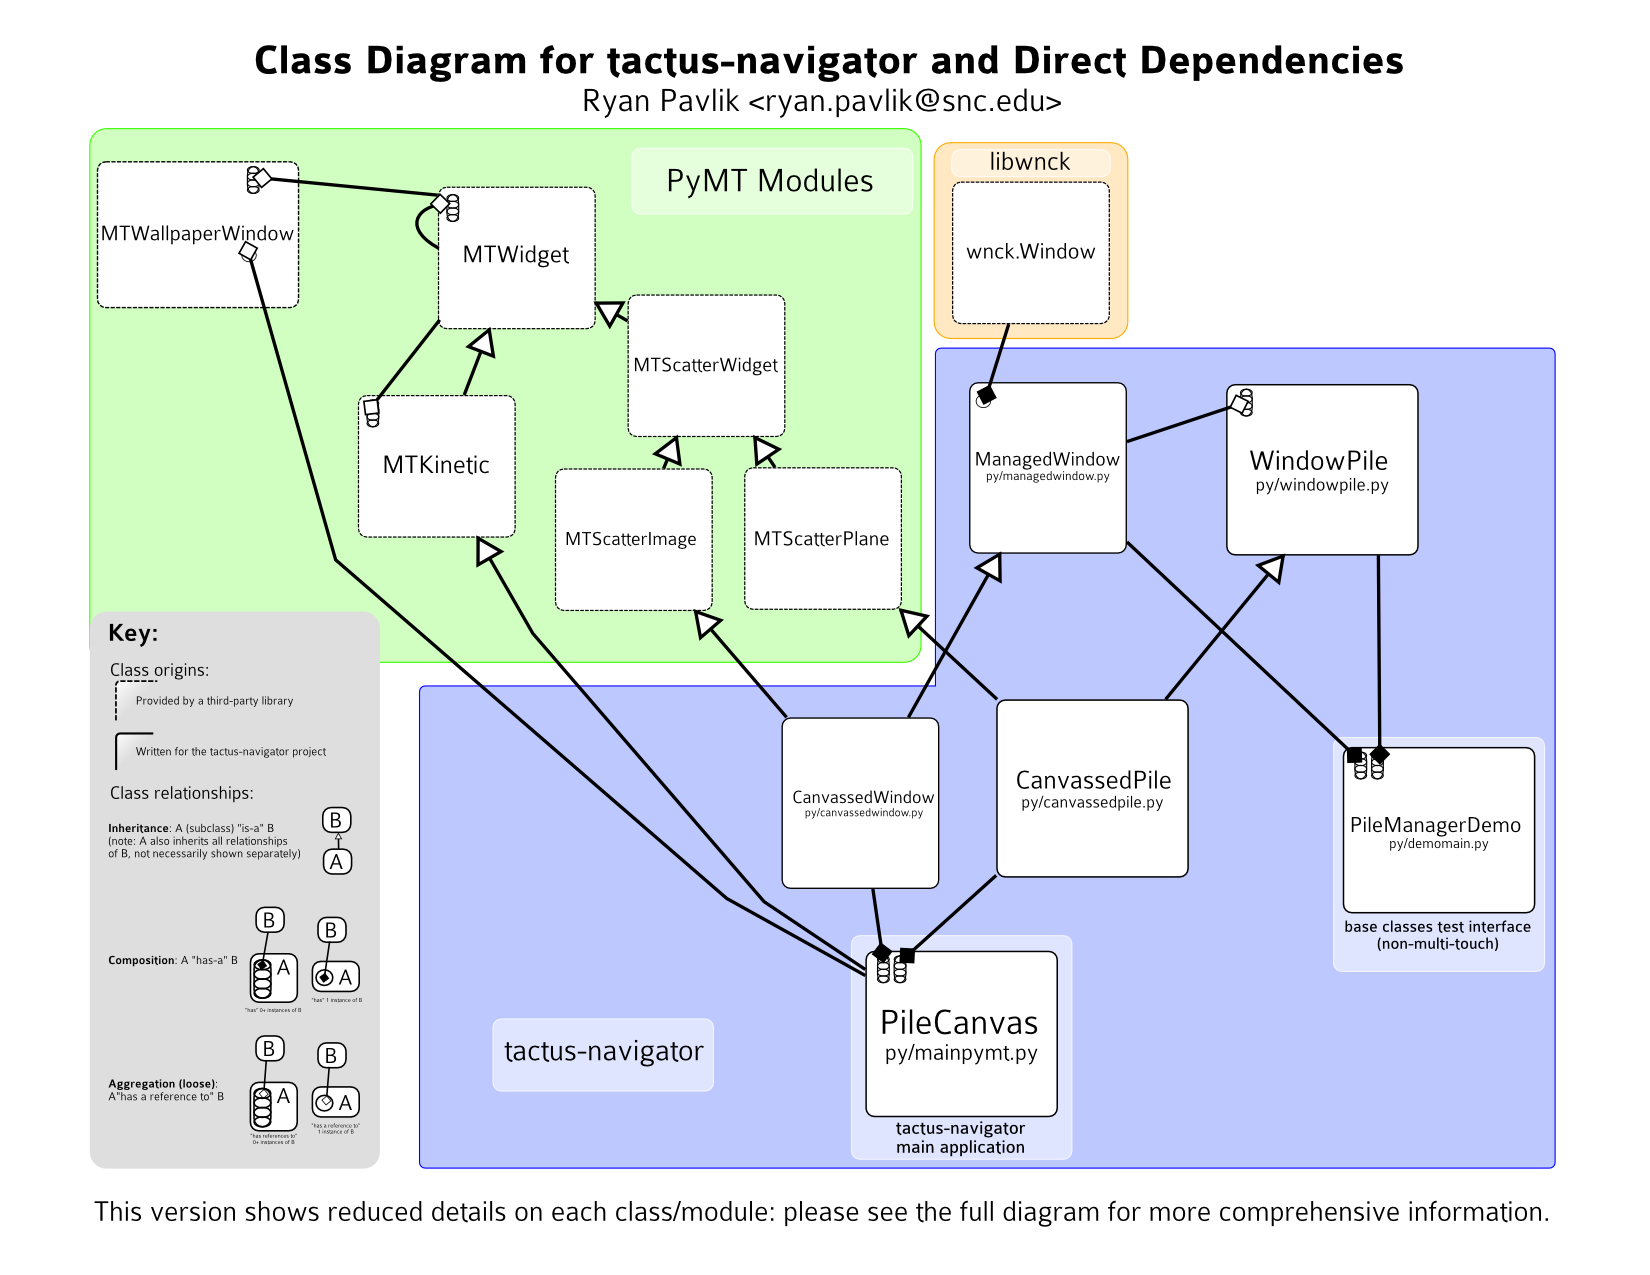
Class Diagram for tactus-navigator and Dependencies
This diagram is quite large, especially in its full detail version. The two diagrams are laid out identically so the simplified version can be used as a "guide" to the more complete version.
The images below link to a (potentially large) scalable PDF (Adobe Acrobat) document of the diagram for on-screen viewing or printing. You can also view a high-resolution bitmap graphic export ("PNG") or download the original SVG (scalable vector graphics) version: free software Inkscape and the font package "Colaborate" (sic) recommended.
Diagram with class names only
Download/view full-size (11"x8.5"):
Scalable PDF (160 KB) - PNG bitmap image (320 KB) - Inkscape SVG original (96 KB)
Full-detail class diagram (with names and descriptions)
Download/view full-size (approx 31"x24"):
Scalable PDF (928 KB) - PNG bitmap image (4.8 MB) - Inkscape SVG original (192 KB)
The base classes used by demomain.py provide all the task management capabilities required without any specific implementation details about how these representations are manipulated. This allowed a small standard GUI (in GTK+, one of the standard GUI APIs in Linux and other Unix environments) to be built to ensure these core classes functioned appropriately prior to the selection of a multi-touch toolkit and implementation in that environment. It would also allow PyMT to be replaced easily with another multi-touch system by just replacing the classes that inherit both from the tactus-navigator base classes and PyMT classes. There is clear separation of functionality between these modules so replacing the multi-touch implementation is straightforward and preserves the maximum functionality.
Screenshots and Videos
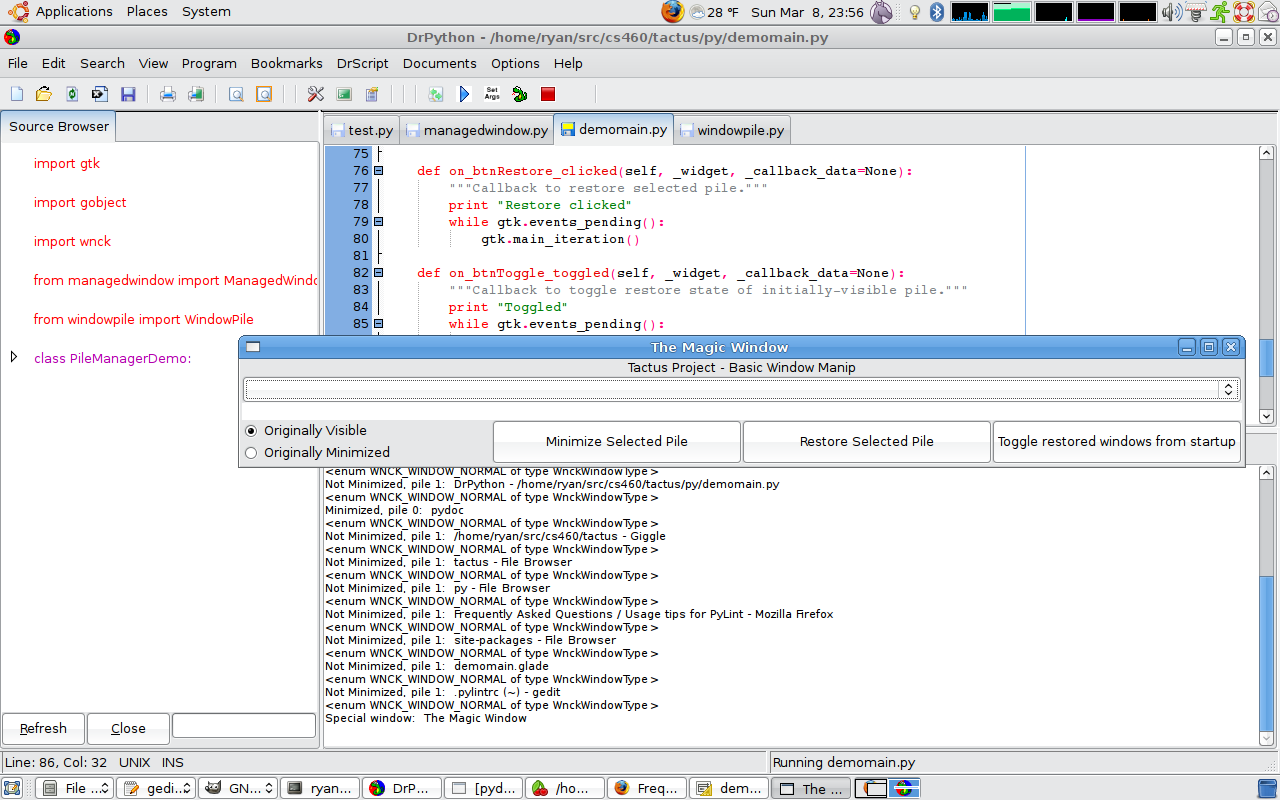
Demo interface used for testing tactus-navigator base classes wrapping libwnck - not all controls are connected because they didn't end up being needed to satisfy testing needs. It is still available in tactus/py/demomain.py
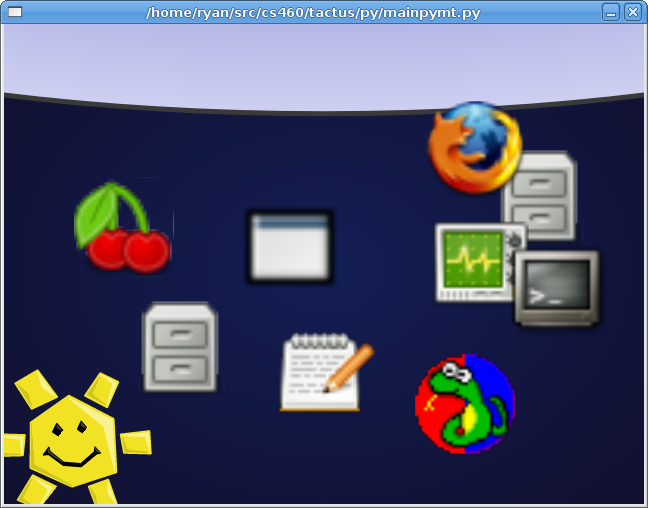
Image from first successful connection between PyMT and the tactus base classes - much of this was modified as the design changed into a multiple inheritance system to clarify code. The yellow sun was a test of loading an SVG (scalable vector) image instead of a PNG icon.
Click to play embedded video: early video of application showing visible piles and manipulation, but with buggy icon motion. Download video or open in other media player. The icon motion bug was a subclassing mistake and fixed shortly after this video was taken.
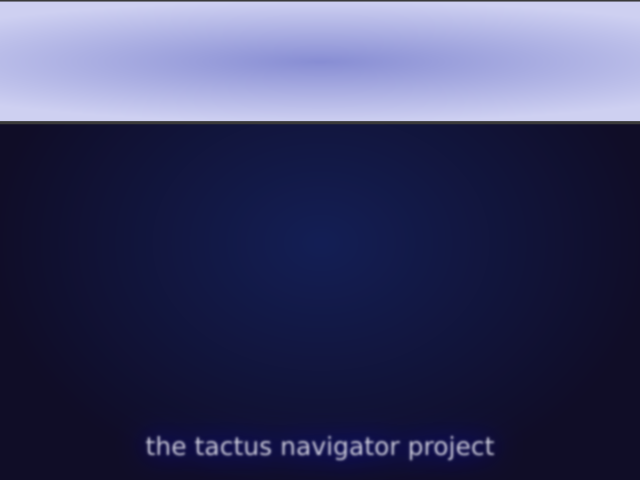
This is the final wallpaper used on the navigation display - note that the display bar has changed into a rectangle rather than a portion of an ellipse as in the mockups and earlier images. Collision detection with the rounded bar proved to be too difficult so this alternate design was substituted. This wallpaper is based on an SVG original, and currently an appropriately-sized PNG (bitmap) version is loaded when the display size is detected - extending the application or PyMT to use the SVG directly would be a useful extension.
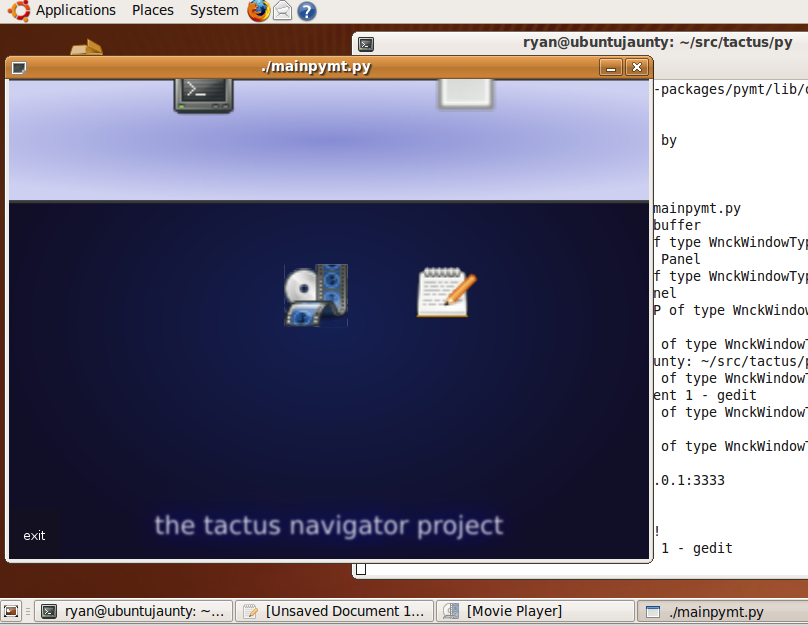
This is a screenshot of the navigator running in single-screen demo mode (rather than dual-screen mode as specified in the interaction design). Both modes work, and the mode is selected automatically based on the presence/absence of a second monitor, but this one makes better screenshots.
Install Instructions
You have two options: either download a "live" copy from version control, so you can always painlessly upgrade (recommended), or get a one-time version with no history by download a zipped (tar.gz) file. I'd recommend the live version control option - they're both just about as easy, but that one lets me fix bugs and get those fixes to you.
Downloads with revision history (accessible with "git" software): Release Versions on SNC servers - Latest snapshot on GitHub (see below for instructions)
Minimal downloads (without history): Release Versions on SNC servers - Latest snapshot on GitHub .tar.gz (for installation and use) .zip for source viewing by Windows/Mac users
Version Control (Live/Git) method - recommended
You can either download a "release clone" from this server or get the most updated version from GitHub. In either case, to browse the history, you'll need to install Git. You don't need any extra software just to download/view the release clone, but you need Git to download the latest version from GitHub. If you want to install git, on Ubuntu Linux,
- Run this in a terminal:
sudo aptitude install git-core
sudo aptitude install giggle
Now, let's download and install tactus-navigator! These steps are all in the terminal, but if you use the "release clone" download, you can do it all graphically (move the downloaded .tar.gz, extract it, run the install script) from within the file manager.
- Change to the directory under which you want your system, and extract the software: (so cd ~ to get ~/tactus/ as the directory for the software - it doesn't have to be within the rp-mt-scripts folder, it can be anywhere you have rights to access.)
       			cd ~

       			git clone git://github.com/rpavlik/tactus.git
tar xvzf tactus-gitclone-release-1-0-1.tar.gz - Go in to the tactus folder, and run the install.sh script. If you're doing this graphically, make sure to choose "run in terminal" when it prompts you. If you're doing this in a terminal,
cd tactus
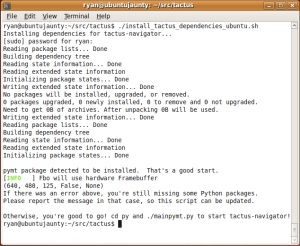
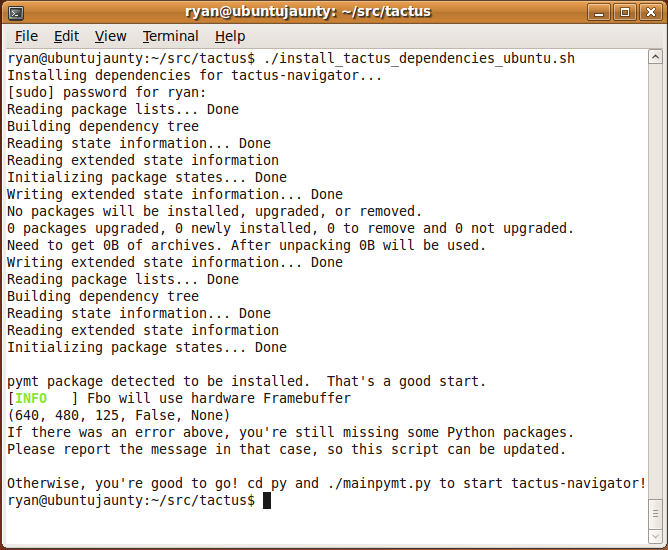
./install.sh
./prepare_dev_environment.sh
-
To run, execute "./tactus-navigator" in the terminal or file manager (by double-clicking it and choosing "Run" or "Run in Terminal"). This actually is a link to the file py/mainpymt.py - this is the file you want to open within DrPython as a development environment to launch it (what I have done).
Note: If it detects you have a dual-monitor setup, it will run fullscreen on the second monitor, otherwise it will run in a small window on your primary monitor for demo purposes. You can change the size of the demo window between 640x480, 800x600, and 1024x768 by editing the fallback values in the function prepare_display_settings() in py/config.py.
Tarball (Single Version) method
- Download the latest tarball of rp-mt-scripts from GitHub (rpavlik-tactus-something.tar.gz) to your system.
- A zip file is available for Windows users to look at, though it won't do anything, and the software won't run on Linux from the zip file quite as easily (since it will lose executable permissions, you'd have to do a bit of chmod +x to the files mentioned below).
- Move the file to the directory under which you want your system: (so cd ~ to get ~/tactus/ as the directory for the software - it doesn't have to be within the rp-mt-scripts folder, it can be anywhere you have rights to access.) Unzip the .tar.gz file, either with a graphical tool or the terminal:
tar xvzf rpavlik-tactus-*.tar.gz - Because you chose a downloaded snapshot, the directory has an ugly long name. Pick a nicer one, by renaming in the graphical environment or in a terminal,
mv rpavlik-tactus-[HIT TAB NOW]/rpavlik-tactus-[HIT TAB NOW] tactus - Go in to the tactus folder, and run the install.sh script. If you're doing this graphically, make sure to choose "run in terminal" when it prompts you. If you're doing this in a terminal,
       			cd tactus

       			./install.sh
./prepare_dev_environment.sh
-
To run, execute "./tactus-navigator" in the terminal or file manager (by double-clicking it and choosing "Run" or "Run in Terminal"). This actually is a link to the file py/mainpymt.py - this is the file you want to open within DrPython as a development environment to launch it (what I have done).
Note: If it detects you have a dual-monitor setup, it will run fullscreen on the second monitor, otherwise it will run in a small window on your primary monitor for demo purposes. You can change the size of the demo window between 640x480, 800x600, and 1024x768 by editing the fallback values in the function prepare_display_settings() in py/config.py.
Upgrading
Upgrading is easy if you chose the a method of installation with version history. Just go into that directory and run the "git pull" command (requires git installed), which will a little bit look like this:
ryan@vm:~/tactus$ git pull

remote: Counting objects: 7, done.

remote: Compressing objects: 100% (4/4), done.

remote: Total 4 (delta 3), reused 0 (delta 0)

Unpacking objects: 100% (4/4), done.

From git://github.com/rpavlik/tactus.git

   7c4c0fb..e742162  master     -> origin/master

Updating 7c4c0fb..e742162

Fast forward

 py/mainpymt.py |    8 ++++----

 1 files changed, 4 insertions(+), 4 deletions(-)
If you chose the minimal snapshot method of installation, you'll need to download a new snapshot, unzip it, and copy the files from the new folder into your original folder, overwriting the older files. Data isn't stored in any files that are distributed, so this is safe, just a bit of a bother.