Madeline Krajewski
This week, I began experimenting and programming! I am beyond excited to get to this step, and I spent quite a bit of time experimenting with different ways in which I can change bits and see how noticeable each change is.
Essentially, my process was: try something, identify what didn’t work, and create a new function to test a new method. This week’s project was purely to test different methods and to attempt to leave failed code unchanged in case it was needed for reference. This is not how one should usually code, but I wanted to preserve original copies of the failed code in order to refer back to it in case I was on the right track but bailed too soon (since even the undo button has its limits).
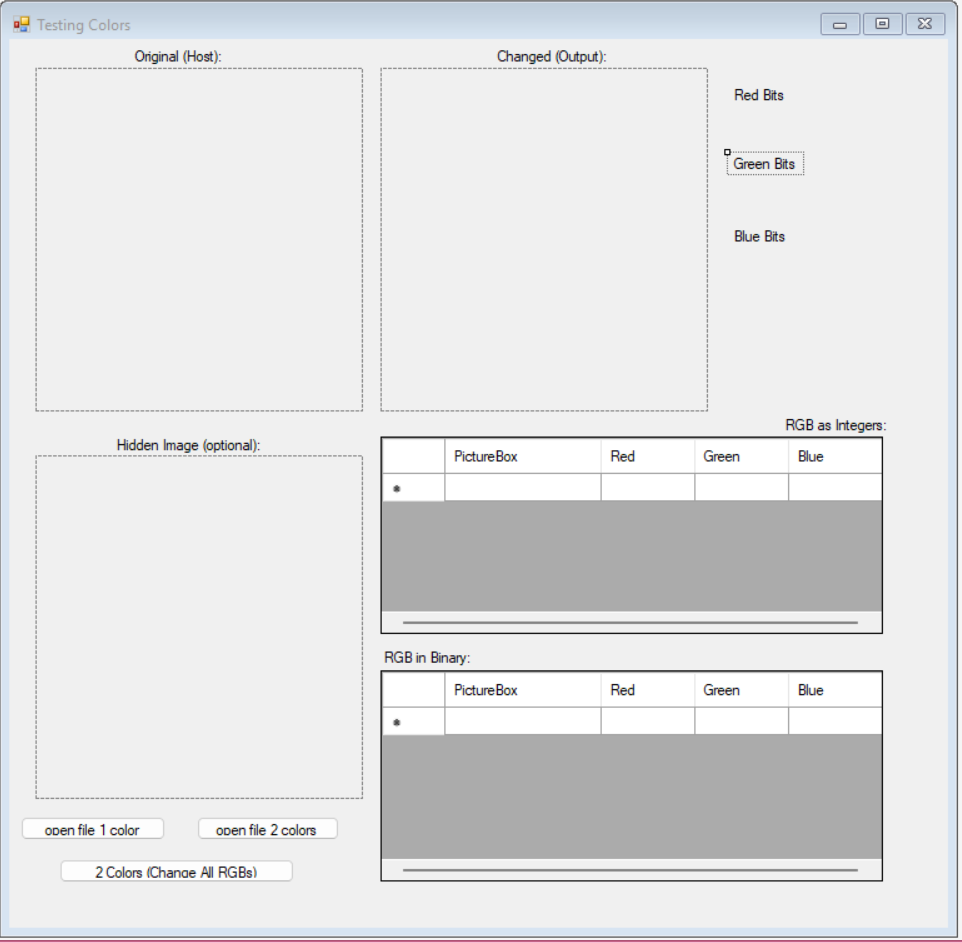
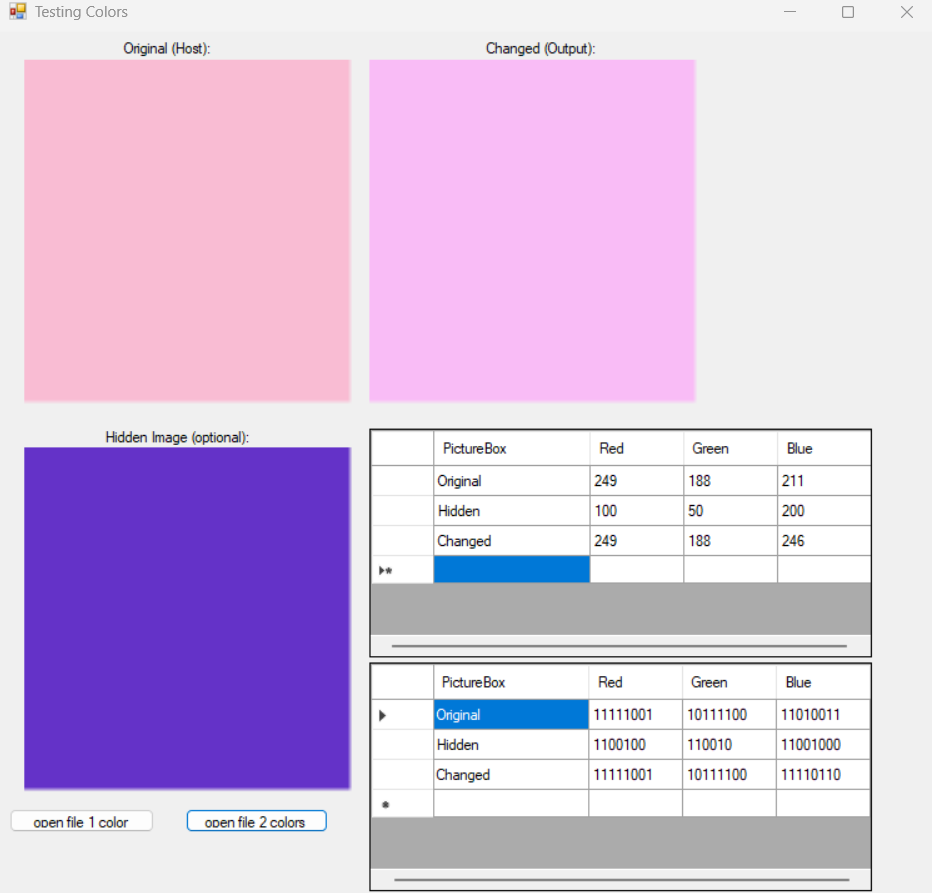
First, I want to explain the general layout of my program. The original (Host) image is the one in which the second (Hidden/Secret) image will be disguised. The changed (Output/Modified) image shows how the original image has changed. The picturebox with the original (Host) label is the unmodified “before” version. Currently, the Hidden Image is optional, so I could experiment with different RGB increases to see how noticeable each change is. By changing one color, I can see what differences occur when I modify one bit, then two, and so on until it becomes noticeable.
The Red Bits, Green Bits, and Blue Bits labels only change during the “2 Colors (Change All RGB)” button click, and was a late addition to my testing program. I explain this further towards the end of my post.
The “Open File 1 Color” button opens a single color image and modifies the Red value. The changes in RGB values are shown in the two tables (one has the RGB values as integers (0-255), while the other has the RGB values in Binary (8 bits/digits). These are the same numbers, but they have different bases. One is base-10, which is what most people are familiar with; the other is base-2, also known as binary.
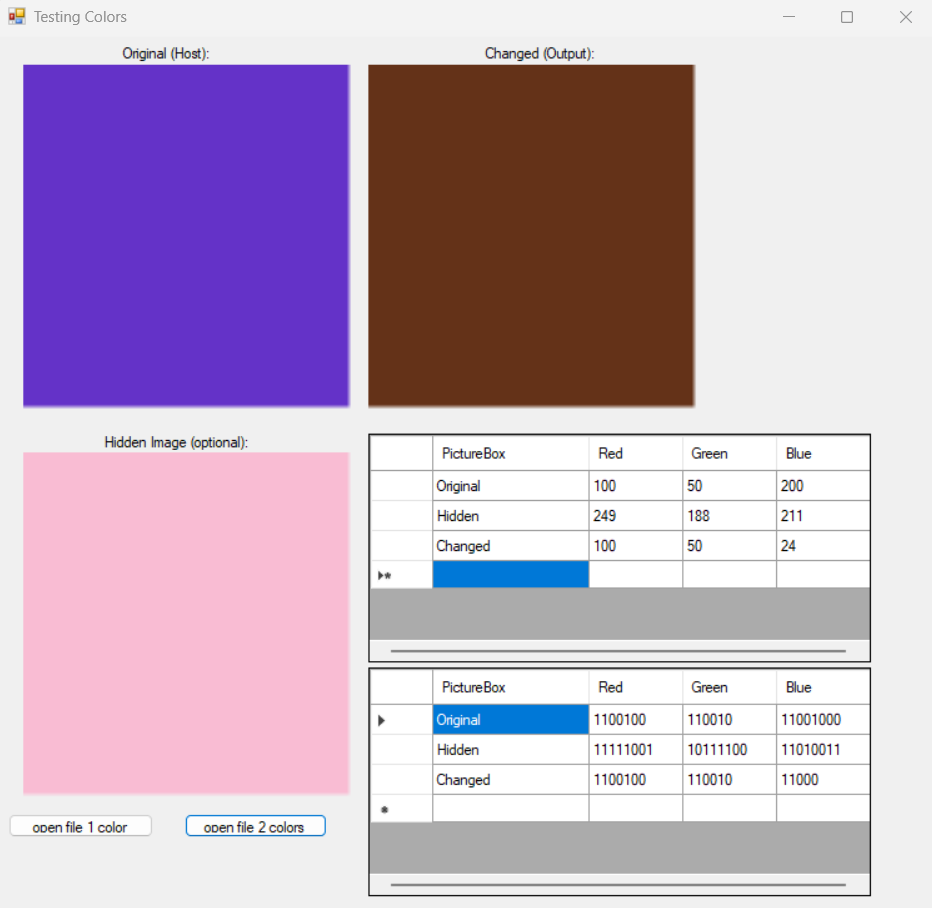
The “Open File 2 Colors” button opens a Hidden image as well, and the Host image’s Blue value is modified. This is because modifying the Red value operated incorrectly, since I was simply “adding” to the Host’s RGB value, and the purple’s red value pushed it over 255. My attempt to fix this went wildly wrong (shown and explained below).
The “2 Colors (Change All RGB)” button attempted to modify all three RGB values. It was a late addition and has fared poorly thus far. I added this mainly to speed up testing, as I could see the bit changes three times per attempt as opposed to one bit.
Finally, the two tables show the different RGB outputs (one shows integers (base-10), and the other shows binary). This is to show the changes made to each color.
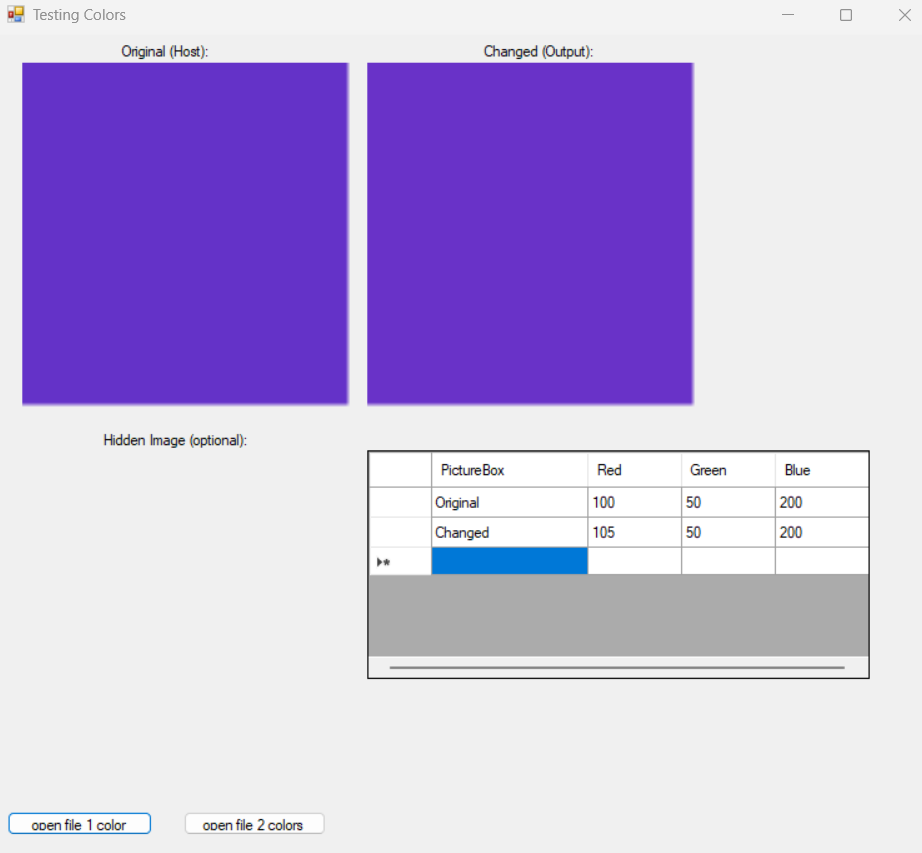
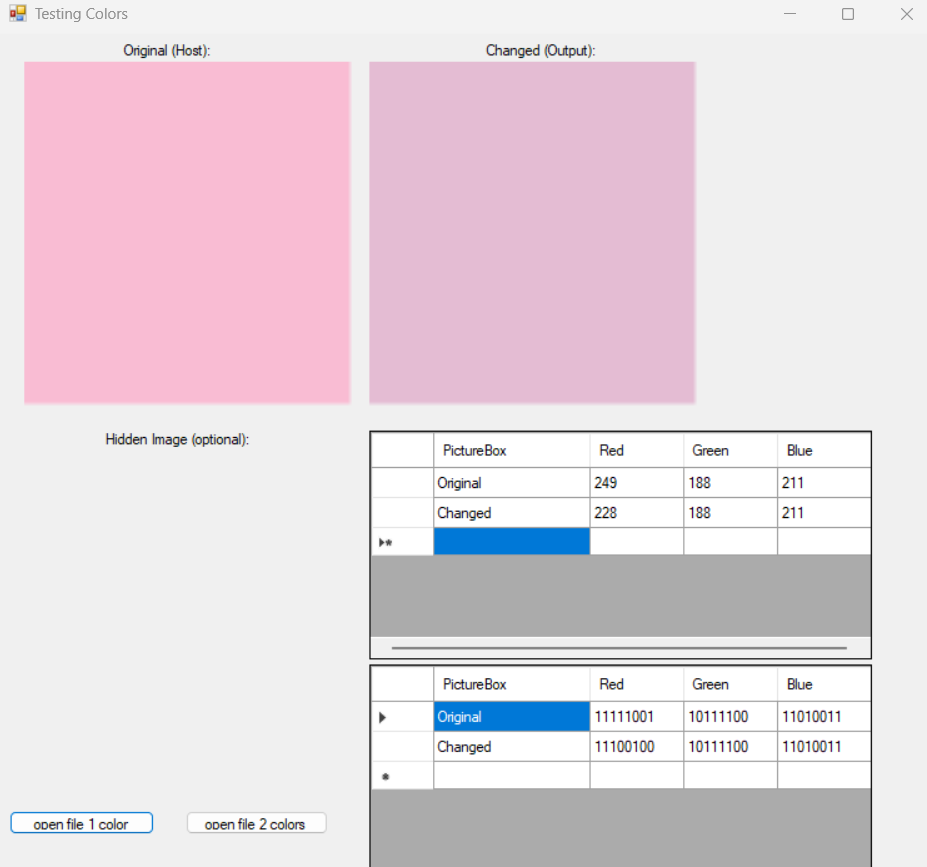
First, I started by adding (an integer value of) 5 to the Red value for each image using my “Open File 1 Color” function. It’s a very subtle change, and I struggle to notice the difference. I ran it on pink and purple, and I find the pink slightly easier to notice.

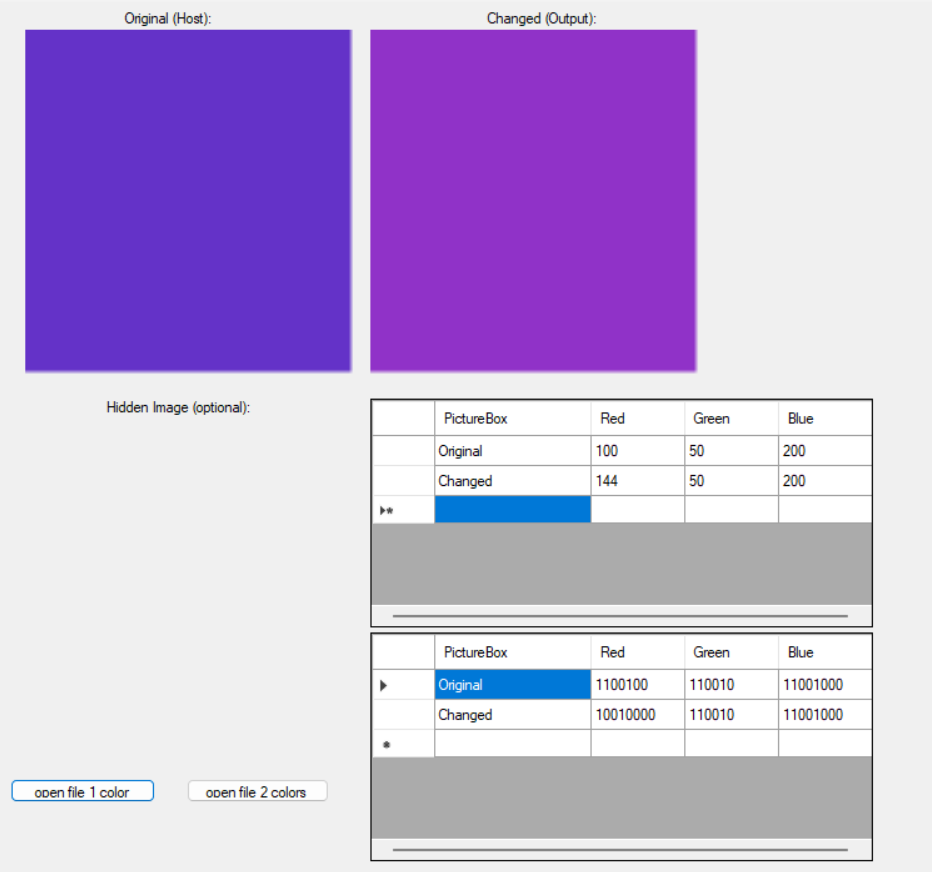
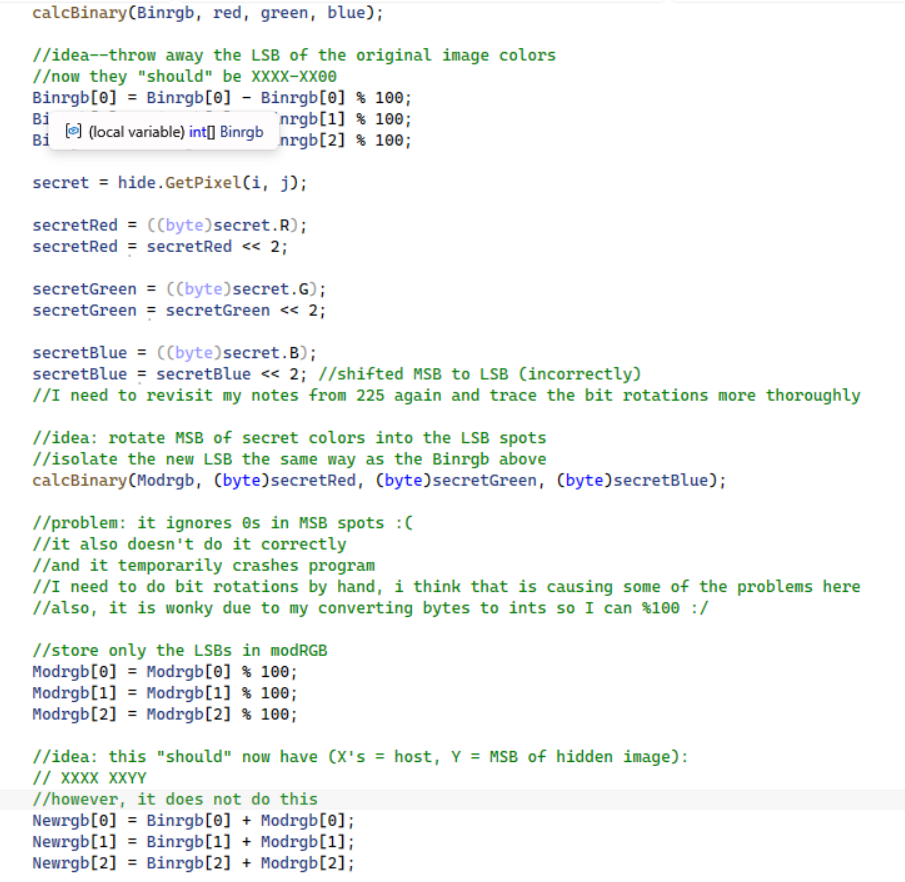
Next, I experimented with Bitwise shifts, specifically to the left. This operation moves the binary bits left (which multiplies the value by two per shift). I shifted the most significant bits (MSBs) in binary to the left by two. This shows a larger change because I changed the most significant bits and replaced them by the following two bits. That is, I took (XXYY —-) and changed it to (YY– –00). I am simplifying the bit rotations here because I didn’t clear out certain registers, but this is an approximation purely to experiment with shifts as opposed to specific and precise operations. This oversight compounded into a significant problem, but I did learn quite a bit about what not to do, which is beneficial in its own way.
The point of this test was more to verify I could play with bitwise shifts and its code more so than focusing on doing so as accurately as possible. (I plan to implement bitwise shifts more precisely and fix the bugs I produced this upcoming week.)
Since these four tests appeared1 to go well, I decided to implement the second Hidden Image (accessed via the “Open File 2 Colors” button) and hide the MSBs of the Hidden Image in the Host Image’s LSBs.
This was implemented incorrectly, and my attempt to remedy the errors here led to different, more exciting errors in the “2 Colors (Change All RGB)” experimental set. (I implemented this function differently in the “Change All RGB” button. I wanted to leave this version untouched so I could refer back to it later.)
In the “Open File 2 Colors” button and its associated function, I shifted the bits of the purple Hidden image to the left then added the Blue values. In this way, I effectively did the following:
- Hidden Image’s original Blue binary number: 1100 1000
- Hidden Image’s Blue binary number, shifted left: 0010 0000
- Added the shifted Left Hidden Image’s binary number (0010 0000) to the Host (pink) image’s blue value.
I got the wrong result. This did not hide the MSB of the purple color into the LSB of the original as I had thought it would. Initially, I didn’t notice this error since the Output image’s color does appear more purplish compared to the Original. However, the change is far more drastic than intended because instead of replacing the LSB, I just added the two colors together. Since it visually appeared more purple, I did not pay close enough attention to the two tables’ outputs to see the math did not add up.
However, before I moved on, I wanted to try flipping the purple and pink colors to see if my solution to exceeding the 255 cap worked. It did not, and I’m unsure why I thought it would. My solution was to take the composite (calculated as above) and mod it by 255 (% 255, as shown in code). This essentially finds the remainder of the division and saves it instead of the “overdraft,” so to speak. Of course, this results in a wildly different number since it effectively “loops” from 255 back to the low end of the range. Here, I threw away the 255 and kept 24 instead.
This is why coding while tired is a dangerous pursuit. As soon as I read through my code the next morning, I facepalmed at my attempt. I will now refrain from coding after being awake for 14 hours. Sometimes, it’s easy to get so focused on one task that one forgets to pace themself, and it produces less than ideal results.
Anyway, here are my less than ideal results:
Instead of fixing this issue within the “Open File 2 Colors” button and its function, I decided to start from scratch and focus on bit manipulation. At this point, I identified two main issues: my bit manipulation was incorrect, and my process of calculating the Output color was not at all the correct approach.
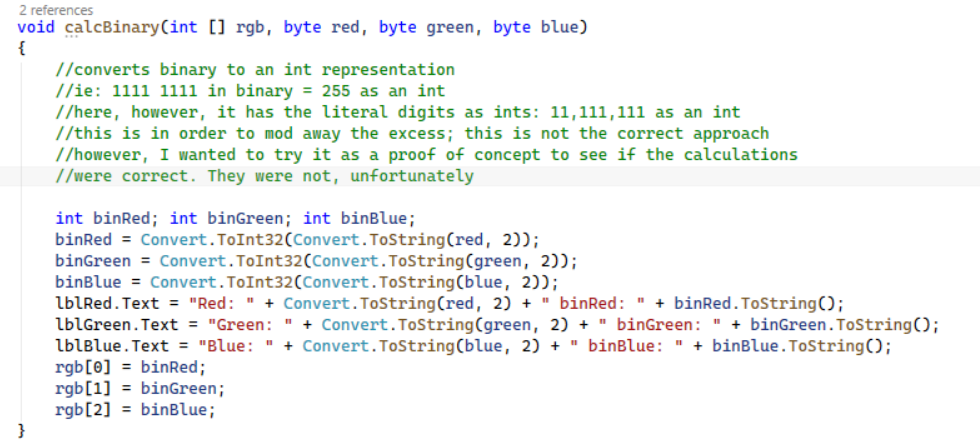
This time, I focused on calculating only the bit changes. I did this by converting the binary to a (base-10) integer representation and experimenting there so I could visually see what was going wrong. (I took this approach because I did not know what else to try. This code is very faulty as a result, but I think it was necessary so that I could visually see what was going on. This is primarily used for printing and displaying more than the bit manipulation process itself. While reading, pay attention to the comments, not the code itself.)
I attempted this on all three R, G, and B values to essentially run three tests at once.
Here is my faulty, commented code:
As well as my calcBinary function:
I believe one issue is that the secretColors are integers (ints) instead of bytes. Visual Studio uses ints during the shifting process, which I did not realize at first. I believe this is partly why my results are incorrect. However, the bigger issue is my implementation and faulty understanding of C# bit manipulation. Instead of tracing by hand what the results should be, I trusted that my implementation in C# worked how I thought it would work. The last time I shifted bits, it was using Assembly and MASM, which is far more granular than the single line of code needed in C#.
I do not actually know how C#’s prebuilt functions work, and while my own approach is certainly flawed, I think my lack of knowledge here is the primary cause of this disaster. In truth, I feel far more comfortable telling the computer exactly what to do in Assembly than trusting the process in C#. The lack of control here fascinates and horrifies me. I absolutely must read more of the C# implementation information.
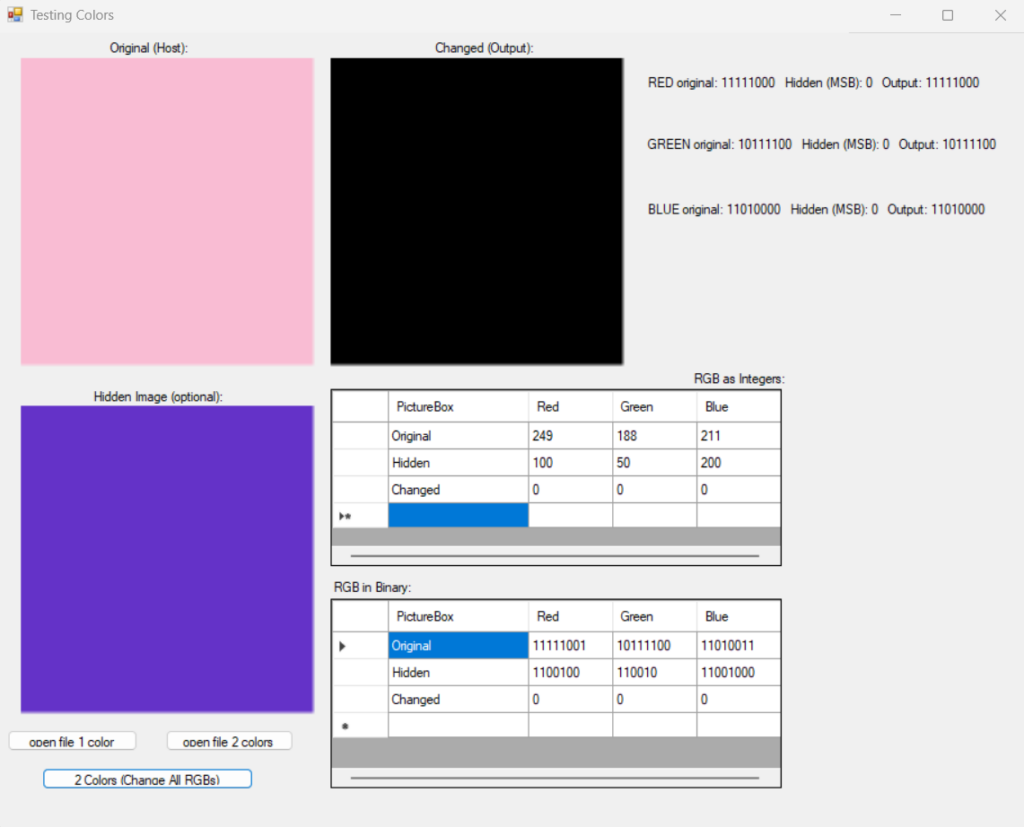
Anyway, here are the outputs of my buggy code. When attempted, the program threw exceptions during the Output Image processing (due to my inability to transform my int (1111 1111) representation into strict binary (I want it to be 1111 1111, not the binary representation of the integer 11, 111, 111). As a result, I commented it out purely so I could see the bit color outputs. I set the default RGB value of the Output to (0, 0, 0), which is black, to more easily tell when something goes wrong.
First, I wanted to check if the output of my calcBinary function was correct. By comparing the Hidden MSB output to the RGB Binary Hidden Row, we can see that
- The Hidden Row leaves out the Red and Green leading zeroes. We know the zeroes should be in the MSB spot because they got thrown away. Ints remove leading zeroes during storage and I suspect is partially why things went wrong.
- We can see the shifts did not move the MSBs into the LSB locations: there are zeroes in those spots in the Hidden MSB labels. This (in my mind) shows the bit rotation doesn’t carry the shifted bits through the register (as I thought) and instead shifts left and replaces the rightmost bits with zeroes. More research is necessary for what went wrong. I suspect I used the prebuilt shift bitwise operator incorectly.
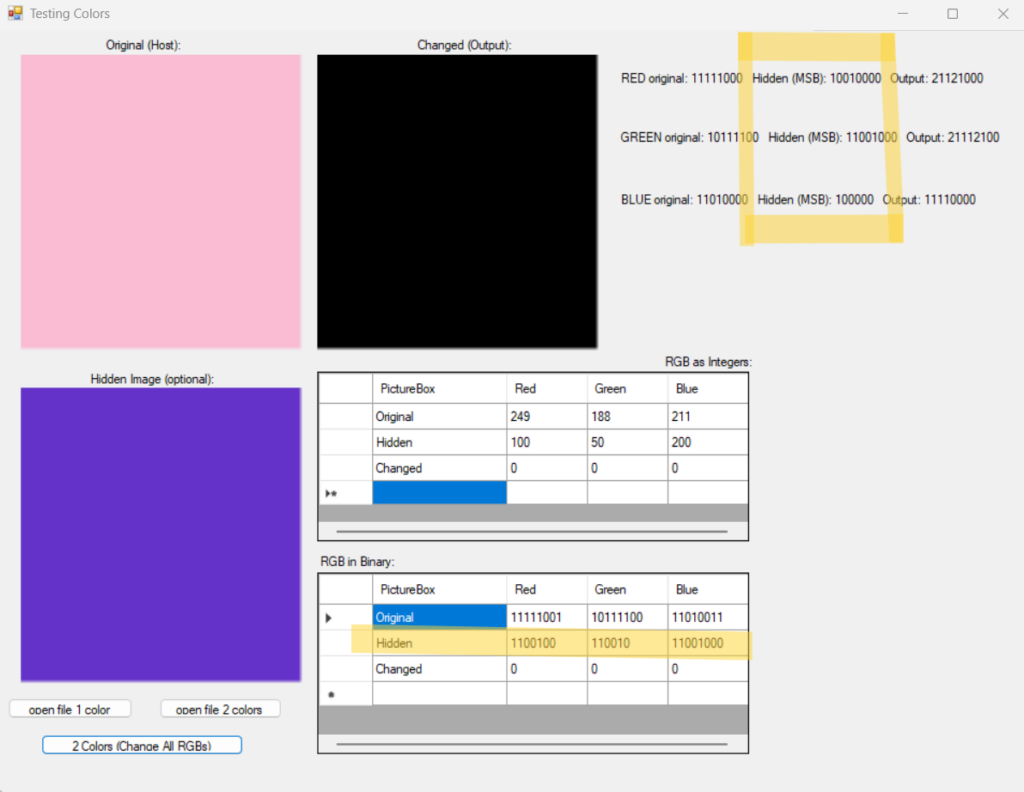
Despite this glaring error, I wanted to see if calculating the MSBs worked. It did not. Here, the hidden MSBs are set to 0. This is because I mod-100 (%100)’d the hidden MSBs (which I thought would be in the LSB location. For the sake of clarity, I put the deduction above, but this step actually occurred first, and the above solved the error shown below). This is a problem because the LSBs were not the MSBs as I had thought, but instead the LSBs received zeroes in the LSB spots.
This is a great example of how I approach unknown problems–by trying an implementation and finding its flaws. Everyone must start somewhere, and since I haven’t tried bit manipulation in C# before, this is my inexperienced attempt. Experimentation rarely goes perfectly the first try. Despite the apparent “failures” shown here, I’m not concerned by the flaws since I now know more than before. I would much rather find these errors now and fix them as opposed to accidentally succeeding and encountering these errors down the road when my program is more complex. These tests enhanced my understanding as opposed to making linear progress, and understanding what needs to happen is the best thing one can do when approaching a problem.
For Week 4, I plan to:
- Research left shifts in C# and compare it to my notes from my Assembly class (CSCI 225).
- Implement the bit manipulations in actual binary instead of int depictions of this. Mainly, I need to figure out how to apply mods to binary numbers and display the results properly.
- Reattempt this project with new insight (essentially, I plan to completely restart the bit manipulation functions while leaving the UI & buttons untouched).
- Move onto implementing Algorithm 1 and testing the outputs to see how each change impacts the output image–particularly, on more complex images.
- Test the new code thoroughly and eradicate the bug infestation seen here.
- This is why geometry teachers emphasize the importance of not assuming an angle which appears to be 90 degrees is 90 degrees. You must either prove it or receive the information at the start of the problem. Similarly, one should not trust their eyesight here and instead reference the numerical changes to see what is going on. ↩︎